RC Airboat
thingiverse
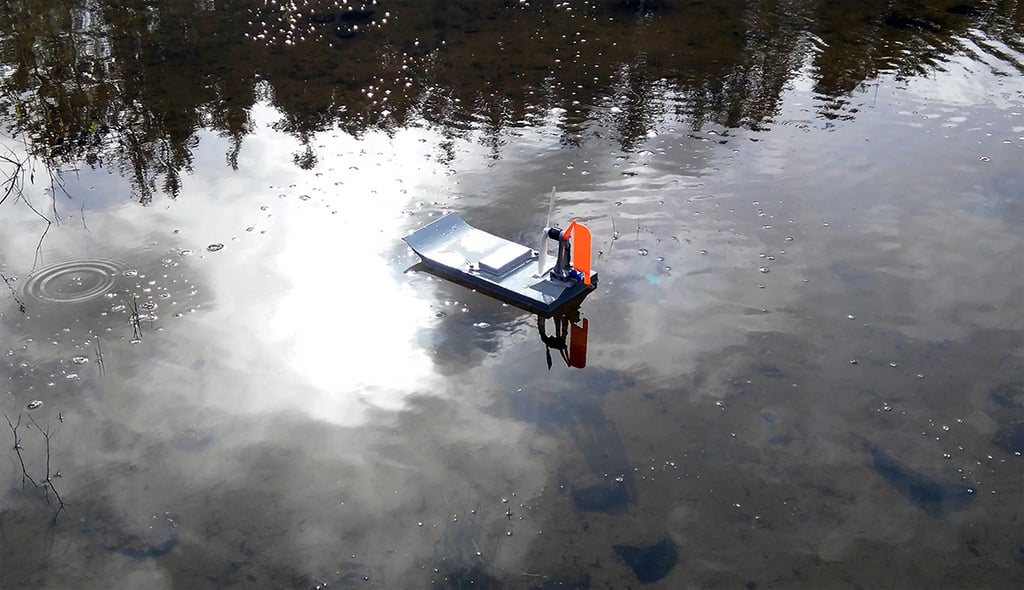
This model is very water resistant, very buoyant, and goes pretty fast with my setup I printed this on my Ender 3. The model is split for easier printing, or a single part if your printer can handle the height. The hatch is 26mm deep, 150mm wide, 132mm long. It fits a 3c 2200mah lipo battery with plenty of room. 04/17/2019 Slight changes to body, major changes to hatch. Much more water resistant now. Add a little grease between the hatch/cap and it's practically waterproof if you've painted the hull. The hatch now uses standard RC Body clips to hold the cap on, or paper clips. I added a slight lip around the edge of the hull, hopefully this will push some water away from the hull/prop. Changes to the motor/servo wire holes should be more water resistant. I'm considering a rubber shroud surrounding the wires, plugged into the top of the hull. Currently your best best it to lay some hot glue around the wires. Hot glue can be easily removed by briefly soaking in Isopropyl Alcohol. 04/14/2019 Water test was a great success! It's evenly weighted, floats soundly, and skims across the water nicely. The initial lid took on too much water, (along with a rear wire intake that I never released) so I redesigned it to be much more water resistant. Remember to waterproof you electronics!! I used it for about 20min and took plenty of water over the deck. Turning hard, speeding around, It never felt like it was unstable or about to tip over. After running I checked the electronics hatch and it was totally dry. Major relief compared to the first run. Running in a straight line is a bit of a challenge, but it's been fairly windy each time I've tested the airboat. I'd rather not redesign the rudder, but it may be needed for better control. Especially when you need the extra control around tight areas going slowly. 04/13/2019 I need to get to an area that will allow me to go faster. I'm thinking that the rudder needs some beefing up. It works great when the boat is "on step" but has little turning authority when the boat is just motoring around. I'd like to see how easily it is to keep in a straight line. A dual rudder, or maybe just a slightly larger single rudder, would probably solve that. _________________________________________________________________________ Minimal parts needed. Transmitter, receiver, ESC, Motor, Battery, 9g Servo, 1" bugle head Screws. 1x Transmitter/receiver:_$30-$75 - I'm using Radiolink RC4GS+R4FG 1x 2212 920KV brushless motor:_$10-$25 1x 30A brushless ESC:_$10-$20 1x 3s lipo battery:_$15-$20 - I went with 2200mAH 1x 9" 9450 Self-Tightening Propeller:_$5-$15 1x SG90 servo:_$1-$5 12x #8 1" bugle head screws:_$3-$7 Total filament weight - 525g $7-$12 I estimate you can build this for about 100$, much cheaper if you already have a transmitter/receiver. Though it's easy to over spend on these little projects ;) _________________________________________________________________________ 440mm total length from stern to bow, (480 from rudder) files split into 2 parts for easier printing. Each half of the frame takes about 8-10 hours to print. My settings were .32 layer, 4% infill 4 walls, 70mm/s for the frame. For the rest of the parts I used a lower layer height, about 15% infill, and only 3 walls. Print the frame upright, with support only touching build plate. Print the motor stand horizontally with the wire rings facing down for best strength. Enable support. Print the rudder with the setting "fill gaps between walls" disabled. it can shave about an hour off the print time. Print the rudder horizontally along the long flat back, aligned to the bed, use a brim. 2 large locating pins should be printed to be placed between the 2 frames if you're gluing them.
With this file you will be able to print RC Airboat with your 3D printer. Click on the button and save the file on your computer to work, edit or customize your design. You can also find more 3D designs for printers on RC Airboat .