RC Plane Launcher Parts
thingiverse
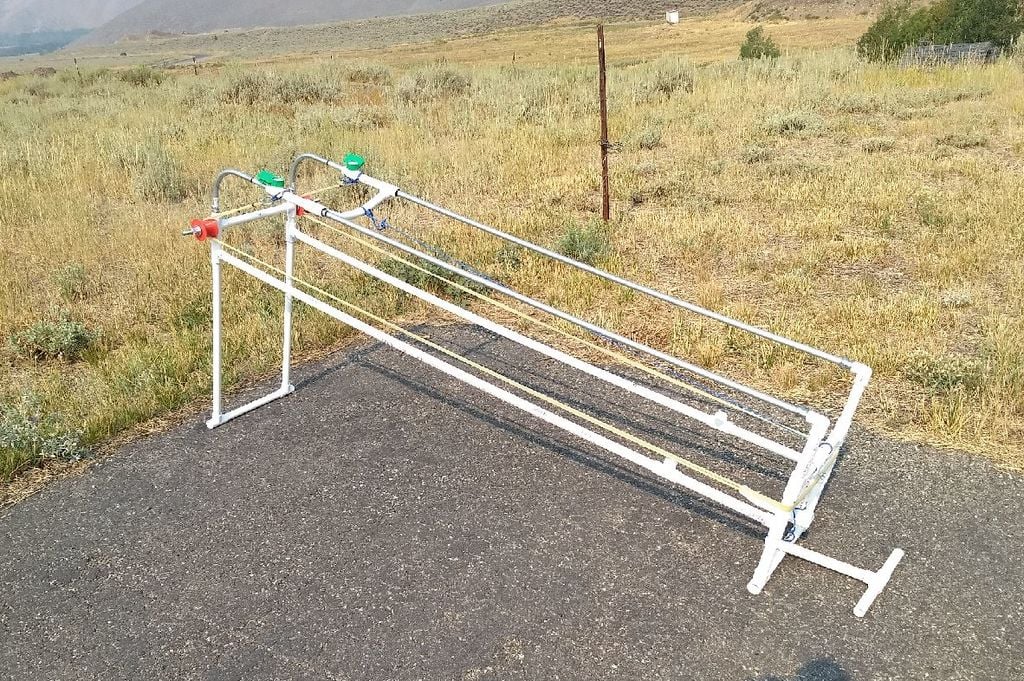
**Disclaimer: I've launched over 30 planes with this design. No safety issues so far. That said, when "armed" this has a tightly strung elastic tube holding a lot of energy. I'm sure it could take out an eye, or more, if it came apart in your direction. There may be other safety risks too. Accordingly, it's YOUR responsibility to take all necessary precautions for YOUR own safety. I take no responsibility for your use of this design, or any variation of it. Thank you.** --- I wanted to make a launcher for my RC planes (the ones that require a difficult hand-launching). I hate those first few seconds where you're hand-launching a plane, and trying not to stall or crash, and then having to get your hands back on the transmitter. The objective for the design was: * Costs less than $50 to make (I’m close to that, but I think it's gone over.) * Uses commonly available materials from your local HW store * Assembles (or disassembles) in less than 5 min * Freestanding/self-contained. You don't need to anchor any part of it to anything. * No modification of the planes you're launching. * Would easily fit in a larger car or an SUV. After a couple of iterations, I ended up with this design. https://youtu.be/b3BgD_pb5wM Here is it launching planes. https://www.youtube.com/watch?v=okmCqEiGUEw It requires: 2x 1/2" metal conduit 90 deg elbow 2x 1/2" metal conduit, 6 ft long (buy 2x 10 ft pieces and cut to 6 ft, or buy 3x 5 ft pieces and make 1 ft sections to add to the 5 ft with couplers) 4x 1/2" Steel Compression Connector Conduit Fittings 4x 10 ft x 3/4" PVC pipe 20+ 3/4" PVC Tees 2x 3/4" PVC Elbow x 1/2" NPT 2x 3/4" PVC inside adapter x 1/2" NPT 1x 1"x 1"x 3/4" PVC slip tee 1x Bundle of Paracord 2x Spring clips 4x 2" 10-24 screws 4x 10-24 wing nuts 2x (or 4x) 1.5" 1/4-20 cap head bolts for inside conduit couplers 2ft 1/2-13 threaded rod 2x 1/2-13 nylon lock nut 2x 1/2-13 std nut 4x 1/2” fender washers 1x A can of PVC cement A few cable ties 5 meters of latex tubing The tubing was the only thing I didn’t buy at Lowes. I bought it on ebay. It was described as “6x9mm Natural Latex Rubber Surgical Band Tube Tubing Elastic Slingshot”. 2x 3D printed pulley wheels 2x (or 4x) 3D printed conduit couplers (depending on how you are doing the conduit) 2x 3D printed wing push brackets (based on your plane model) (For any non-symmetrical push brackets, you'll need to print a mirror image.) Tools: PVC pipe cutter Drill and bits Heat gun Measuring tape This launcher ended up about 6 feet long, mainly because if it was any longer I could not reach to “arm” it by myself. "Arming" requires holding the launcher in place with the top of your foot, while you grab the carriage and pull it back against the force of the elastic tubing, and then latch it in place. I’m able to launch a 2kg plane off it. I made the launcher about 12” wide because I felt that would be wider than the biggest diameter prop I’d be using (so it would not hit the conduit rails). You can go wider, but I kept it there for the stability of the plane while sliding on the rails. Construction can require a bit of fiddling with the PVC pipe dimensions as sometimes you have to accommodate variations in the PVC fitting dimensions. (Different brands are dimensionally different so try to stick to one brand.) You also have to make a lot of effort to glue the fittings at the right/correct angles so the long sections of pipe run parallel to each other (otherwise the carriage will bind up when you launch and you’ll lose power) That said, generally speaking, you should be able to use the dimensions I’ve indicated on the photos to cut your PVC pipe and get a working design. Heat gun: I used the heat gun to help thread the conduit compression connectors into the 1/2” threaded PVC fittings. I heated the metal connector and then twisted it in. The heat helped warm/distort the PVC so it was able to thread it, and achieve a tight fit. I also used the heat gun to bend the PVC connector pipe on the carriage (the moving PVC part that pushes the plane). You need to make a fairly precise adjustment here. Heat the pipe and carefully bend/distort it so the carriage runs smoothly on the conduit rails. Having the pipe arch down also helps align it with the stop cord, so nothing gets tweaked too much then the carriage is brought to a stop. Heat and bend the pipe that holds the carriage in position then it's "armed". Again, experiment some here so it holds with confidence, but will release predictably when you step on the release lever. You'll likely need to heat the cap head screws to get them threaded into the couplers. You do need the screws in there for strength or the 3D printed part will ultimately break, even if you make the part solid and print it with 100% infill PLA. I didn't try ABS. (I used cap head screws because I had a bunch lying around. Some other 1/4-20 might work fine, if it's head fits inside the conduit.) You can also use the heat gun on the ends of the long PVC pipes, and then insert them in the tee fitting, so the pipe will reduce in diameter slightly. This makes subsequent assembly/disassembly of the launcher much easier. After this, I retained the pipe in the fitting with the 2" bolt and wingnut (through a hole you drill through the fitting and the pipe). I labeled those connections with a sharpie, A-D, so I could match them up again then reassembling, so the drilled holes lined up. Pulley Wheel: The pulley has two different side profiles. I did that to see which might work better, and I can't tell the difference, so turn them whichever way you want. I don't have a construction or assembly video at this point, so hopefully you can see what you need with the photos and the videos. I'm reciting this from a combination of notes, shopping lists and memory. There may be errors or omissions. If you find something, let me know.
With this file you will be able to print RC Plane Launcher Parts with your 3D printer. Click on the button and save the file on your computer to work, edit or customize your design. You can also find more 3D designs for printers on RC Plane Launcher Parts.