RC Pocket Boats - Simple Print & Build!
thingiverse
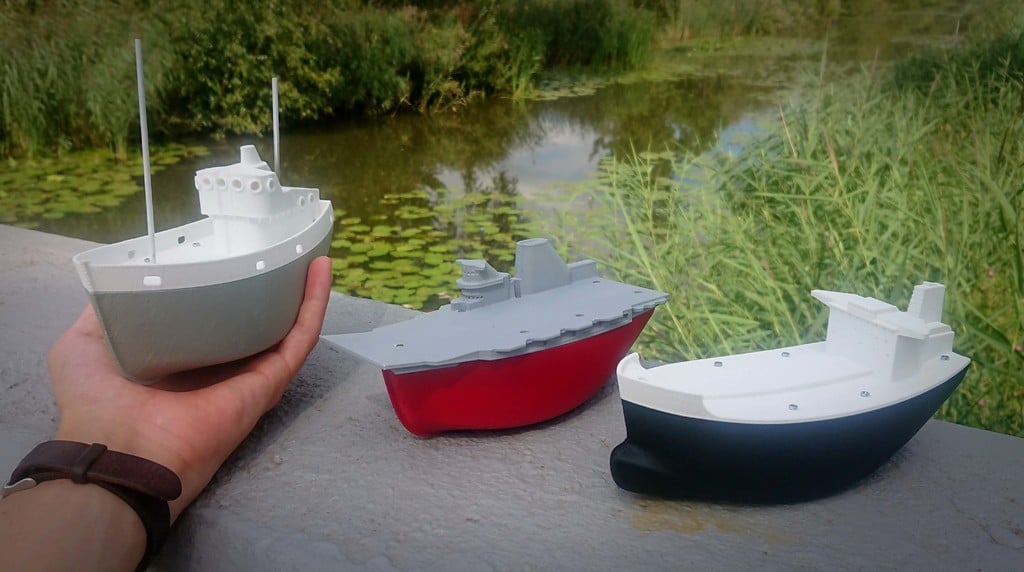
### Pocket Boats! ### I decided to design a simple cartoony egg-boat to be run off the bare minimum of electronics. This uses two metal gear micro servos, two 18650 batteries, and a receiver. It doesn't get much simpler than that! The hull is also designed to be easily printable - in theory it needs no supports, although I suggest having them on just in case. I ended up designing several cosmetic variants. Currently I have the standard Fishing Trawler type hull, the Eggson Valdez - an oil tanker, and the USS Leggsington - an aircraft carrier. <iframe width="560" height="315" src="https://www.youtube.com/embed/uPW79hIy6N8" title="YouTube video player" frameborder="0" allow="accelerometer; autoplay; clipboard-write; encrypted-media; gyroscope; picture-in-picture" allowfullscreen></iframe> ### Required Hardware: ### Here's a list of items that will need to be bought in order to make this boat go: * Metal Gear Micro Servo - 2pcs * M2x10mm Screws - 9pcs * M2x3mm Threaded Insert - 9pcs * 2x 18650 Parallel Battery Holder - 1pcs * RC Receiver Unit * OD2mmxID1mm Brass Tube * Ø1mm Brass Wire * Ø2mmx400mm Rubber Cord * Ø3mm Wooden Dowel (for masts) * 10KΩ Resistor - 2pcs ### Tools: ### To assemble these, you'll probably need: * Screwdriver with selection of bits * Scalpel or hobby knife * Hacksaw or jeweller's saw * Pin-vice or drill * 2mm drill bit * 1mm drill bit * Cyanoacrylate (superglue) or epoxy glue * Soldering Iron * Sandpaper * Source of boiling water - kettle ### Assembly: ### Included in the files is an assembly guide with step-by-step pictures for the construction of the boats. 1. Start by printing all the bits you need, of course! Choose between the various types of hull and superstructure. They all fit together, but the keel of the fishing boat doesn't line up with the hull of the tanker at the bow. Some sanding or additional pieces of plastic might be required if you want a fishing boat with a bulbous bow or a tanker without. Heat stake the threaded inserts into the lower hull. A good way to do this is with a soldering iron or with a piece of threaded rod and a lighter. Be careful not to burn yourself! 2. Dismantle one of the metal gear servos. Keep the stage 1 reduction gear (the one that the motor meshes with), the motor + control board, and the final splined gear that the servo horn screws onto. Using the splined gear, heat it with a lighter and carefully press it into the hole in the printed servo arm. This will form the matching splines and allow the arm to snugly fit onto the other, non-dismantled servo. Using a cup of boiling water, carefully dip the propeller one blade at a time into the water, and give the blades a 40 degree twist to form them into a working propeller. Using the Soldering Guide, solder the stage 1 reduction gear onto the propeller shaft. If the soldering guide doesn't work, you can try using copper tape around the shaft to shim it out until it fits the hole in the gear. Make sure it's aligned and centred, or your boat will run very poorly. This might take a couple of tries to get right, and is the most difficult part of this build. Using a soldering iron and two matching resistors, convert the control board of the dismantled servo into a continuous rotation speed controller. There are many online guides on how to do this. Example: https://www.youtube.com/watch?v=mRO0wfSQ6jw You don't need to use SMD resistors, the regular wired ones work fine. 3. Install the motor, prop shaft, and rudder shaft tubes. Wick some superglue or epoxy to seal the shaft tubes onto the hull, but make sure the shaft isn't in the tube when you do so! Ensure that the drive gear meshes nicely with the motor gear. This step may need some fettling or shimming. You can heat the motor carefully with a lighter and press it into the plastic if it needs to engage more, or add some thin shims if it engages too much and jams. 4. With the heat-formed servo arm screwed onto the steering servo, screw it into place. The screws might need heating slightly on first install to ensure the plastic doesn't split along layer lines. 5. Install the propeller and rudder. Push the propeller onto the shaft, pull it tight so there is no slop and the drive gear won't skip off the motor, and then carefully bend over the shaft using needle nosed pliers so that it fits into the slot on the propeller. Don't worry too much if you bend the shaft such that the propeller is out of alignment, that can be bent back afterwards. Just ensure the propeller is on snugly. put a 90 degree bend in the end of the rudder wire, and glue it into the rudder. Then push the wire up into the rudder tube, and bend over the other end at 90 degrees where it comes inside the boat. Drill a 1mm hole through the skeg using the dimple as a guide. Make a small piece of wire into a square U-shape and use it to constrain the lower end of the rudder. Glue the wire into the rudder at the bottom, and check the whole rudder assembly pivots freely. 6. Using contact adhesive, stick the rubber seal in place. Check that the tiller arm fits onto the rudder wire, and will align nicely with the servo arm across its full range of motion. Use hot water to heat and bend the servo arm or tiller arm if they don't line up perfectly. When you're happy, carefully glue the rudder wire into the tiller arm. Keep the rudder moving as the glue cures to make sure you don't accidentally glue the rudder in place. Then glue a short length of wire into the tiller arm to allow it to track inside the servo arm slot. 7. Install the rest of the electronics. The boat accepts two 18650s as batteries and ballast. Make sure they are wired in PARALLEL. The higher voltage of a series setup might fry the receiver if it's plugged straight in without a B.E.C. installed. Plug the battery and servos into the receiver - BE VERY CAREFUL OF POLARITY. I've fried receivers getting this wrong. It might also be worth adding a waterproof switch to the exterior between the battery and Rx to make it easier to turn off and on, but that is up to the builder. 8. Screw on the cover! A nice easy step. 9. Add some masts and any other greeblies you want! Deck furniture is always a good way to add interest to a model. You might want to install a waterproof switch somewhere on the exterior to save having to unscrew the whole deck every time to turn it off and on. Enjoy sailing your Pocket Boat, and don't forget to post a make! I always love seeing people build these designs.
With this file you will be able to print RC Pocket Boats - Simple Print & Build! with your 3D printer. Click on the button and save the file on your computer to work, edit or customize your design. You can also find more 3D designs for printers on RC Pocket Boats - Simple Print & Build! .