Rear Case for Programmable Power Supply 50V 5A Model
thingiverse
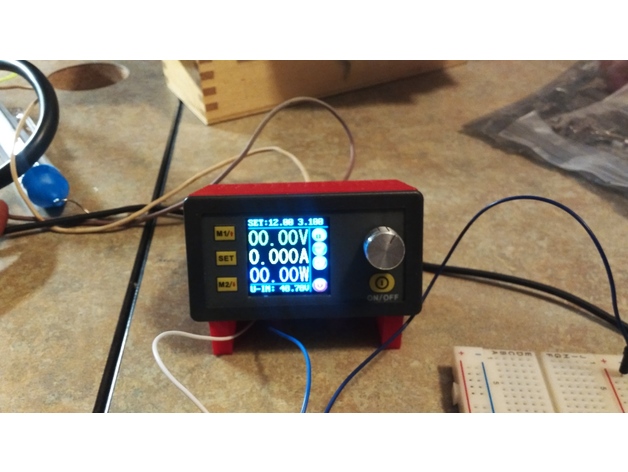
This is a rare case for those budget-friendly variable power supplies. I designed this for the 0-50V, 5A model but all variations seem to have the same main case/LCD so it will probably work for all of them regardless of rating as long as they look like the one in the picture. For some reason, they don't come with a rear case and have components exposed. A generous amount of vent holes has been added to the top and rear of the case for cooling. I've never known mine to get hot but I've always run it at low current and under 24V. It has a heatsink on the unit so I assume it can benefit from cooling at higher loads. There are clips on the side of the power supply for mounting, but trying to use them would probably mean actually cutting them down since there is no gap between the clip and the face. I opted to just have a void in the case where those clips are and rely on a slip fit instead of modifying the power supply or cutting off the tabs entirely. I assumed most others wouldn't want to butcher their unit either for really no gain. The case has legs that tilt the LCD to a good position for sitting on a bench making it easier to read and access the controls. The STL was output in millimeters. Please see the printing notes before printing, as you may want to scale it down slightly. If you're confident in your printer accuracy, I would measure your power supply and compare the dimensions in the model and scale in the X and Y accordingly to your desired specs. Mine is scaled about 1.5% larger than measured dimensions to account for shrinkage and because I made the walls 0.06in and when printing with 2 shells they would actually be about 0.075in. In the future, I'll make sure to use metric units and make the walls multiples of .4mm or .5mm so it can shell more accurately. If you print it as is, there's probably no chance it will be undersized though, but if your printer prints very accurate shell models, it may need to be shimmed (paper, tape, whatever) to give it a really snug fit since this STL is slightly oversized. FYI: I highly recommend this power supply for the money, especially if you already have a DC power supply to power it. You have to provide it with a power source and it can down-convert to any voltage/current from 0V to the max of the input power supply voltage/current. In my case, I happened to have a 48V, 10A power supply, so I can program it anywhere from 0-48V up to its max rating of 5 amps. I've heard that it's possible to find cheap laptop AC to DC 48V power supplies also. If you only have say a 24V or 12V power supply and don't expect a need for more than that, they have even cheaper versions (36V max I think) that might be a better buy. If you don't have a cheap/free source for the supply power for it, you would probably be better off buying one of the more traditional bench units. I've seen a good but cheap unit with their own built-in power source for under $100 new. Printer Settings: Printer Brand: MakerBot Printer: MakerBot Replicator Rafts: No Supports: No Resolution: .3mm Infill: 10% Notes: I originally printed this out at dimensions measured from the case but it didn't fit - my walls came out thicker than designed because I used inch units and so when using 2 shells, the walls came out thicker, plus I didn't account for shrinkage either. I really thought it could get it to fit really tight regardless with some effort but no such luck. So I increased the dimensions by the amount my print was off by plus a small fudge factor just because I didn't want to have to print it a third time and that's what I've posted here. Even mine was ever so slightly loose, so I put a little tape on the inside to snug it up. If you are not concerned about shrinkage or will be using a single shell, you could probably reduce it up to 1.5%, but I would probably not reduce it by more than 1%, with 0.5 to 0.75% possibly being a range to get a good tight fit without risking it being undersized. You do not need to use supports if you orient it correctly with the back of the case (the side that is most covered in holes and the notch in it) facing down. That way, the start of the legs are touching the bed and it can easily build out that profile without supports. I printed mine in PLA using a cooling fan.
With this file you will be able to print Rear Case for Programmable Power Supply 50V 5A Model with your 3D printer. Click on the button and save the file on your computer to work, edit or customize your design. You can also find more 3D designs for printers on Rear Case for Programmable Power Supply 50V 5A Model.