Rear Fan Mount for Gregs X-Carriage
thingiverse
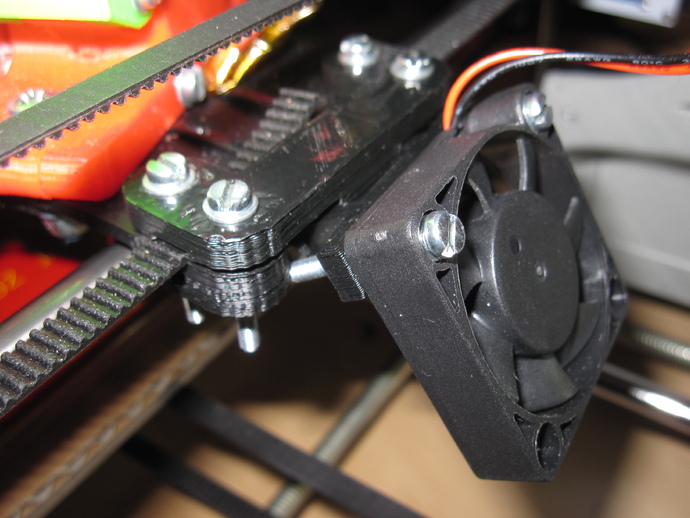
UPDATE! I'm pleased to see the positive attention this little part has gotten. I've added a version that has the belt clamps (for GT2 belts) built in, which has a couple small benefits. You can modify the scad to make something similar for your belts. Or I can help you out if you leave a note. (6/8/2013) I'm using Greg Frost's excellent X-Carriage on my Prusa Mendel reprap. I was a bit frustrated, though, that I couldn't find any designs here to mount a fan behind the x-carriage. So I made this, and I've had much success with it. For me, at least, this allows the fan to be closer to the print head than if it were mounted on the sides, and it saves a non-trivial amount of x-axis print space. If you futz with this design, and I hope you do, please let me know what you come up with. I leave as exercise for the reader the creation of built-in belt clamps, fan ducts, fan brackets, and the like. Instructions Make sure that you're using Greg Frost's x-carriage, or one of it's derivatives where the centers of mounting holes for the belt clamps are about 43mm apart. (Or, print and use a new x-carriage from the part from which this is derived. Or, use the scad file here to create a whole new x-carriage and use that one.) The piece that connects the fan to this mount is not provided here. Select one, and print it out. This part uses a 15mm wide mounting block, which appears to be some sort of de facto standard. You'll have to choose a fan bracket that matches this mount and the size of the fan you have. I'm using a 40mm fan and "40mm Fan Bracket for Jonas Kuehling's RepRap X-carriage", thing #37872. Attach the fan and bracket to the mount using an M3 screw of suitable length. I'm using a 25mm with no nut. I squeeze a M3 washer between the mount and bracket to keep things nice and tight. Some sanding of the bracket was necessary to make the fit. Unfortunately, you're going to have to disassemble your x-carriage somewhat to get this bracket on. Remove the your belt clamps, and place this mount between the clamp/belt combo and the x-carriage. Hold the whole thing together with 25mm M3 screws, washers, and nuts. You know the drill. (There should be no need to drill.) I don't use those clever x-belt tensioners, and this part might make their use difficult. Please comment if you have experience to contribute on this point.
With this file you will be able to print Rear Fan Mount for Gregs X-Carriage with your 3D printer. Click on the button and save the file on your computer to work, edit or customize your design. You can also find more 3D designs for printers on Rear Fan Mount for Gregs X-Carriage.