Recirculating Ball Slide for 1" Square Tube (Improved)
prusaprinters
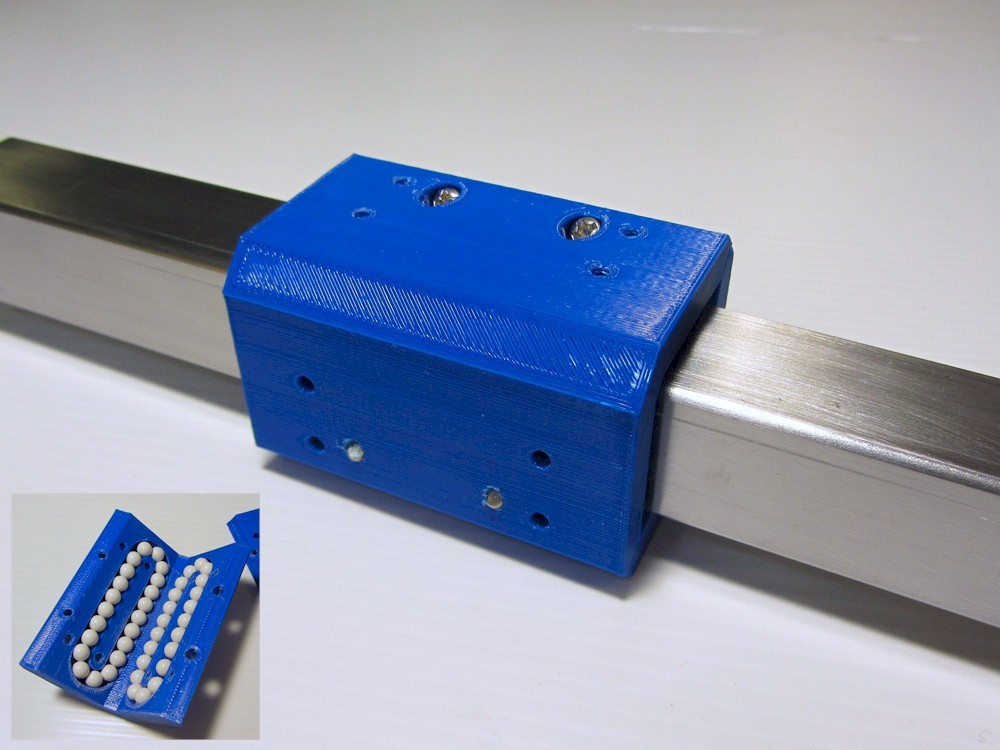
<p>This is an improved version of my earlier ball slide (<a href="https://www.thingiverse.com/thing:943122">https://www.thingiverse.com/thing:943122</a>). It also uses 6mm dia airsoft pellets as bearing balls, but it is lower-profile and runs a little more smoothly. Note that while it looks like the balls in the oval circuit will just scrub against the tube, one leg of the circuit is raised slightly while the rest of the circuit is recessed so that the balls can recirculate freely.</p> <p>So how smooth and precise is this ball slide? Firstly, by adjusting the clamping screws, you can tighten it to take out all backlash. However, being made our of plastic, is is never going to be as stiff as a hardened steel slide. You can increase the stiffness some by increasing the preload, but as you do, the movement becomes less smooth, and you increase the wear. For the most part, this is really only recommended for light or intermittent duty applications. It would be great for use on FRC robots.</p> <h3>Print Settings</h3> <p><strong>Printer:</strong></p> <p>UDIO</p> <p class="detail-setting rafts"><strong>Rafts: </strong> <div><p>Doesn't Matter</p></div> <p><strong>Supports:</strong></p> <p>No</p> <p class="detail-setting resolution"><strong>Resolution: </strong> <div><p>0.2mm</p></div> <p><strong>Infill:</strong></p> <p>30%</p> <p><br/> <p class="detail-setting notes"><strong>Notes: </strong></p> </p><div><p>Print 2 of the ball slide parts and one keeper piece. After printing, run some fine grit sandpaper in the ball slots to remove any blobs or lumps. Do not over-sand!</p></div> Post-Printing ============= <p>You'll need 84 airsoft pellets (21 for each ball circuit) and four 6-32 x 1/2" socket-head cap screws. And also your aluminum or steel 1" square tubing.</p> <p>Before assembly, tap the edge holes with a 6-32 thread, and also any of the mounting holes you plan to use on each of the faces. Make sure to clean out and debris.</p> <p>To assemble, place each of the ball slide halves on the beveled edge so that both slots are facing up. Fill each channel with balls (21 each). Carefully place the keeper piece on top of one of the halves. Hold the keeper and that half together as you flip it over and place it on top of the second half. Make sure you align the halves so that the counter-bored holes on one half line up with the threaded holes on the other half. Insert the four 6-32 screws in the counter-bored holes and gently tighten.</p> <p>When ready to assembly onto your tube, hold your tube end-to-end with the keeper and slide the ball slide onto your tube. Tighten all four screws so that the gaps on either side are parallel and equal on both sides, until all play is removed from the slide.</p> <p><strong>UPDATE:</strong> I've added some breakaway spacers on one of the mating edges. Break these away on just one of the halves and leave the other set in place. When tightening the screws, tighten the side<em>with</em> the spacers completely. Then use the screws on the other side to adjust the preload. Clamping these spacers tight will dramatically increase the stiffness of the ball slide.</p> </p></p> Category: Engineering
With this file you will be able to print Recirculating Ball Slide for 1" Square Tube (Improved) with your 3D printer. Click on the button and save the file on your computer to work, edit or customize your design. You can also find more 3D designs for printers on Recirculating Ball Slide for 1" Square Tube (Improved).