Recirculation filter for 3d printer enclosure
thingiverse
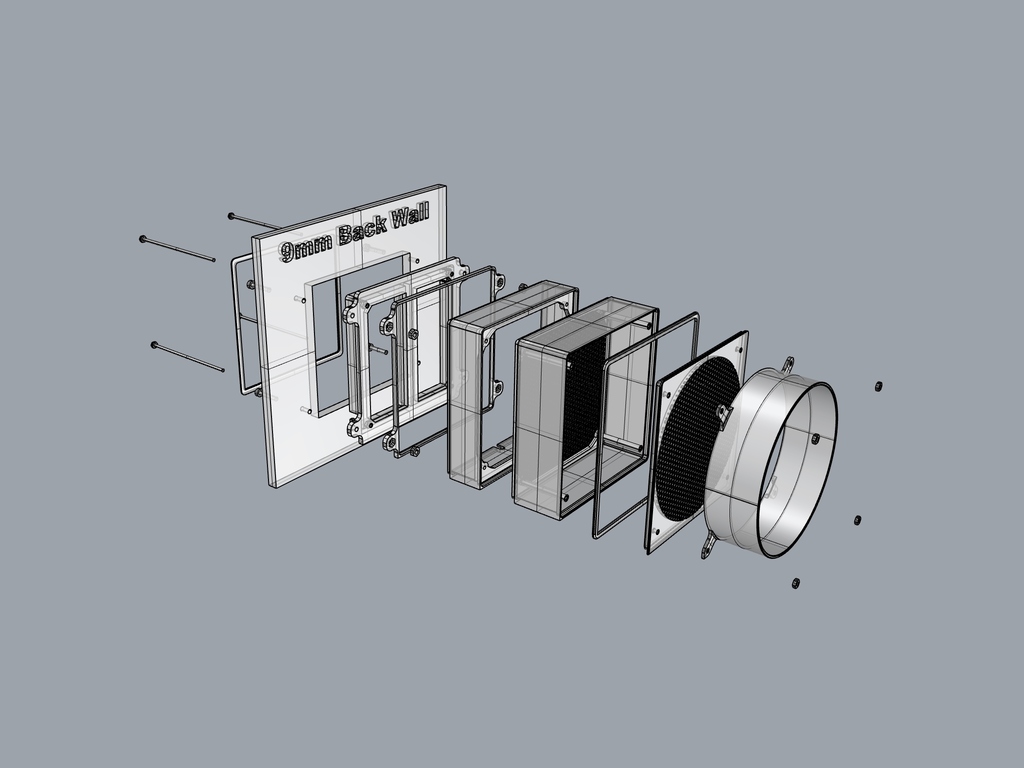
Looking for an air filter solution in my printer enclosure I found the one from FlyByTom and the remix from bblank01. I made changes in the design so I could mount it vertically at the back of my enclosure, and I added a 125mm flexible hose and connector to create a recirculation filter system. This for two reasons, to keep the warmth inside and to keep dust from my workshop outside the enclosure. Important to realise is I changed the design to fit the 9mm thick back wall of my printer enclosure. I added the STEP files so you can change the ‘HEPA_mount_1’ and ‘Inlet_Hose_Connector’ to make it fit your enclosure. Changes: I changed the parts so the whole thing is assembled with 4x 100mm long m3 threads. I added a hose connector for a flexible 125mm PVC hose. I changed the Carbon Chamber grill so the pellets are on both sides enclosed by a grill with 3mm holes. I added an air inlet. With the possibility to add a piece of an extractor hood filter to diffuse the air flow. My experience now is the HEPA filter and carbon filter already reduce the airflow a lot, so I decided to skip the extractor hood filter to not create more resistance. The grill is slightly angled to direct the airflow upwards, away from the printers. Printing tips: Most parts can be printed without supports (except Carbon_Chamber and Fan_Mount). I splitted some parts so they can be printed without supports (HEPA_Mount_1 & HEPA_Mount_2 and Inlet_Hose_Connector_Mount & Inlet_Hose_Connector & Inlet_Cross). I printed all parts with 0,2mm layer thickness, 20% infill and 3 perimeters. Assembly instructions: First assemble the whole filter unit before mounting the assembled unit to the 3d printer enclosure, as it is impossible to fill the carbon filter chamber in mounted (vertical) position. Make sure it is filled to the top so there is no chance of the pellets settling. Every part has a sharp corner, make sure the sharp corners are aligned. This because position of the holes in the parts are not exactly symmetrical, which might result in misalignment and difficulties with assembly. I didn’t feel like changing the holes in all parts ;-) (The inlet does have symmetrical placed holes) Mount the assembled filter unit to the back wall of the enclosure. If the carbon pellets need replacement after a while you will have to disassemble the unit from the enclosure. Possible improvement: The airflow in this design is quite low, because of the HEPA filter and the large volume of carbon pellets. A reduced carbon filter chamber might result in an increasing airflow. Parts list: HEPA filter: Replacement HEPA filter for iRobot Roomba 800 900 series Fan: NF-F12 industrialPPC-3000 PWM (+12V adapter) Active filter carbon pellets 0,5 kg (active carbon based on coal might work better, but active carbon based on charcoal is environmentally a better choice) PVC flexible hose 125mm (1,5 meter) 2x tie wrap 45cm 4x M4×20mm bolts 4x M4 nut 4x M3×100mm thread 8x M3 nut
With this file you will be able to print Recirculation filter for 3d printer enclosure with your 3D printer. Click on the button and save the file on your computer to work, edit or customize your design. You can also find more 3D designs for printers on Recirculation filter for 3d printer enclosure.