Relay Control OctoPrint Wanhao i3
thingiverse
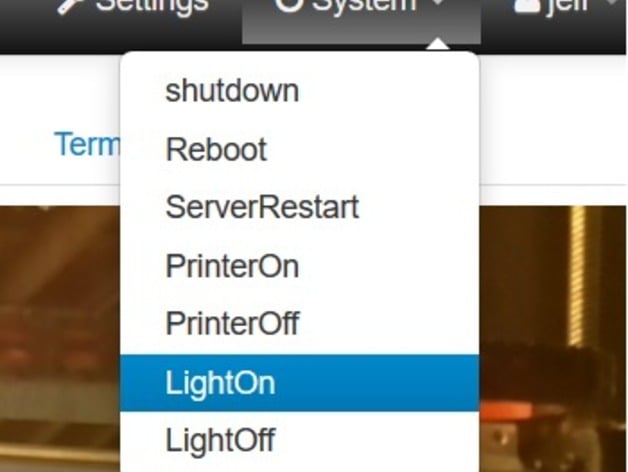
Introduction I have a Wanhao Duplicator i3, a raspberry pi 2 running octoprint (the octopi image), an LED light over the printer, and a 4 relay board from sainsmart. There are places with instructions, tips, etc. But I wanted to share how I did it with this specific printer, and I wanted to illustrate exactly how I managed to control the printer power, and the light, with some rudamentary automation. CAUTION Duh, this is AC power. The printer can create a lot of juice, but it's nothing compared to the power coming from the walls. This can definitely kill you, so be cautious. If you don't know what you're doing, then stop. GPIO Scripts octopi comes with the gpio stuff installed, so just running "gpio" on the command line gives me several options. I made 4 scripts to control the relays. They were all in "/usr/local/bin/". I had to make them as root, and I had to add permissions "sudo chmod a+rx .sh" so that the pi user could execute them. printer_on.sh: #!/bin/bash gpio export 23 out gpio -g write 23 0 printer_off.sh: #!/bin/bash gpio export 23 out gpio -g write 23 1 light_on.sh: #!/bin/bash gpio export 18 out gpio -g write 18 0 light_off.sh: #!/bin/bash gpio export 18 out gpio -g write 18 1 You can see, I wired GPIO 18 to the control of the light relay, and 23 to the control of the printer power relay. You can also see that since I used the normally open connection, the signal is reversed (0 is on and 1 is off). OctoPrint Config So that's cool. I can type 'light_on.sh' and see the light turn on. But I don't want to ssh into the machine to do that, I want to use the octopi web interface. The configuration for octopi is /home/pi/.octoprint/config.yaml So, to let me run these commands from the "system" menu, I added this to my config: system: actions: - action: pon command: printer_on.sh name: PrinterOn - action: poff command: printer_off.sh confirm: Are you sure you want to turn off the printer? name: PrinterOff - action: lon command: light_on.sh name: LightOn - action: loff command: light_off.sh name: LightOff That gave me control of the lights, and printer from the system menu. OctoPrint Config Part Two That wasn't enough. I really wanted the lights to only be on when I'm printing, and I want the printer to be on when I restart the raspberry pi. So I also added this to the config. (See more details on the events part of the config here (http://docs.octoprint.org/en/master/events/index.html) events: enabled: true subscriptions: - command: - printer_on.sh - light_off.sh event: Startup type: system - command: light_on.sh event: PrintStarted type: system - command: light_off.sh event: PrintFailed type: system - command: light_off.sh event: PrintCancelled type: system - command: light_off.sh event: PrintDone type: system What this does (if you can't tell by reading it) is that when octopi starts (Startup) it will turn on the printer, and off the lights. When a print starts (PrintStarted) it will turn on the lights. When a print fails, is cancelled, or finished correctly, it will turn off the light. I probably could have used the CaptureStart and CaptureDone events, because that's really more of what I need, but this is working. I went ahead and tested all of that using just the relay board before I connected up the printer or light. Just trying to make fewer really big mistakes here. Wiring the Relay Board I have a PiTFT screen, which is supposed to run OctoPiPanel. I haven't gotten that to work yet, but it does leave me with a challenge to wire up the relay. I don't have access to the general GPIO pins, because there is a screen on there. The screen covers the regular pins, but also provides them on another connector on the right side of the screen. For the relay board, I just soldered directly to the back of that connector. I only needed 4 wires, and they are as follows: Pi Pin Relay Pin 5V Vcc Gnd Gnd 23 IN1 18 IN2 Connecting Printer Power The power supply from Wanhao is noisy, and annoying. I would have preferred to control low voltage DC signals, but I want that power supply off too. So I chose to control the 120VAC that powers the power supply. The power going to the power supply comes from the connector, goes through the switch on the back, and then goes to the power supply and is attached with a screw. I took a picture of which wire I disconnected from the power supply, but be careful, yours might be different. I ran that cable out to the relay board, and I ran another cable back into the control box to that spot on the power supply. I just ran the cables next to the fan, but I should print a new back, with a hole in it for these cables. I wired the relay so that if the relay board loses power for some reason, then the printer will be shut off (Normally Open). Now that I think about it, I don't really like it that way, maybe I'll reverse it later. Connecting LED Light I have an LED light that illuminates the desk that the printer is on. I opened it up, and there's clearly a 120VAC cable coming in, and a power supply to convert the power to DC, likely a lot lower voltage, like 12, or 24V. I decided to put the relay on this lower DC line, instead. So I cut that cable, soldered in a 2 conductor wire, and ran both to the NO part of the second relay. Part Links This is the relay board I used:http://www.sainsmart.com/4-channel-5v-relay-module-for-pic-arm-avr-dsp-arduino-msp430-ttl-logic.html This is the cover I used:http://www.thingiverse.com/thing:957292 Update to work with PushBullet plugin I use the Push Bullet plugin, and it sends me a photo at the end of every print. Unfortunately, it was taking the snapshot right after the lights went off :). So I modified the lights_off script like this, so that it will wait 5 seconds before turning off the lights, and wouldn't block the octopi running the job: light_off.sh #!/bin/bash gpio export 18 out (sleep 5 && gpio -g write 18 1)& I first changed this: gpio -g write 18 1 into this: sleep 5 gpio -g write 18 1 And that worked fine, but someone told me that would be making octoprint stall for 5 seconds while it was doing that sleep (I don't believe them, but it was a very reputable source). So I changed that to this: (sleep 5 && gpio -g write 18 1)& "sleep 5" waits five seconds. "&&" means that the first command has to complete with success, and then the second command will be called, so "sleep 5 && command" will wait five seconds, and call "command". Putting that thing in parenthesis, and adding a "&" at the end means the whole thing will get run in the background, so that octoprint can keep on doing whatever it was doing before calling that script, wihtout waiting for the sleep or the command to finish.
With this file you will be able to print Relay Control OctoPrint Wanhao i3 with your 3D printer. Click on the button and save the file on your computer to work, edit or customize your design. You can also find more 3D designs for printers on Relay Control OctoPrint Wanhao i3.