Remix Micro 105 FPV Quadcopter
thingiverse
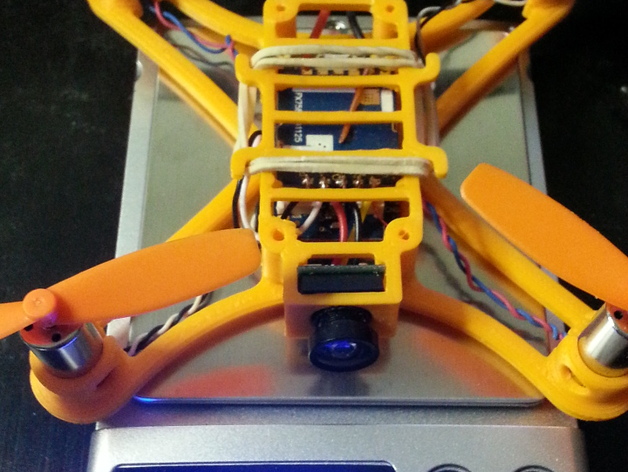
This is my take on punkkills' exceptional Micro 105 FPV Quadcopter.\nhttp://www.thingiverse.com/thing:1221911 \npunkkills also gives credit to FireFlo V2 and Alpine Drones Micro H. The frame is remarkably light yet stiff, printed with ABS. Main frame tubes are hollow extrusions and print hollow with fill set at 100%. Raised mounting perches are provided for the Micro-Scisky Flight Control Board. They elevate the board for USB access without notching the frame. The board is placed on mounts, then melted over corners of the board with a flat tip in a soldering gun (I've been adding a small bit of ABS to the tip to fill the corner).\nTwo tops are included. The first fits FX758-2 5.8G 200mW Video Transmitter and 170 Degree Wide Angle Camera. The transmitter clips into the frame, providing clearance for straight wire antenna between the transmitter and the frame. The camera snaps into the front of the frame. Standoffs are partially tapped with 4-40 threads. The top section is attached to the frame with four 4-40 x 1/4" button socket head screws.\nThe other top fits Quanum Elite TX Camera Combo. It may hold just being snapped in, but I'm using a rubber band for added security (a zip tie would work as well). Left front standoff requires some post-processing to clear a chip on the back of the camera. Both front standoffs might need cleaning up to fit the bottom of the camera securely. It's also attached with 4-40 screws.\nEverything else is pretty much punkkills' build links. A few additional comments: Batteries - I found these batteries on Amazon (https://www.amazon.com/dp/B01581AVTA/ref=sr_ph?ie=UTF8&qid=1467063313&sr=1&keywords=720mah). They offer quicker and cheaper shipping than Hobbyking, with correct polarity. I time my flights to five minutes, and these discharge to about 3.8 volts, leaving a nice safety cushion for landing. The Elite might draw less power than the separate camera/TX setup, but I haven't tested it.\nI'm using the wiring adapter that came with Quanum Elite, but a gram could be saved by soldering the camera directly to the controller board. Some slight horizontal lines appear in the video with the Elite, so I tried the camera with a separate battery for power, but didn't see any improvement in video quality.\nThe better antenna on the Elite seems to give me slightly better range than the separate camera/TX setup. Initially, I ran a longer antenna (about 16mm) and it worked a little better. I shortened it up for testing to get closer to 12.8mm and range was reduced. It might be due to wire diameter (I'm using .8mm). Additional testing is in order. I need to do a cloverleaf antenna. The Elite is sketchy on low-level passes through the back yard, standing in the front. I wouldn't try it at all with the separate camera/TX setup. It could also be the FPV headset - I'm using Eachine VR-007. It might affect range as well. I don't have anything to compare it to.\nPrint Settings\nPrinter Brand: LulzBot\nPrinter: Mini\nRafts: No\nSupports: No\nInfill: 100%\nNotes: Print at 100% infill. Tubes are modeled hollow and should print that way.\nPost-Printing\nTop Finishing\nSome finishing may be required for the Elite version of the top.
With this file you will be able to print Remix Micro 105 FPV Quadcopter with your 3D printer. Click on the button and save the file on your computer to work, edit or customize your design. You can also find more 3D designs for printers on Remix Micro 105 FPV Quadcopter.