REMIX Raspberry Pi 4B case for CR6 Max with 40mm Fan and Onboard Power and Converters
thingiverse
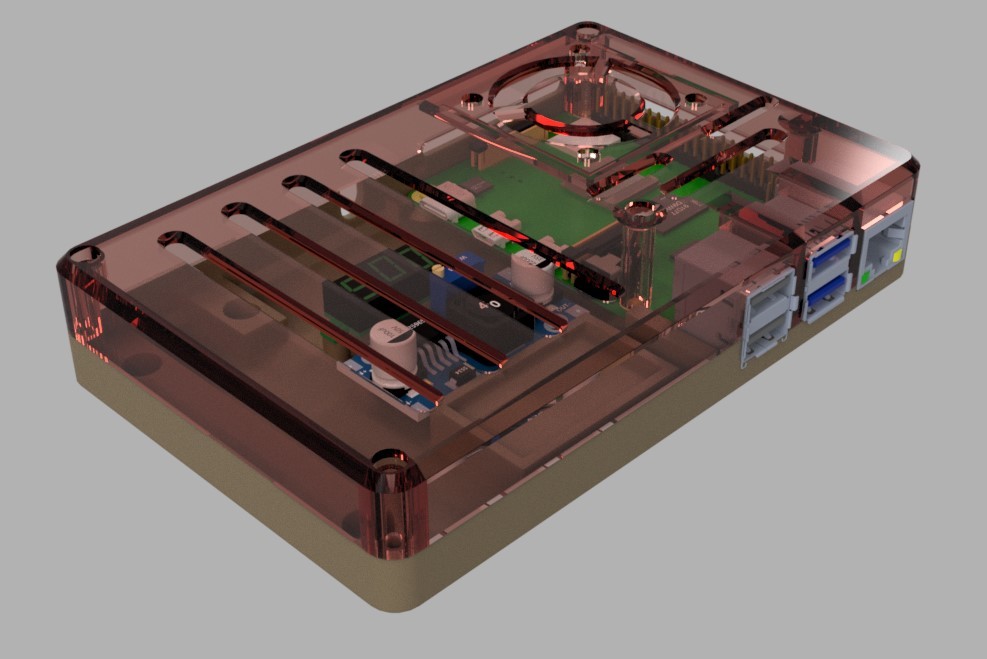
First, thanks to Olvin for the design and including an editable file for remixes. Following suit, I've included the f360 files for further remixing if desired. I wanted an all-in-one solution for my CR6 Max to incorporate a Raspberry Pi 4b for octoprint with a quiet fan, included usb power for the Pi and a buck converter for 12v fan (which I had lying around). The case is pretty self explanatory. You'll need: 1. 2x M2.5 6mm long screws to mount the R Pi 2. 2x M2.5 25mm long screws and 2x M2.5 20mm long screws to connect the fan cover to the electronics portion of the case (the 25mm long screws go through the R Pi mounting holes 3. 4x M3 8mm long screws to mount the buck converter and LED voltmeter 4. 3x M4 x 8mm long screws with t nuts to mount the case to the 4040 extrusion 5. LM2596 Buck converter for 12v power to the fan - make sure to adjust the power output before connecting the fan! (These: https://smile.amazon.com/gp/product/B07VVXF7YX/ref=ppx_yo_dt_b_asin_title_o06_s00?ie=UTF8&psc=1 ) 6. USB buck converter (make sure it can handle 24v incoming power) (These: https://smile.amazon.com/gp/product/B087RHWTJW/ref=ppx_yo_dt_b_asin_title_o02_s00?ie=UTF8&psc=1 ) 7. LED Voltmeter (These: https://smile.amazon.com/gp/product/B00YALV0NG/ref=ppx_yo_dt_b_asin_title_o05_s00?ie=UTF8&psc=1 ) 8. RPi 4b with Octoprint installed 9. A USB voltage disconnect (I used the one I designed here: https://www.thingiverse.com/thing:4762791 ) 10. Wire to connect to the Meanwell Power supply. I used a standard LED lighting connector for power input to the case, and rigged up a wire to the PSU. I terminated the Pi side with a standard LED power connector and the supply side with terminals. 11. A jst connector set for the fan connection. 12. A right angle connector for the USB port and a short USB C Cable (This: https://smile.amazon.com/gp/product/B08P18HKYF/ref=ppx_yo_dt_b_asin_title_o02_s00?ie=UTF8&psc=1 and this: https://smile.amazon.com/gp/product/B08D9SB161/ref=ppx_yo_dt_b_asin_title_o02_s00?ie=UTF8&psc=1 ) 13. A 40x10mm fan, preferably very quiet. I used a Noctua 40x10 that I had laying around. 14. Some basic soldering skills. Refer to the pictures for how I wired everything. Undertake this project at your own risk. If you screw this up, you could fry your boards, cause a fire, electrocute yourself, etc. I printed the files using my CR6 Max.
With this file you will be able to print REMIX Raspberry Pi 4B case for CR6 Max with 40mm Fan and Onboard Power and Converters with your 3D printer. Click on the button and save the file on your computer to work, edit or customize your design. You can also find more 3D designs for printers on REMIX Raspberry Pi 4B case for CR6 Max with 40mm Fan and Onboard Power and Converters.