Remote Control Stand
thingiverse
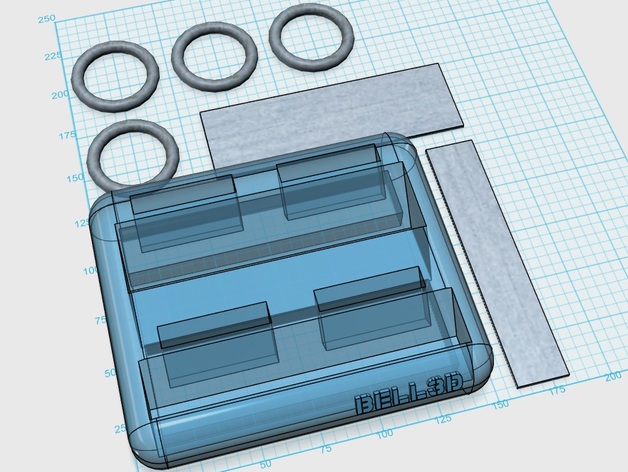
This is a simple remote control stand. The model certainly does it's job, and houses the four remotes that previously cluttered my living room. The four rings are meant to be rests for the remotes and do actually do the job. I printed them as separate objects so that I could play with colour mixing, and also so that different designs and shapes could be interchanged to change the look, and and provide specific support for a strange shaped remote for example. As they are, they work fine with all of my remotes, so I'm unlikely to change them for now. The model is designed with two large cavities in the bottom - the idea is that some ballast can be added to give the model some weight (some heavy coins hot glued in place worked very well, bringing the final weight of the model up to about 0.4kg, which works very well stopping it flipping over when a heavy remote is put into it), or potentially to store a few spare batteries. Also of course, it reduces the amount of plastic required, which turned out to be a key move for me as this is not a quick model to print at the resolution I choose. Further infomormation about this and other models I create can be found in the blog & gallery sections of my website: http://www.soldersuckerblog.com Instructions The model was printed on my trusty Printrbot Simple Metal, using FL33 Gold PLA for the main model, and FL33 Red PLA for the accessories at 215c on a non-heated Kapton covered bed with a light coat of glue-stick. In total, printing at a 0.2mm layer height took around 13 hours for all parts. I played a little with the Slic3r settings on this one to reduce time and filament, and used the 'Only infill when needed' option, and a 10% fill density with a honeycomb pattern. These choices reduced the printing time by almost 9 hours! The top/bottom layers patterns are 'archimeanchords' for a change. This took ages to slice, but produced a nice result. As this is quite a transparent material being used, I could have just used my standard 'rectiliniar' pattern to be honest, as it doesn't really stand out at all, and is somewhat overwhelmed by the infill underneath. If I do use this pattern again, I'll make sure to use 5+ solid top and bottom layers to make it worthwhile! The 'Only infill when needed' option produced a very strong print, even at only 10% infill. The only issue I had with this option versus the test prints I did previously, was that with this option the top rear of the case contains no infill support at all, and had a gap which separated the top from the adjacent side wall. Fortunately, I was able to join this easily using just hot air so it's not at all visible now and hasn't affected the structural integrity of the model.
With this file you will be able to print Remote Control Stand with your 3D printer. Click on the button and save the file on your computer to work, edit or customize your design. You can also find more 3D designs for printers on Remote Control Stand.