Repkord Snap Roller & MagTrack System
thingiverse
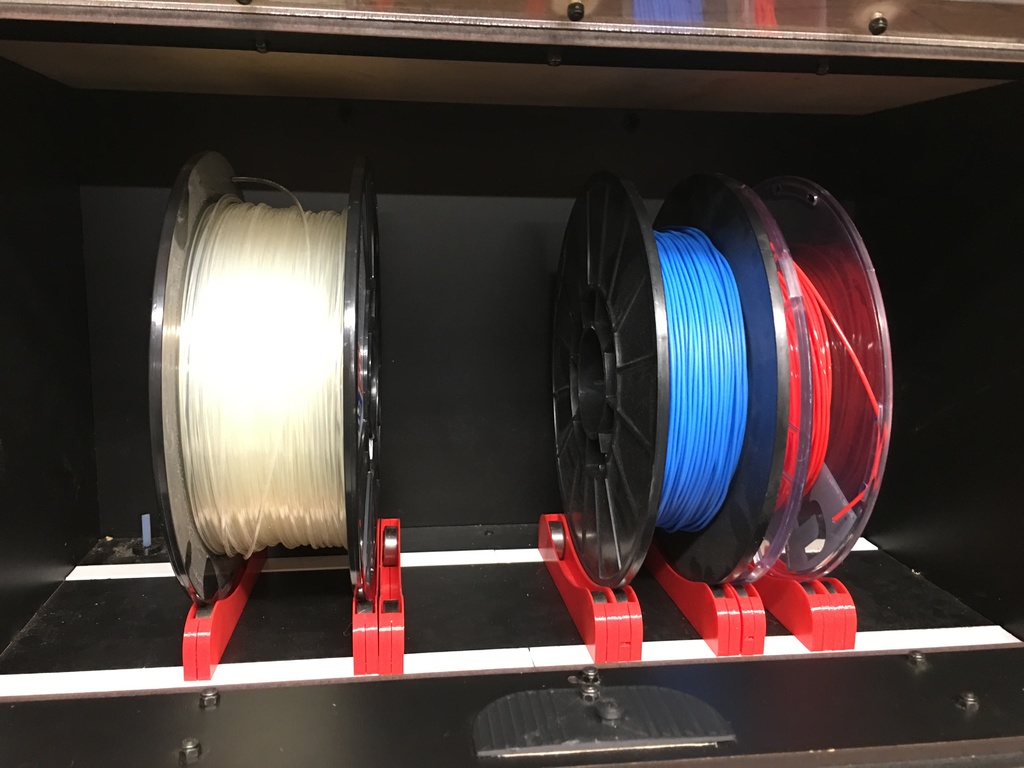
NOTES ON REPKORD SNAP ROLLER SYSTEM Inspired by the original TUSH design, but we decided there was a bit more ULTIMATE to be had. So we've beefed these rollers up a bit, made them snap and hold together better and added a magnetic option to aid in positioning the rollers. Uses standard 608 "Skate" bearings that you can find just about anywhere. While this was originally designed for the Repkord RepBox we're making the snap roller system available for all and have included connectors for use out in the open! You'll find variants of the rollers and track to accommodate different setups and magnet sizes. PRINTING BE SURE TO HAVE YOUR PRINTER WELL TUNED AND CALIBRATED PRIOR TO PRINTING. Tolerances on this model are decently tight so for best results you'll want to make sure to use a printer that's tuned for good dimensional accuracy. We've had great success using the Prusa MK3 and the Creality CR-10. SLICING: Print at a .2mm layer height or finer with 100% infill with two top, bottom and shells. .4mm nozzle is recommended. MAGNETS We recommend using 10mm x 3mm rare earth neodynmium magnets as they seem to provide the best connection when rollers are used side by side in a double configuration. When installing the magnets in the rollers its very important that you PUT ALTERING POLARITIES ON EITHER END OF THE ROLLER in order for them to click together properly in double configuration. This means you need to have North up on one side of your track and South facing up on the other track. DOUBLE ROLLER In addition to the single rollers there is a double roller model of the snap roller you can print for use between multiple spools and for maximum compactness. You may achieve the same effect by clicking two singles side by side at a cost of taking up just a bit more width. BEARINGS Standard 608 "Skate" Bearings ASSEMBLY Due to the bearings being metal and the magnets being rather strong we've found it easiest to snap together one end at a time. Once the magnet and bearing are snapped in on one side check the polarity of the magnet that's snapped in with the second magnet. Then flip that second magnet and snap it into the other side along with the second bearing. Again DON'T FORGET TO ALTER MAGNET POLARITIES AT EITHER END OF THE ROLLER TRACK The track is designed with maximum versatility in mind. You may extend the length of your system by using the double connector to snap them together using the dovetail joints. Before placing your magnets lay out your spools next to the track facing up and press in magnets at each spot a flange lines up with a magnet space. If you're clicking two snap rollers together then only place magnets for one side, leave space for the adjoining roller and repeat the process until configured to your liking. If you mess up you can just pop them out using a flat head screwdriver. If you need hardware for your snap rollers please consider buying the hardware sets from www.repkord.com to help support our development of awesome things like this.
With this file you will be able to print Repkord Snap Roller & MagTrack System with your 3D printer. Click on the button and save the file on your computer to work, edit or customize your design. You can also find more 3D designs for printers on Repkord Snap Roller & MagTrack System.