Replacement hard drive mounts for Dell OptiPlex 5050 (and similar) SFF PCs
thingiverse
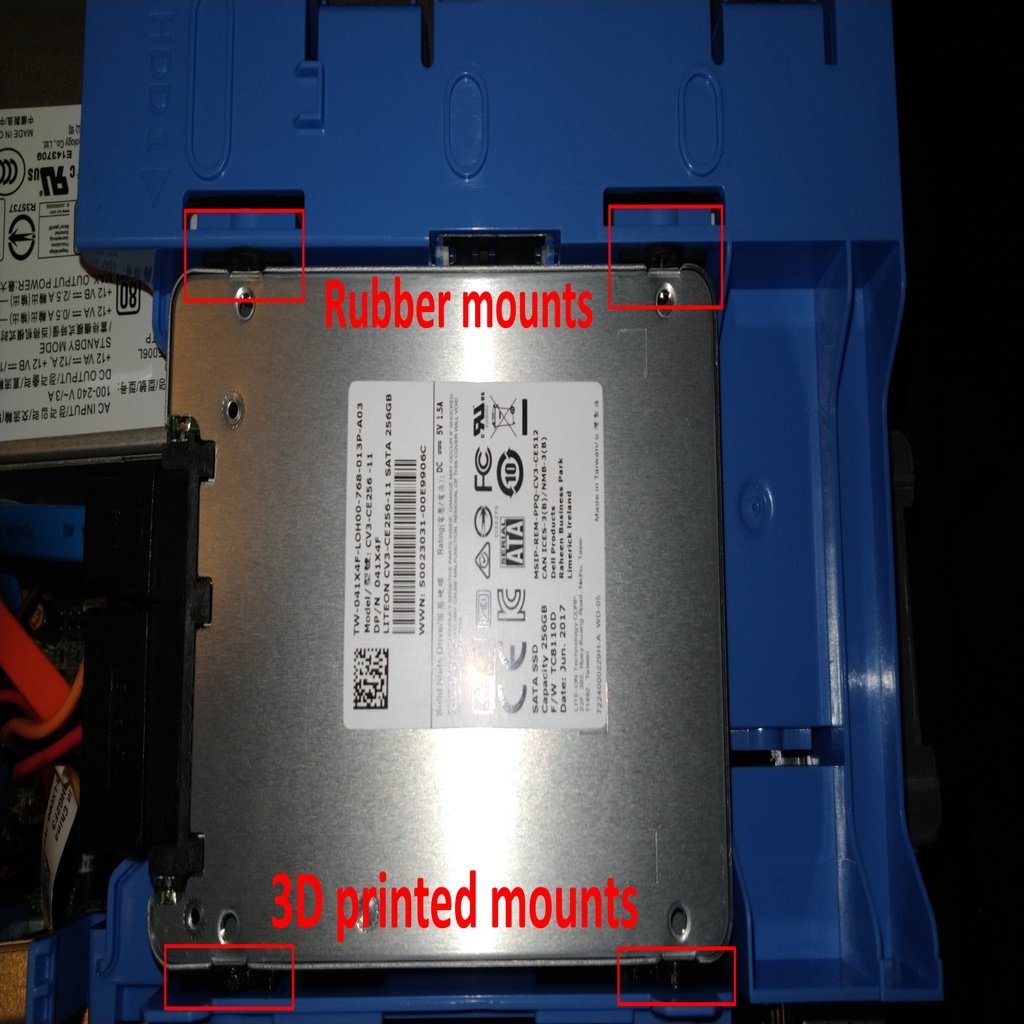
I bought a used Dell OptiPlex 5050 SFF desktop for my granddad, and he had asked me if the machine had the ability to accept a second SSD. Although the machine included an SSD this time, the bracket only included the small rubber mounts in one of the two available 2.5" bays. My options were to order a $18 replacement bracket, wait a week, and just pop the other set of mounts off; or design and 3D print some exact-fit replacements to avoid the cost, the wait, and depriving someone else of the bracket. The four rubber mounts each contain a metal pin that holds the drive by its screw holes, and you normally have to flex the plastic tabs they sit in on one side to remove or insert the hard drive. I have never been a fan of this mounting method, as I prefer screws; however, it is necessary for two of the mounts in each bay to utilize pins, because the plastic surrounding them blocks the path for a screwdriver. Installation instructions: 1. Remove the side panel, and pull the large clip in the 2nd photo in the direction of the arrow to remove the caddy. 2. Pull the two tabs on the opposite side away from the hard drive. 3. Disconnect the cables and remove the drive. 4. Push the two rubber mounts out of the tabs, but DO NOT lose them. Leave the other two rubber mounts in place, as shown in the 2nd photo. 5. Slide in two of the 3D printed mounts and insert one M3x5mm screw into each mount, as shown in the 3rd photo. (If the screw won't easily fall into the hole, then press and twist it in with a screwdriver.) 6. Once this is done, flip the caddy over. 7. Insert the two rubber mounts you removed earlier on the non-tabbed side (near the "HDD 1" debossed label). 8. Slide the other two 3D printed mounts on the opposite side (single long tab) and insert one M3x5 screw into each mount. 9. Pull the tab(s) with the 3D printed mounts outward, and slide the drive back onto the pins in the rubber mounts. 10. Tighten the screws on the new mounts to fully mount the hard drive. 11. Repeat steps 9 and 10 for the second drive. If your computer doesn't have the SATA power splitter cable needed to power both hard drives, then you will need to purchase one (part number 0247PN). It can be found on eBay. If you don't have the right screws on hand, eBay and Amazon both sell them in absurd quantities for under $10. Here's a good link to a variety kit: https://www.amazon.com/CO-RODE-Notebook-Computer-Samsung/dp/B01GE9AK7I/ref=sr_1_3?keywords=laptop+screws&qid=1574496524&sr=8-3 My wife has the Rhino 6 skills, so credit goes to her for drawing the model.
With this file you will be able to print Replacement hard drive mounts for Dell OptiPlex 5050 (and similar) SFF PCs with your 3D printer. Click on the button and save the file on your computer to work, edit or customize your design. You can also find more 3D designs for printers on Replacement hard drive mounts for Dell OptiPlex 5050 (and similar) SFF PCs.