Replicator 2X active cooling fan duct - front discharge
thingiverse
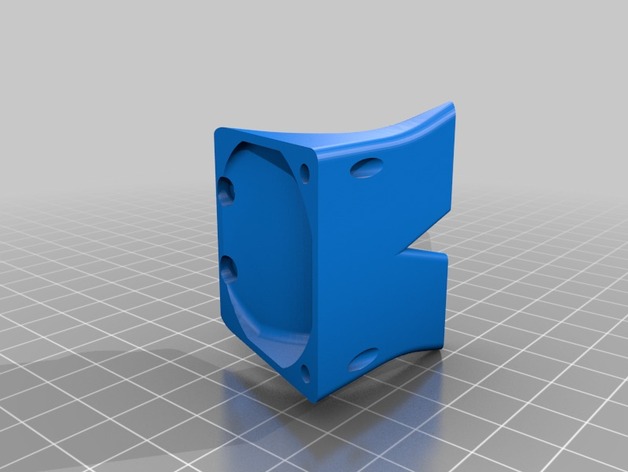
This is an active cooling fan solution for the Replicator 2X. It is similar to the design by ten13th except it is made to work with any 40mm front-discharge fan. It is secured in place with two of the long hex bolts from the extruder, and the fan is secured to the duct using the bottom 2 screws. I tried initially to use the MakerBot motherboard's cooling fan relay, however this is a 24V output so it should only be used with 40mm cooling fans rated for 24V. The relay did not seem to respond well when I connected a 12V voltage regulator to it in an attempt to use a 12V 40mm fan (which is much more common). To avoid damage to the mobo, I have the cooling fan now connected to an external power source. The front-discharge fans are not as efficient as side-discharge fans due to the drastic reduction in flow cross-sectional area. This design will provide a gentle flow for moderate cooling (e.g. for making small ABS or large PLA parts); however, if you need more air flow (e.g. for small or detailed PLA prints), a side-discharge fan is recommended. Instructions Print Parameters: Lay the model in MakerWare face down with inlet port flat on print surface and exhaust ports pointing up ABS 0.2mm layer thickness with infill density 0.3 Rafts and supports are recommended Support angle set to 60 degrees with density of 0.2 To avoid print lifting, set raft outset to 6mm Additional parts: Digikey part #259-1566-ND 40mm 12VDC fan Any 12VDC household power supply Switch (optional) Assembly instructions: Remove raft and support carefully Remove the inner 2 hex bolts from the extruder head (picture) Clean the fan duct bolt holes and thread the hex bolts through Tighten the hex bolts and secure duct to the extruder head (pictures) Split the wire ends of the 12VDC and solder (or twist together) with ends of the fan Mount the fan on the duct using the 2 bottom screw holes (pictures) Optional - if using MakerBot fan cooling relay: Any 24V 40mm fan e.g. DigiKey #381-2367-ND Turn the Rep 2X on its side, preferably its right side when looking at the machine from the front Take off the 4 bolts at the bottom holding the protective cover of the motherboard (see picture) Locate the cooling fan relay connector and connect your fan to it. Warning: the cooling fan relay does not handle much load (which can be concern especially when printing dual extrusion), there have been frequent reports of this relay failing (FET burning out). When this happens the circuit will fail closed. As such, when the fan is turned "OFF" there will still be about 17-18V across the leads; the fan will still turn, but it will rotate at a lower RPM. When the fan is turned "ON" there will be about 24V across the leads. In other words, the cooling fan will never shut off if the FET relay fails. It's probably safer if you implement an external power source separate from the Rep 2X.
With this file you will be able to print Replicator 2X active cooling fan duct - front discharge with your 3D printer. Click on the button and save the file on your computer to work, edit or customize your design. You can also find more 3D designs for printers on Replicator 2X active cooling fan duct - front discharge.