Replicator 2X Fan Duct
thingiverse
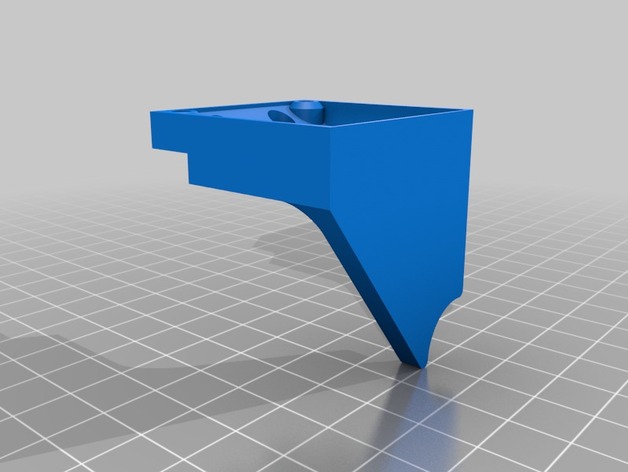
ATTN: Work-In-Progress!! I'm still working out some details in the model. Also this design may not blow enough air to be very effective. Tubeaxial fans can move a lot of air (CFM) but they aren't very good at generating pressure (as in through a nozzle). I'm working on a second design using a blower-style fan which generates about 6x the pressure, which may work better. This thing allows you to add the third cooling fan to a Replicator 2X. The third fan cools the freshly extruded plastic, which is critical for successful PLA printing. It cools only the right-side nozzle. If you want to cool the left side, just mirror the part before printing. I may add a mirrored version soon. This part requires no modifications to the Replicator itself. However, you will need to snip off one of the mounting ears on each of the fan grilles or the screws may not be long enough to thread into the stepper motors. I added a wire to the unused fan output on the factory board and ran it up and around to the extruder. I bought a 24v fan on Digikey (the Rep's fans are all 24v fans) as well as the plug-in connectors for the wiring. This way you can unplug the fan as needed, and the wire simply plugs in to the Replicator's board. Wiring: You'll need to solder two of the crimp connectors to one end of your 2-conductor wire. Trim the fan leads down to about 2 inches long and solder two crimp connectors to the fan as well. Insert the crimp fittings into the plastic housings to make a plug. Plug this end of the wire into the fan output on the board and run the wire up and over to the extruder. I zip-tied it in place along the existing wiring harness. Then cut the wire to rough length and solder on the female connector that receives the fan's plug (this connector already has the pins in it). Watch your polarities here, you don’t want the fan to run in reverse. You may choose to add some very small heat shrink tubing on these solder joints, but it’s not critical depending on how you have things arranged. Mechanical assembly: Remove the middle two long screws that go through the fans, through the extruder, and back into the stepper motors. Use wire cutters and snip off the mounting ears for the fan grilles in these two locations. Don't worry, one screw is more than sturdy enough to keep each grille in place (or just get rid of the grilles altogether). The tension in the assembly should keep the plastic spacers in place between the fans and the heatsinks. Insert the screws in the middle holes of the duct. Insert the screws back where they go and push the whole assembly back together. The thickness of the duct replaces the space previously occupied by the grille mounting ears. Tighten the screws snugly but not too tight. (If the spacers fall out, you may need to remove the other two screws and slide everything together first, then install the whole deal onto the heater block. You can also just tack the spacers to the fans with a little CA glue.) Mount the fan to the duct in the remaining holes. I used some small #6 screws and nuts, commonly available at any hardware store, Lowes, Home Depot, McMaster-Carr, etc. Plug the fan into the plug on the wire you installed earlier and that's it. With the combination of stock firmware and Makerbot Desktop, the cooling fan is controlled manually with the on-board menu on the Replicator 2X. I just wait until the first layer or two is down, then manually turn the fan on and leave it on. I'm sure there's a more sophisticated way to handle the fan control, but up to this point I was more concerned with getting it wired and mounted. Comments are suggestions are welcome. Part Numbers: Fan: Digi-Key Part Number P15610-ND Manufacturer Part Number 1606KL-05W-B30-L00 Connectors: Digi-Key Part Number 455-2266-ND Manufacturer Part Number XHP-2 Digi-Key Part Number 455-2879-ND Manufacturer Part Number B2B-XH-A-M(LF)(SN) Digi-Key Part Number 455-2261-1-ND Manufacturer Part Number SXH-002T-P0.6 Wire: I used some leftover fine 2-conductor wire I had laying around. Other good choices are the cord from an old mouse, or fan wires from the inside of an old PC. Just use something thin enough to be flexible and fir the application appropriately. These fans don't draw much current, esp at 24 volts. Print Settings Rafts: Doesn't Matter Supports: Doesn't Matter Resolution: .20mm (standard) Infill: anything Notes: I printed this a variety of ways while finalizing the dimensions. .20mm layers and 2 shells worked well for me. I think the infill really doesn't matter since there's not much solid area to be filled. I used zero %. The best orientation for printing is with the fan mounting flange face down on the plate, with thee nozzle pointing straight up. This way there won't be any support in the air passageway. If you have trouble with it curling due to limited surface area, try the version with ears, and also use a raft. That should keep it stuck a little better.
With this file you will be able to print Replicator 2X Fan Duct with your 3D printer. Click on the button and save the file on your computer to work, edit or customize your design. You can also find more 3D designs for printers on Replicator 2X Fan Duct.