Replicator Bed Level Jig
thingiverse
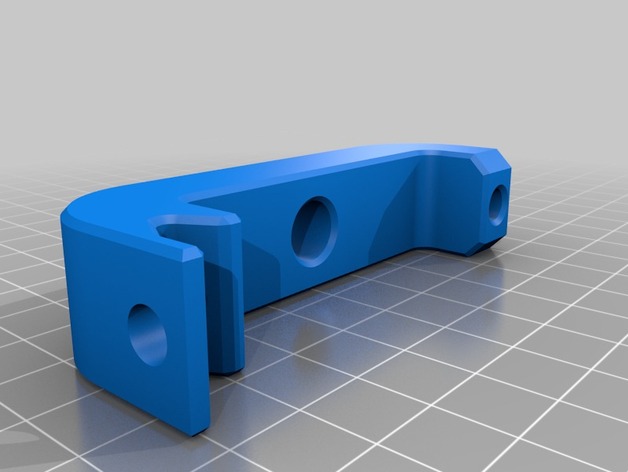
Frustrated with the bed leveling procedure on your new Replicator? Thought you got it level only to have your print fail the first layer or not bond on one side? I believe the 4 screw leveling design and the difficulties with achieving a truly level build plate are the root of many user's build problems. They certainly were for me. With this jig and a dial/digital indicator you can get your build table as level as is possible. You can also use this to find out if your build plate is warped! Video procedure at http://youtu.be/hgWeew6SmjQ UPDATED: 2/12/2016 Extended back tab and added another magnet to give it more stable "clamping" to the X axis rails. Made magnet holes pass all the way through to allow you to push the back the other way if necessary. Included 3D Systems Geomagic and step CAD files if you want to modify for your needs or fix a weakness in my design. Instructions This procedure is a work in progress. I have done this on mine and my print quality and first layer bonding to the build table are the best they have ever been. Your mileage may vary. This may sound very complicated but if you have any machinist experience it should be relatively straight forward. I will try to add photos later to augment the thousand words here. It might be easier to perform the standard Replicator leveling and then fine tune it with the Digital Indicator and this jig. I have started doing this after I heat the build plate as I have seen to plate go way out of level after heating. UPDATE 5/21/2012: I consistently see the front of the build plate droop about 0.3mm-0.4mm when the plate is heated to 100C. That's pretty much the diameter of the filament and is definitely enough to mess up a build. I suspect the plastic bed support arms are softening slightly in the heat. Now I always preheat my plate and then check level, being careful of course not to burn myself! Builds are consistently good now with 0.2mm layer height. Watch your extruder nozzles throughout this procedure - don't crash them into your build plate! Print this jig. I used 25% fill, 0.2mm layer height, bed temp 110C, nozzle temp 227C, 1 shell. Install 0.25" Diameter X 0.25" thick magnets ( http://www.amazon.com/Magcraft-NSN0617-4-Inch-Magnets-20-Count/dp/B000SQK2JK/ref=pd_cp_hi_1 ) just flush with surface in their respective holes. See magnet install picture http://www.thingiverse.com/image:136277. Carefully insert digital indicator into the top center 0.375" hole. It is a press fit. If your bonding between layers is not good it might crack. Don't push it all the way in just get it started. My Pittsburgh (Harbor Freight 93295) Digital Indicator has 1" of travel. I seated it in the jig such that there is a gap of 0.34" between the top of the jig and the bottom of the Digital indicator body (See gap photo http://www.thingiverse.com/image:136278). We want the dial indicator seated such that the needle just starts to move when the jig is installed with the build table in the home (top) position and the jig attached to the X axis rails. The build table deflects easily with very little pressure so if the dial indicator is set too far down its spring force will deflect the table down and cause measurement errors. Before you install the jig on the X axis rails, use the Replicator Home Axes from the Utilities menu to send the build plate to the top Home position. Put the nozzle(s) over the back right corner nearest that leveling screw. I used a 0.001" shim (I happened to have paper that thickness). I'm an not sure about this thickness yet. I might want it a little thicker? I got some feeler gauges ( http://www.amazon.com/gp/product/B005689P7A/ref=oh_details_o00_s00_i01 ) and will test some different thicknesses. Adjust the back of the build table till the nozzle just "bites" the shim when you pull it. This is your reference height. Makes sure there is no plastic sticking from extruder nozzle as this will mess up your measurement. NOTE: Watch it when you move your nozzle(s) for the next steps - don't crash them into the table before it is leveled. Move them to the far left to keep them off the work surface and out of the way for the rest of the procedure. Now place the jig on the X axis rails with the Dial indicator needle facing down toward the table. You should feel the magnets click the jig in place. It should sit flat and steady - no wobble. Carefully move the X and Y axis and slide the indicator jig such that the indicator tip is just forward of the back right build plate leveling bolt (See home zero picture http://www.thingiverse.com/image:136276). Don't put the indicator tip on the bolts. Put it on the plate somewhat close to the bolt. The indicator tip should contact the table and move up slightly. Carefully zero the digital indicator without pushing up or down. Now go to each leveling bolt starting with the back left one so the nozzle(s) stay off the build plate. Adjust the leveling screws to get close to zero on each. It takes a light touch on the leveling screws - pushing up or down even slightly on then shows up on the gauge. NOTE: 3 points in space is a plane, 4 points is a pain! Because there are 4 leveling screws you will find that you get 3 right and then you get to the 4th and it seems to mess things up. Get it close and then check the other 3 again, it took me a couple passes at first becuase my table was out of whack but now it is easier to get it back into shape. NOTE2: If you have OCD like me you'll want all corners exactly zero. This will drive you nuts. Remember 0.03mm is less than 0.0012". Don't get too carried away. UPDATE: 5/22/2012 I don't follow my own advice - I keep going till I get all zeros anyways! Now enjoy the high quality printing you expected from your Replicator! UPDATE: I added a 3D CAD file in .igs format exported from Alibre 3D for those you want to modify this to fit their own indicator. UPDATE 7/9/2012: I added a version 2 with a V shape for the back rail, elimianated the superfluous hole in the side and leveled the contact points front and back. Also added version 2 with the harbor freight 5/16" magnet holes ( http://www.harborfreight.com/10-piece-rare-earth-magnets-67488.html ). I undersized the holes by 1/64" so hopefully a press fit. I have not printed the new version yet.
With this file you will be able to print Replicator Bed Level Jig with your 3D printer. Click on the button and save the file on your computer to work, edit or customize your design. You can also find more 3D designs for printers on Replicator Bed Level Jig.