RepRap Pro Ormerod Spring-loaded extruder
thingiverse
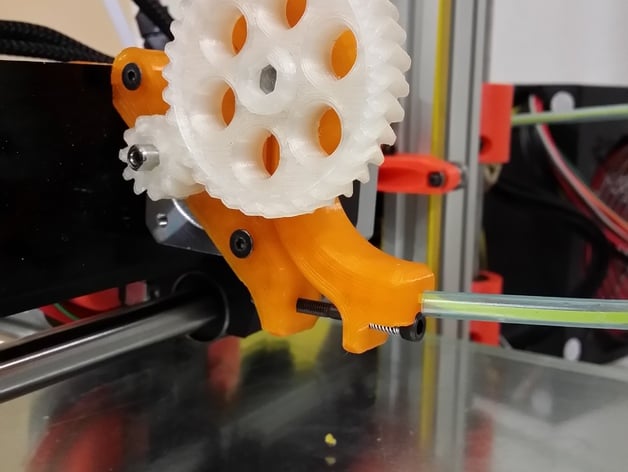
After problems with inconsistent filament diameters in my RepRapPro Ormerod I made an extruder block that includes a spring for tensioning. It uses a long 3mm screw, nut and a tension string on a long lever arm. I've implemented this one with great results - it handles variations in filament with ease. This works well with variable filament diameters. Smooths out the action of roughly printed gears. Makes cleaning the hobbed insert a snap - Undo the bottom spring screw, flip the back up and clean away! :) As mentioned on forums.reprap.org it makes the mounting of iamburny's Herringbone gears (http://www.thingiverse.com/thing:242536) a bit easier because you can mount the gears separately, then mesh them together once complete. The spring I've used came from a fairly strong action ball-point pen - the lever action increases the effect of the spring, so it works well for me and others. EDIT: Some discussion on the RepRap forums indicates that there is a large difference in spring strength in pens and that they can be under strength for this purpose - A suggestion is the springs that can be found in the plunger of products like soap dispensers - refer to http://forums.reprap.org/read.php?340,524181,page=2 for the ongoing discussion. :) The STEP files are included in case you want to make a modification - in which case share & share alike (and keep me informed - I'd like to know) :) PTFE version In this version the Feeder part has a wider feed pipe to allow for the PTFE insert to run all the way up to just before the hobbed insert. This is supposed to decrease the resistance on the filament and stop wear on the extruder. Instructions Print the version you want - Most people will only use the 'Extruder' files - either the PTFE liner version or the standard - that has all the parts necessary. The 'With support' files include simple support that should print well with most slicers and should be easily removed. Whichever files you use, you'll need a 'motor' part, a 'feeder' part and probably the 'tongue' part. Screw the feeder to the motor using an M3 screw and nut through the hinge at the top - optionally using thin washers between if your print has the space. I found that I had to work the hinge a little bit before it was a smooth action, but don't need the washers myself. Build the extruder as per the original RepRap plans. Make sure that the tongue is properly inserted and anchoring the Bowden tube correctly, then optionally anchor that in place with a cable tie or screw. Insert the long M3 screw at the bottom with the spring between the head and the bracer near the filament entry point. Tension the spring by sending through filament - can be done by hand by turning the large gear. Specifically try to stop the filament to make sure the hobbed insert doesn't slip on the filament.
With this file you will be able to print RepRap Pro Ormerod Spring-loaded extruder with your 3D printer. Click on the button and save the file on your computer to work, edit or customize your design. You can also find more 3D designs for printers on RepRap Pro Ormerod Spring-loaded extruder.