RepRap Prusa i3 bed auto-level
thingiverse
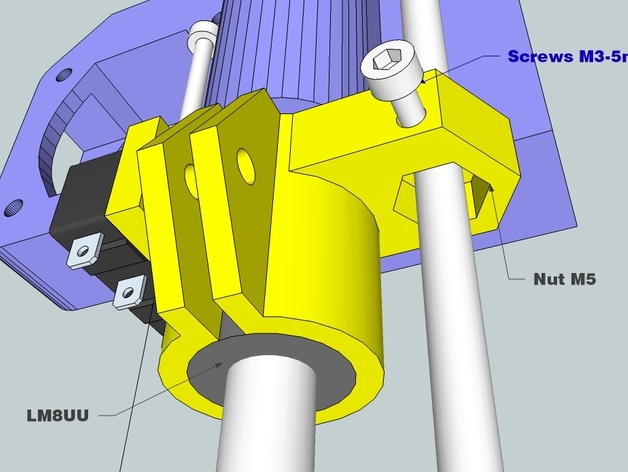
When going down, the extruder will touch the bed, and the axis will keep on that heigt, since the Z_EndStopMount pieces are not glued to the axis, they will continue going down and the circuit will get opened, then, z-min is triggered. Demo video:https://www.youtube.com/watch?v=AOHPTKWP9wohttp://youtu.be/PSwfhPHeCR4 Download the model:http://www.thingiverse.com/thing:273805 (The Prusa_i3_X_End_Motor.stl is copied fromhttp://www.thingiverse.com/thing:39889/#files) Parts: AutoLevel_Z_EndStopMount.stl x1 LM8UU x1 Screws M3-15mm x1 Screws M3-5mm x1 Screws M2-8mm x2 Nut M3 x1 Nut M5 x1 Just like the "X End motor mount ", Use a M5 nut to pull up/down the end-stop-mount. But need use a M3-5mm screw to fix the M5 nut with it. M3-15mm and the M3 nut is used to grip the LM8UU in the center clamp. Directly use the original Z End-Stop micro switch as the detect switch shows in the figure. Adjust the touch screw of X end motor mount to "just" press the Z End-Stop Switch. When move down Z direction and J-Head hit the bed, X would stop move down, but Z End-Stop Mount wont stop and the micro switch would be released. By this way, Marlin can detect the nozzle already hit the bed. Use Marlin "Bed Auto Leveling, grid mode"https://github.com/ErikZalm/Marlin Edit the configuration.h file.https://github.com/ErikZalm/Marlin/blob/Marlin_v1/Marlin/Configuration.h Invert your Z min end-stop setting. Originally, Z min end-stop is hit when Z at home position, But this design let it release when Z at home. const bool Z_MIN_ENDSTOP_INVERTING = false; Active auto leveling by delete "//" before #define ENABLE_AUTO_BED_LEVELING Update these setting for the rectangle in which to probe #define LEFT_PROBE_BED_POSITION 0 #define RIGHT_PROBE_BED_POSITION 120 #define BACK_PROBE_BED_POSITION 150 #define FRONT_PROBE_BED_POSITION 50 Set the number of grid points per dimension. I wouldn't see a reason to go above 3 (=9 probing points on the bed) #define AUTO_BED_LEVELING_GRID_POINTS 3 These are the offsets to the probe relative to the extruder tip (Hotend - Probe) Because directly use J-head to probe bed level, offset of X and Y should be zero. The offset of Z direction need to check up by exam, we set to zero in the first time. #define X_PROBE_OFFSET_FROM_EXTRUDER 0 #define Y_PROBE_OFFSET_FROM_EXTRUDER 0 #define Z_PROBE_OFFSET_FROM_EXTRUDER 0 Burn Marlin into RAMPS system. Execute these G code for first level detect. G28 X G28 Y G28 Z G29 G1 Z10 G1 X100 Y100 Check the Z offset Put an A4 paper on print bed, and lower Z 0.1mm once a step until J-head just bites the paper and can't move the paper easily. At this time, READ the Z POSITION FROM LCD. This reading is your offset of Z direction. Update the Z offset (Z_PROBE_OFFSET_FROM_EXTRUDER) and burn Marlin into RAMPS again. (optional) Do "Restore Failsafe" in LCD if there are old config setting in EEPROM. Update "Ptr G-code -> Prefix" in KISSlicer M104 S G28 X G28 Y G28 Z G29; Detailed Z-Probe G1 Z3 G1 X100 Y200 F3000 G1 Z0 M109 S After all, enjoy the convenience of Auto Bed Leveling!
With this file you will be able to print RepRap Prusa i3 bed auto-level with your 3D printer. Click on the button and save the file on your computer to work, edit or customize your design. You can also find more 3D designs for printers on RepRap Prusa i3 bed auto-level.