ReprapGuru I3 X Axis Tensioner
thingiverse
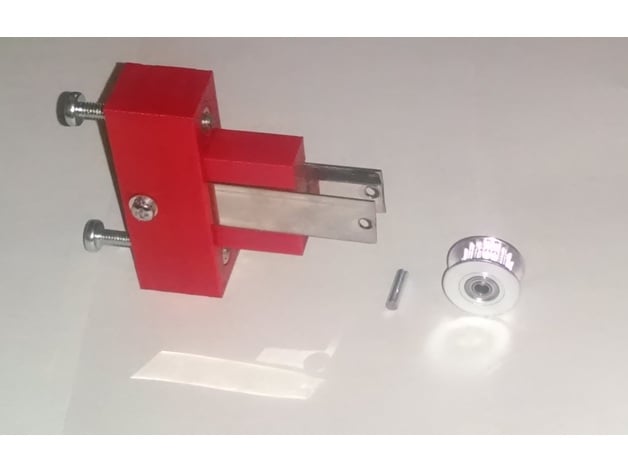
Update 2/11/17 Added pictures. For most Prusa I3 machines, getting sufficient tension on the belts is a challenge. The X Axis belt is particularly difficult to manage. This problem becomes even more pronounced when you have to take the belt off and re-install it in its trimmed form, only to find that you can't get enough purchase on the belt to pull hard enough to achieve the desired tension. The RepRapGuru I3 (original or V2 with the display) is not immune to this issue. Spring clips are not a viable solution as they introduce their own artifacts to the print by allowing the belt tension to be variable. Fortunately, these machines have a nice open through-slot on the left side of the X Axis assembly where we can add our own tension block. On my prints, I started noticing X-axis shifting, indicating that the belt was slipping during the print which ruined several long print jobs. This led me to come up with a solution. Instructions The left side of the X axis features the belt idler pulley secured by an M3 bolt and lock nut. We can replace this static bolt with our tension block, allowing us to adjust the tension easily using two M4 screws. You can print this in PLA or ABS; either works well. Steps: Print the part supplied here. In addition, you'll need: (2) M4 bolts x 30mm or larger, then sized to allow for adjustment without too much sticking out. (2) M4 nuts. (1) Strip stainless steel; recommend K&S #87163 available online or at Ace Hardware for less than $2. Cut two 60mm lengths from the strip. (1) M3 bolt or 3mm steel rod to act as a replacement axle for the idler pulley. Cut and trim this to be exactly the same width as the inside of the slot where the idler pulley screw used to pass through, about 11 mm. Be prepared to file it down to size until it's exactly the right length. On each of the steel strips, drill identical 3mm holes at each end, along the centerline of the strip. See the assembly diagram above. I used a 1/8 inch bit which is just slightly larger than 3mm, and I taped the two strips together to ensure alignment. Dismount the X axis belt and remove the M3 bolt and lock nut that secure the idler pulley. Insert the two steel strips into the block, secure them in place by reusing the M3 bolt and locknut from the idler pulley. Insert the two M4 nuts into the nut traps in the block. Insert the M4 screws from the outer face and thread them onto the M4 nuts, but just flush, not all the way through. Mount the idler pulley onto the exposed ends of the steel strips. Do so until you have applied enough pressure to lessen the amount of deflection you can get if you try to pinch the belt together. Be reasonable though, and be warned: too much tension can pull the Z Axis smooth rods in towards each other. I've supplied the Fusion 360 source file so that you can make adjustments for your application. If you come up with an improvement to it, please share it back! Notes: I'm not sure that the stock plastic idler pulley will give you enough clearance on the sides to make this work. I had occasion to change out the stock idler pulley, so I replaced it with an aluminum 20T dual bearing pulley which is what I used when designing the part. You could also go toothless, like stock: https://www.amazon.com/gp/product/B01BTTEQU0/ref=oh_aui_detailpage_o02_s00?ie=UTF8&th=1 If you have the stock idler pulley, you could try thinner steel; it should be plenty strong at half the thickness. IE: http://www.acehardware.com/product/index.jsp?productId=106613346 Print Settings: Printer: RepRapGuru I3 v2 Rafts: No Supports: No Resolution: 0.2 mm Infill: 30% Notes: PLA seems to be just fine.
With this file you will be able to print ReprapGuru I3 X Axis Tensioner with your 3D printer. Click on the button and save the file on your computer to work, edit or customize your design. You can also find more 3D designs for printers on ReprapGuru I3 X Axis Tensioner.