ReRouter - Make an Extensible IoT Router
thingiverse
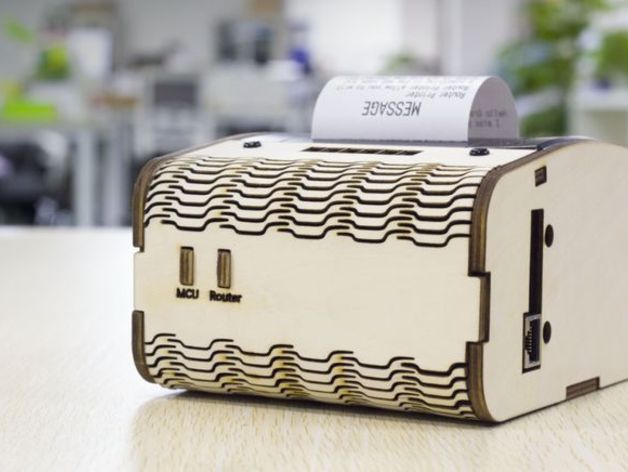
This text appears to be a tutorial on how to build an IoT router using a Linkit Smart 7688 board and a MediaTek Cloud Sandbox (MCS) account. The tutorial consists of 14 steps that cover software development, hardware preparation, and laser cutting. Here is a summary of the steps: **Software Development** 1. Install required Python dependencies using pip. 2. Configure the MediaTek Cloud Sandbox (MCS) account and create a new prototype for Linkit Smart 7688 named LinkitRouter. 3. Upload Arduino code to the Linkit Smart 7688 board. **Hardware Preparation** 4. Prepare materials such as wood, screws, studs, rivets, glue, tape, screwdriver, and laser cutter. **Laser Cutting** 5. Laser cut a box using the prepared materials. **Software Setup** 6. Download code from GitHub and navigate to the RouterScript folder. 7. Edit UpdateSensor.py and relay.py files using vi editor. 8. Set up the startup script by creating a new file called "router" and making it executable, then moving it to /etc/init.d/ and enabling it. **Hardware Assembly** 9. Assemble the hardware components, including the wood box and Linkit Smart 7688 board. **Testing** 10. Connect to the Linkit Smart 7688 Wifi AP and access the Router Printer web page. 11. Test the printer by inputting text in the textbox and clicking Print Message. 12. Go to the MCS website and check the test device, including controlling the relay and viewing sensor values. **Final Result** 13. The tutorial concludes with a picture of the completed router and a description of its features. Overall, this tutorial provides a comprehensive guide for building an IoT router using Linkit Smart 7688 and MediaTek Cloud Sandbox.
With this file you will be able to print ReRouter - Make an Extensible IoT Router with your 3D printer. Click on the button and save the file on your computer to work, edit or customize your design. You can also find more 3D designs for printers on ReRouter - Make an Extensible IoT Router.