Resin mixer // Mezclador de resina
thingiverse
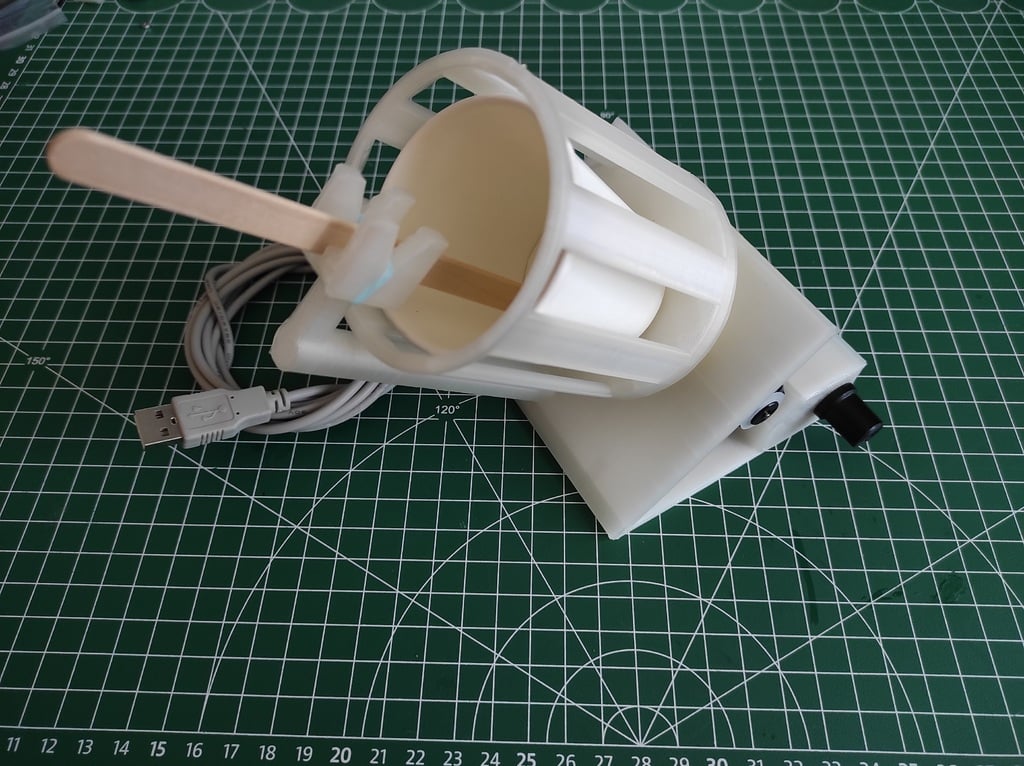
Created to ease the mix of the resin at a proper (adjustable) speed so bubbles are not created. This is the description of the parts: - Basev7: the stand where to mount all the other parts. - palov3: the part to put a stick to mix the resin inside the container. - cogv3: remix, used to connect the motor to the cup. It is recommended to glue both parts together. - cazov2: the container where to put a paper cup, a silicone cup or anything else to put the resin to be mixed. - Esquina: optional part to improve the stability of the mixer, to be glued in the inside corner of the stand. Multiple ones can be used. - Pata: optional part in case you want to raise the stand and modify the angle used to mix the resin. Non 3d-printed parts (with links): 1x 3v-6v motor: https://www.aliexpress.com/item/1005004042688989.html 1x Motor controller: https://www.aliexpress.com/item/1005004223443730.html 3x M3 nuts: https://www.aliexpress.com/item/32798773566.html 3x M3 x 30mm screw: https://www.aliexpress.com/item/32798773566.html Wooden sticks: https://www.aliexpress.com/item/1005005428656900.html 1x Rubber band: https://www.aliexpress.com/item/1005005103083647.html 1x M3 x 12mm screw to screw the cup to the motor through the cog: https://www.aliexpress.com/item/4001074924245.html 1x USB Cable Cable Soldering iron NOTE: you can use as well M2 nuts and M2x30 screws. In order to connect the motor to the stand it is highly recommended to have an additional tool like pliers as there it not too much space to manuver. Cut the USB cable so you keep the male USB-A connector with the cable (check picture) and connect red (+) and black (-) cables to the side of the controller labelled as "DC IN", the connect the motor to the side labelled as "Motor". ------------------------------------------------------------------- Creado para facilitar la mezcla de resina a una velocidad adecuada (ajustable) para evitar la creación de burbujas. Descipción de las piezas necesarias: - Basev7: la base en la que se montan las demás piezas. - palov3: para poner un palo de madera que se usa para mezclar la resina dentro del contenedor. - cogv3: remix, usado para conectar el contenedor al motor. Se recomienda pegar. - cazov2: el contenedor en el que poner un vaso de papel, de silicona o cualquier otro para mezclar la resina. - Esquina: opcional, para mejorar la estabilidad del mezclador, para ser pegado en la esquina interior del mezclador. Se pueden usar varios. - Pata: opcional en caso de que se quiera elevar el soporte y cambiar el ángulo usado para mezclar la resina. Partes no imprimibles (con links): 1x motor 3v-6v: https://www.aliexpress.com/item/1005004042688989.html 1x controlador de motor: https://www.aliexpress.com/item/1005004223443730.html 3x tuercas M3: https://www.aliexpress.com/item/32798773566.html 3x tornillos M3 x 30mm: https://www.aliexpress.com/item/32798773566.html Palitos de madera: https://www.aliexpress.com/item/1005005428656900.html 1x goma: https://www.aliexpress.com/item/1005005103083647.html 1x tornillo M3 x 12mm para atornillar el contenedor al motor a través del engranaje.: https://www.aliexpress.com/item/4001074924245.html NOTA: también puedes usar tuercas M2 y tornillos M2x30. Para atornillar el motor al soporte se recomienda usar un alicate ya que el espacio es limitado. Corta el cable USB de manera que te quedes con el cable y el conector USB-A (el de la foto), conecta los cables rojo (+) y negro (-) al lado del controlador marcado como "DC IN" y luego el lado marcado como "motor" al motor.
With this file you will be able to print Resin mixer // Mezclador de resina with your 3D printer. Click on the button and save the file on your computer to work, edit or customize your design. You can also find more 3D designs for printers on Resin mixer // Mezclador de resina.