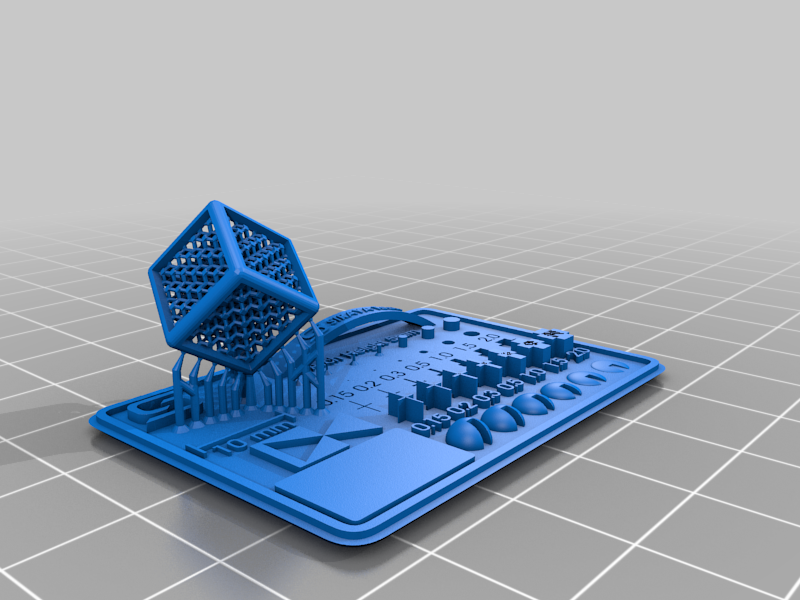
Resin Testprint from Siraya
thingiverse
https://siraya.tech/pages/siraya-tech-test-model # Siraya Tech Test Model V5 ### Introduction: We developed the Siraya Tech test model V5 to be a quick and easy way for the user to determine exposure value for resolution, accuracy, and printability. It is built on previous works from Peopoly, Photonster’s XP2, and many inputs from our talented users. ### What makes it different than other test models? Many 3D printing resin test models on the market have their roots in 2D Printing which the focus is on X/Y resolution. Some are also designed to be a quick print, so it is very flat. This is generally fine for general model resins that are hard and brittle. But those test models can give misleading results when working with non-brittle resin-like Fast and Blu or transparent resin-like Tenacious / Simple. In addition, there is also a need to check out other aspects of print, such as printability, accuracy (shrinkage), and the effect of anti-aliasing. This led us to develop Siraya Tech test model V5. ### How to use the Siraya Tech Test model: 1. Set up a printer and related profile for a resin you want to test in your slicer 2. Place the model in the center of the plate for the smaller printer. For larger printers (12.5” or larger panel), you may want to put it slightly off-center so avoid concave in the center build plate. 3. Print and wait for the results 4. For initial checking of results, you can stop the print at 3.5mm height (70 layers for 50um layer height) to check.  5 Make sure the print is cleaned and cured for checking. This gives your best data. 6 Once you have test results, Check for following This section is for the resolution  You can see how all the holes and pins are showing to determine if the resolution is enough for your application. What do we mean by that? If you are printing for visual effects, such as a delicate model piece, you want to see the pins printed while all the letters and crosses, especially negative ones, are fully open. If the pins have ones that are not fully formed. You can increase normal layer exposure time by 10% to see if only the 0.15 pins fail. But if you see more than one pin fail, you may want to up your exposure time by 30%. If you see the recessed texts are covered up, especially 0.2. It may mean your exposure is too much and needs to be decreased. Try a 5-10% decrease in exposure time and see if that helps. 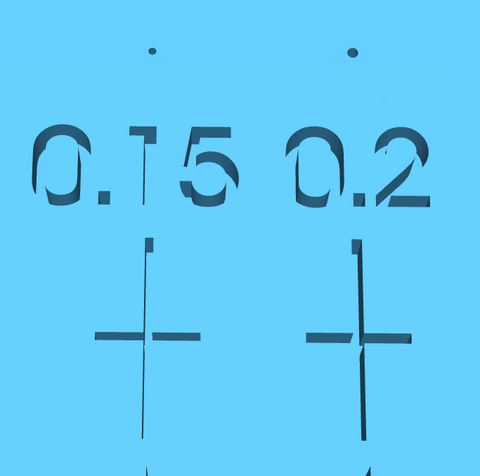 Another way to check to see if exposure is too much is by checking the triangle feature here:  If the edges and angles are sharp, exposure is pretty good. If the edges are round, then you may be over exposing. Another way to check exposure is the small circular objects:  If you are exposing correctly, the edges of the slits (opening of the circle) will not expand to become fatter. You can also spot stacking marks on the circle if AA is not turned on. - Once you have found an exposure that looks to give you good results, you can print the entire model to check the printability of your setting. Many test models can give misleading results because they do not check if the setting can print difficult models. So the idea is to create a good stress test for real-world printing to see how the setting can handle a more difficult situation. The cube in our test model represents a more difficult than average print:  And the support on the cube, especially the tips, is where things are most likely to go wrong.  So once you have a setting, run the entire test and see if the cube comes out clean with no defects. If so, congratulations! You have a pretty good setting for the resin you are testing. If the cube does not print, then you may have to increase the exposure time. For most printing, print success should prioritize overprint resolution, so it pays to be slightly overcuring if you are printing a challenging model. - What was described above is for general model resin and includes our Fast, Simple, and Easy resin. However, not everything is designed for max resolution, and some are more for strength, impact resistance, or other material properties. So, in that case, you may have to change your calibration criteria. Blu, for example, not being able to print 0.15 pin is ok if you are curing for better tolerance. Or for Tenacious, it is flexible, so it may be too difficult to print the cube. You only need the test model to tell you a good ballpark exposure so you can print with decent resolution and a high success rate without sacrificing the flexibility of the material (overcuring makes a print stiff) - Other nice features of the test mode: Shrinkage checking Right next to the cube is the 10mm measure:  When the test model is cleaned and cured, this can tell you how much shrinkage is. The bars on both ends help with measurement. The AA Arch It is right above the pins  This is designed to check the effect of AA (anti-aliasing). AA expresses differently on different panel/slicers/boards/resin, so you can use this to find the best AA level for your application. We recommend no-AA for using the test model when calibrating for exposure. - ### The note space  Next to the triangle is the note area where you can mark the test pieces to help you remember and compare exposure and other test data.
With this file you will be able to print Resin Testprint from Siraya with your 3D printer. Click on the button and save the file on your computer to work, edit or customize your design. You can also find more 3D designs for printers on Resin Testprint from Siraya.