retractaWDT - a retractable WDT Tool for Baristas
prusaprinters
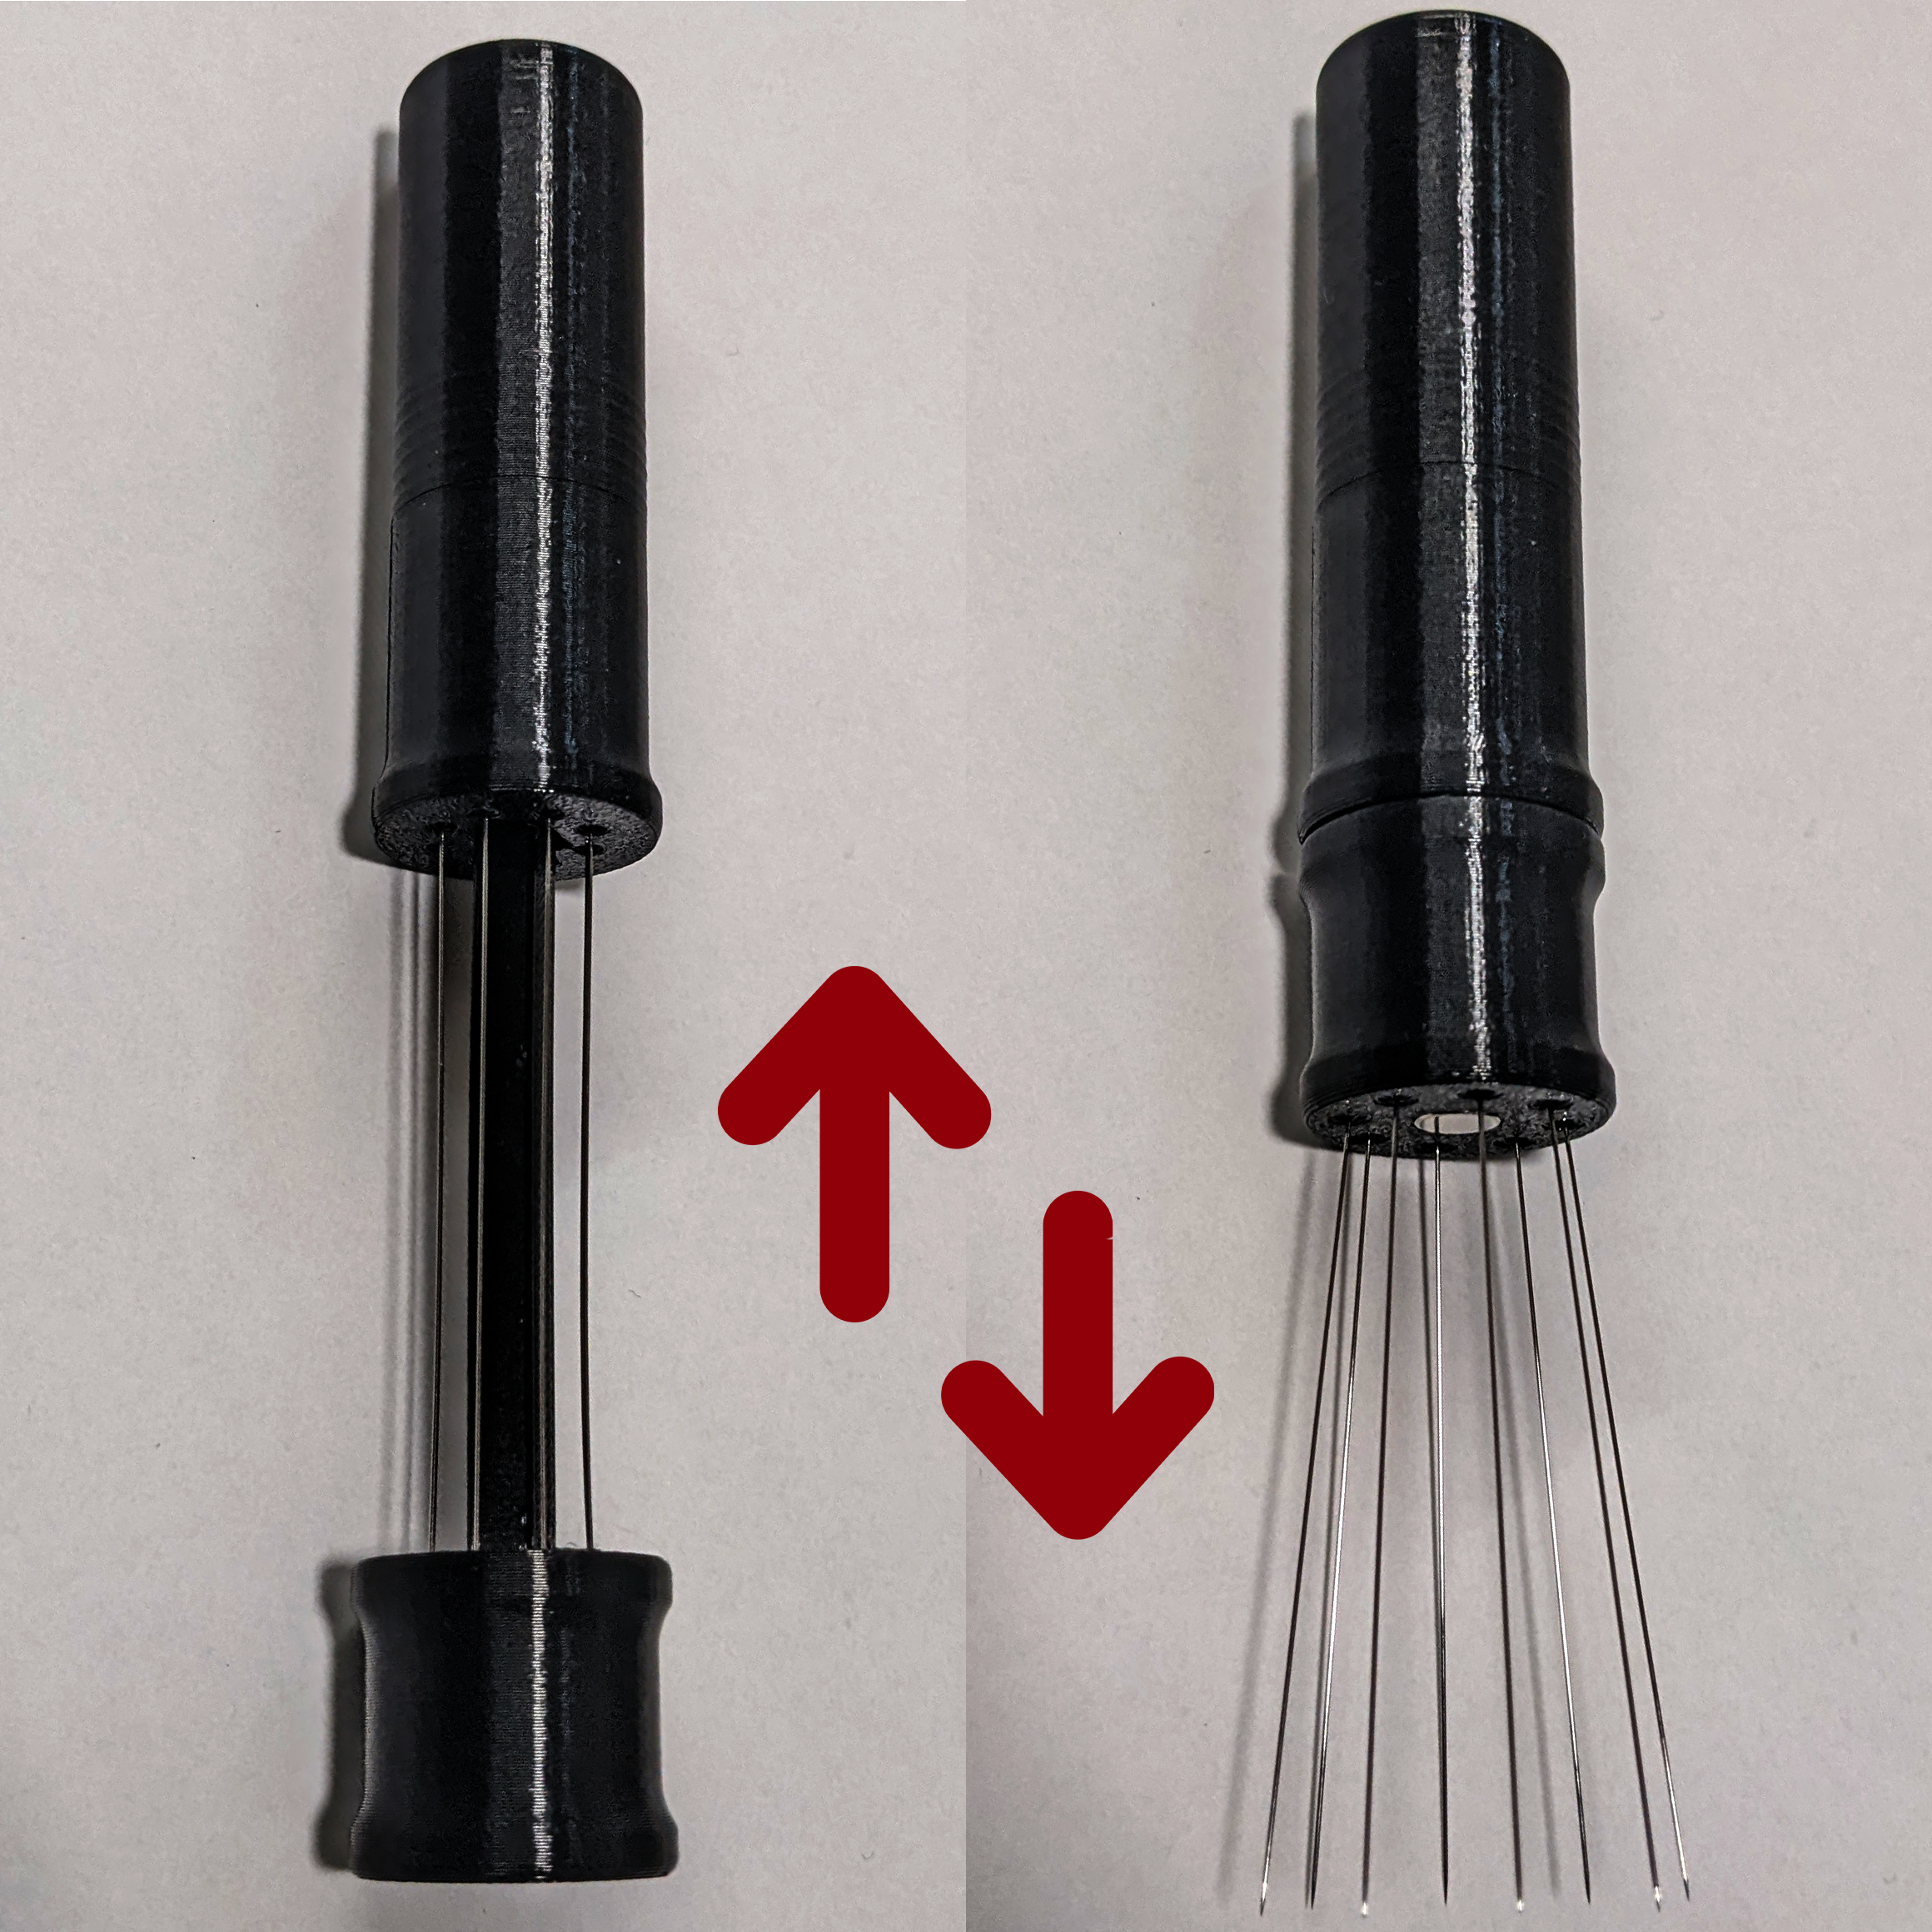
<p>I love espresso. I love making espresso. </p><p><strong>But I hate needles!</strong></p><figure class="image image_resized image-style-align-center" style="width:66.71%;"><img src="https://media.printables.com/media/prints/320491/rich_content/8bb750d0-ba2d-4b6f-9982-b4c2ed1187d6/pxl_20221119_135720857.jpg#%7B%22uuid%22%3A%2260e6f36c-d5d8-422f-ba2d-709a01ef530e%22%2C%22w%22%3A2586%2C%22h%22%3A2586%7D"></figure><h3>What is this thing?</h3><p>A WDT tool is used to stir freshly ground coffee. By distributing the powder evenly you reduce the chance of channelling and your espresso is always perfect (no guarantee!).</p><p>Many WDT tools use acupuncture needles because they are very fine and work great. <strong>BUT I HATE NEEDLES!</strong></p><p>My take with this tool was to hide the pointy end of the needles when the tool is not in use.</p><h3>What do you need?</h3><figure class="image image-style-align-right image_resized" style="width:37.04%;"><img src="https://media.printables.com/media/prints/320491/rich_content/f8b56988-1cb6-4a1a-9d28-4e47b67a99c4/pxl_20221119_133354596.jpg#%7B%22uuid%22%3A%22b1ec22d9-e883-480d-9a46-140fa149a8ca%22%2C%22w%22%3A1720%2C%22h%22%3A1720%7D"></figure><ul><li>Some 3d-printed parts<ul><li>retractaWDT_upper</li><li>retractaWDT_middle</li><li>retractaWDT_lower</li><li>retractaWDT_shaft</li><li>retractaWDT_cap <i>(optional for extra safety)</i></li><li>retractaWDT_sleeve <i>(optional for extreme safety)</i></li></ul></li><li>a very short piece of extra filament</li><li>2x magnets (6mm diameter/ 2mm height) <i>(only needed if you want the cap or the sleeve)</i></li><li>8 acupuncture needles* </li></ul><p>*I am using the same needles that come with some 3d-printers to unclog nozzles. You can buy them all over the net. Watch out for the following sizes:</p><ul><li>0.35x75mm or 0.4x75mm</li><li>I got a whole bunch of them here: <a href="https://www.aliexpress.com/item/1005001467649993.html">https://www.aliexpress.com/item/1005001467649993.html</a> </li></ul><h3>How do you print it?</h3><figure class="image image-style-align-left image_resized" style="width:33.41%;"><img src="https://media.printables.com/media/prints/320491/rich_content/2931b988-3ed9-48e8-97b5-be98ec389556/wdt_slicer.png#%7B%22uuid%22%3A%2277a3fc1c-c98a-452c-b2f2-4db9aa2a730e%22%2C%22w%22%3A589%2C%22h%22%3A589%7D"></figure><p>I used my Original Prusa MK3S with MMU2S and some modifications.</p><p>0.2mm layers, standard profile.</p><p>You have to orient some of the parts for easiest printing (look at the picture).</p><p> </p><p> </p><p> </p><p> </p><h3>How do you assemble it?</h3><figure class="table"><table style="background-color:#E0E0E0;border:1px solid #fa6831;"><tbody><tr><td><figure class="image image_resized" style="width:100%;"><img src="https://media.printables.com/media/prints/320491/rich_content/0242f2a7-5ed8-4074-b005-210fe203aeaf/pxl_20221119_133419084.jpg#%7B%22uuid%22%3A%223f98b33b-704d-4d7e-b622-b340c270d905%22%2C%22w%22%3A1512%2C%22h%22%3A1512%7D"></figure></td><td>Insert the shaft into the middle piece.</td></tr><tr><td><figure class="image image_resized" style="width:100%;"><img src="https://media.printables.com/media/prints/320491/rich_content/630fbfe5-cbff-4239-813a-6e074f75932a/pxl_20221119_133439727.jpg#%7B%22uuid%22%3A%22e72bdbfe-8691-4e5b-81fd-256cee3b9984%22%2C%22w%22%3A1220%2C%22h%22%3A1220%7D"></figure></td><td>Click the shaft into the lower piece. Watch out: There is a wrong an a right direction to do this. If it clicks in, you did it right!</td></tr><tr><td><figure class="image image_resized" style="width:100%;"><img src="https://media.printables.com/media/prints/320491/rich_content/df3e3bd3-d1eb-4ea5-8897-1e8a0cdf9580/pxl_20221119_133511225.jpg#%7B%22uuid%22%3A%22e3213021-8e1e-4161-a6ab-b231d81122b4%22%2C%22w%22%3A1940%2C%22h%22%3A1940%7D"></figure></td><td>Insert a short piece of filament (1cm is enough) in the hole in the bottom of the lower part. It blocks the shaft from coming of.</td></tr><tr><td><figure class="image image_resized" style="width:100%;"><img src="https://media.printables.com/media/prints/320491/rich_content/9d28bfa2-ad51-4fe2-949a-8f08880d2581/pxl_20221119_133618319.jpg#%7B%22uuid%22%3A%227ccbe47f-7c68-4487-9f40-7e3847002a7a%22%2C%22w%22%3A2196%2C%22h%22%3A2196%7D"></figure></td><td><p><i>This step is only needed if you want to use a cap or the sleeve:</i></p><p><i>Insert magnets in the lower part an in the cap/sleeve.</i></p></td></tr><tr><td><figure class="image image_resized" style="width:100%;"><img src="https://media.printables.com/media/prints/320491/rich_content/64769e7a-a1f2-40a6-a039-c2f7044447f9/pxl_20221119_133738218.jpg#%7B%22uuid%22%3A%2202fb04e1-f08b-4163-b1aa-26f661611e96%22%2C%22w%22%3A1120%2C%22h%22%3A1120%7D"></figure></td><td><p>Insert the needles.</p><p>This step may be traumatic or satisfying.</p><p>Please be patient!</p></td></tr><tr><td><figure class="image image_resized" style="width:100%;"><img src="https://media.printables.com/media/prints/320491/rich_content/ff2d896b-d06f-41e9-a6b2-126a54f6751c/pxl_20221119_134003627.jpg#%7B%22uuid%22%3A%22e5fab40f-9ff4-48d9-a8fa-376b54907b04%22%2C%22w%22%3A1820%2C%22h%22%3A1820%7D"></figure></td><td>Push the needles all the way in and move the middle part up.</td></tr><tr><td><figure class="image image_resized" style="width:100%;"><img src="https://media.printables.com/media/prints/320491/rich_content/5f75f9d0-2dd0-41b7-b08f-0ed3377b1603/pxl_20221119_134322491.jpg#%7B%22uuid%22%3A%22c96dd662-5d13-4ac8-96ee-c92b57662cb0%22%2C%22w%22%3A1824%2C%22h%22%3A1824%7D"></figure></td><td><p>Screw the top part on.</p><p>If you use PETG this is gonna be really tight. PETG on PETG produces a lot of friction. It may help to warm the threads of the middle part with a lighter.</p></td></tr><tr><td><figure class="image image_resized" style="width:100%;"><img src="https://media.printables.com/media/prints/320491/rich_content/d788ceda-efd3-46de-922f-3d28ab2f18e3/pxl_20221119_134359459.jpg#%7B%22uuid%22%3A%22603b5810-7994-4a23-a483-1d79e2b4394b%22%2C%22w%22%3A1144%2C%22h%22%3A1144%7D"></figure></td><td><p>You did it!</p><p>Go make an amazing espresso!</p></td></tr></tbody></table></figure><p> </p>
With this file you will be able to print retractaWDT - a retractable WDT Tool for Baristas with your 3D printer. Click on the button and save the file on your computer to work, edit or customize your design. You can also find more 3D designs for printers on retractaWDT - a retractable WDT Tool for Baristas.