Retro Monitor
thingiverse
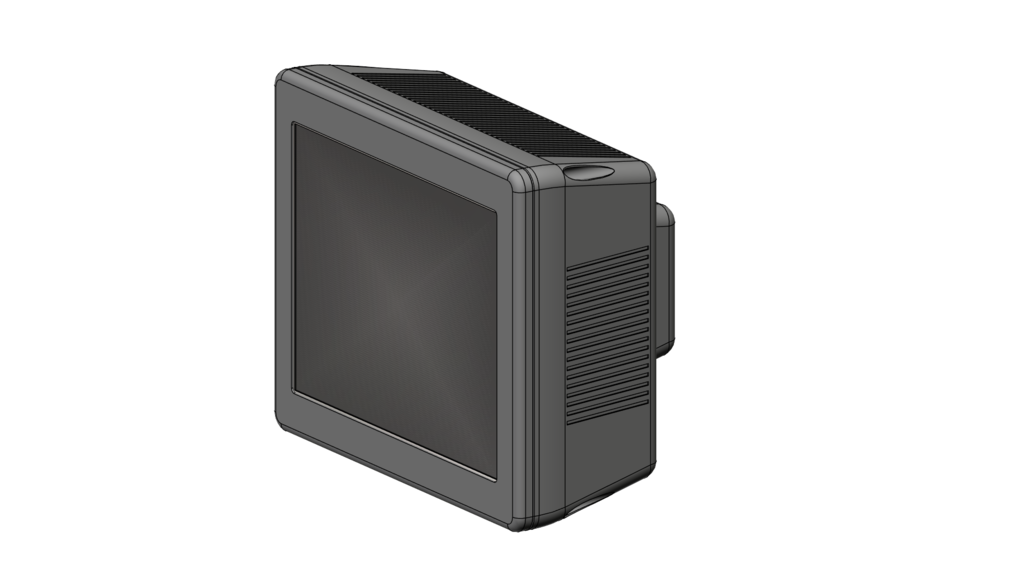
08.01.2022 - Happy New Year! Retro Monitor It's been many, many, months since I last uploaded a 'Thing', or indeed logged in Thingiverse. Here's a New Year gift to anyone who has an interest in retro electronics, and wants a suitable monitor enclosure for their computer or arcade setup. The basic idea is a fairly simple one, and not new, but I hope all will agree this take on the idea is very well implemented: -Take a modern LCD panel and driver board -Mount it inside a suitable box -Use that either as a nifty little monitor or as an enclosure for a complete system So why is this version? -A good deal of thought has been put in to the aesthetics -The enclosure has been carefully designed so it will be: a) easy to print, support not necessary, but check your print size is adequate b) robust c) very flexible in application, with a comfortable viewing angle built in d) a doddle to use in both landscape and portrait modes without compromise e) a 9-ish" screen hits that small size vs usability sweet spot f) easy to modify for any chosen panel ...it even has angle adjustment when used in portrait mode The case itself has been designed to be as modifiable and modular as possible. With that in mind I have included the original CAD files in several popular formats for easy modification but no .stl files for printing. You will need to fiddle a bit first, export your .stl files for printing, then run them through your preferred slicing software. I have also included mounts for: -Raspberry Pi A+, B, Pico -MiSTer -RC2014 Pro -A typical LCD driver board footprint ...along with suggested 'cut outs' for things like wires, ports, switches, buttons, LED's, etc. All these 'extras' are pre-located in what I consider to be suitable positions, but feel free to move / add / delete to your heart's content. A perfectly reasonable option would be to print the case 'as is', then drill holes and mounts when you have a better idea of positioning. As provided the enclosure is set up to accept a 9.7" 2048x1536 panel as used by some iPads - Model No: LP097QX1-SPC1 https://it.aliexpress.com/item/1005002113658592.html There is no reason why you couldn't use any alternate panel and suitable driver board, it would simply be a matter of adjusting the aperture size if the measurements are close, or cut the enclosure in quarters through the aperture if more drastic repositioning is needed. A tip: The driver board included in the aliexpress link is absolutely fine, especially as it's HDMI and includes a header for speakers for easy wiring. But it will be no good for retro systems without a good deal of faffing with converters. Equally the panel resolution is serious overkill for retro systems. Much better to go for a decent cheaper panel of lower resolution, and a driver board that supports things like VGA, S-Video, Composite, or even SCART, from the get-go if your intention is to build a monitor for an old computer. If your chosen driver doesn't support sound that really isn't an issue, fleaBay has loads little amplifier boards that will suit perfectly. I've not included any suggested speaker mounts, there are just too many options - DIY or hot glue, the choice is yours! Panel Choice: You absolutely don't have to go for the suggested panel. -alter the aperture size to be 0.2mm larger all round than the outer dimensions of the panel -more 'good' is more important than more resolution -an aspect ratio of around 4x3 is nearly always better than any widescreen panel -if you're shooting for a jack-of-all-trades more resolution is good to hide mismatches -resolutions that are an exact multiple of your X, Y, or preferably both, really help -save some money and pick the lowest resolution panel that's suitable Driver Board Choice: Unless you're recycling buying a panel + driver combo will save you a lot of headaches. Think very carefully what your application is going to be BEFORE you buy. If you buy something with HDMI only you're going to be SOL if the intended hardware is composite only. HDMI enabled driver boards often come with headers for speakers, which is nice. But if you go that route and think you're being clever by buying such a board knowing it's also got an older video input for your use case do check that it's also got an audio input other than HDMI. You can always buy a dirt cheap, but decent, audio amplifier PCB if you want to include sound so don't let that be your deciding factor. A driver board that comes with adjustment buttons is nice, but consider where you're going to mount them. Of far more importance is a driver that will actually accept the inputs you want at the frequencies that will be provided - Composite, S-Video, Component, and SCART are almost certainly going to be fine regardless; PAL or NTSC, but do check. HDMI and Display Port are unlikely to have issues... but it's almost certainly the case the moment you try to plug the 'VGA out' of a retro computer in the the 'VGA in' of any modern driver board you will get nothing but a 'No Signal' or 'Unable to Sync' message! Old computers = 15Khz-ish, and almost no modern display but a projector will cope with that... ...if your driver board has SCART you may find your 'VGA' is fine, but if you have SCART why not use it? Getting Ready: 1) THINK! It's a big print that will take a long time to do. Will it actually fit within your printer's volume? Are you absolutely sure you got all your measurements correct? 2) It's a good idea to do a trial print of just the aperture of the front bezel to be sure the panel will be a comfortable fit. 3) Have you got all your intended parts? -Suitably modified .stl versions of the front bezel, body, and rear section, any mounting hardware you want to include in the print -Screen and Driver board. Are you sure how and where you are going to mount them? -Speakers and amplifier? Are you sure how and where you are going to mount them? -Any system boards? Are you sure how and where you are going to mount them? -If required where are you going to mount the PSU for any system board? -Screws to mount the bezel to the case? Make sure they aren't too long!!! 4) Holes. You may include them in the print or cut / drill after -Power cable holes? -Holes for ports? -Holes for buttons, switches, indicators..? 5) Hot glue is almost certainly going to be your friend; both for securing the panel in the bezel and for attaching anything poking through the plastics. 6) Are you ABSOLUTELY SURE you got ALL your measurements correct? Don't forget that while a well set up 3D printer will do a nice and consistent job what it thinks is a mm may not be exactly a mm!
With this file you will be able to print Retro Monitor with your 3D printer. Click on the button and save the file on your computer to work, edit or customize your design. You can also find more 3D designs for printers on Retro Monitor.