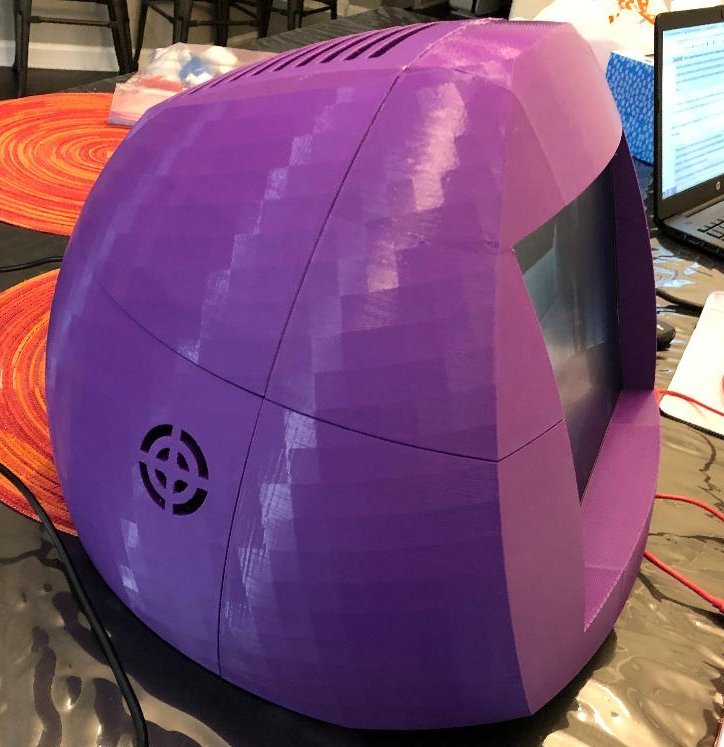
Retro Style Case for 12 inch LCD and single board computer
prusaprinters
<p>I designed this case myself. I wanted it to have a retro look without copying any actual computer case. The parts are small enough to print on a Prusa Mini+, but you need to print without skirts or brims. You also need to be careful with supports to keep them within the printable area. I used eSun PLA+ and a 0.6mm nozzle.</p><p>When gluing everything together, I kept the top half separate from the bottom. This makes the top half act as a lid that can be lifted off for easy access to the internals. The main parts have slots for inserting “biscuits”. These help keep things aligned while you glue it all together and add continued strength afterwards. The parts that make up the front of the case have slots for installing clips that hold the LCD panel in place. Make sure they work properly for your panel before gluing them in. </p><p>I glued this using 3D Gloop which may not have been the best idea. The glue surfaces are so large and complex that I had trouble getting 3D Gloop applied and parts moved to the correct places before the glue set up. Regular super glue might have been easier to use. I suggest testing first with scrap pieces.</p><p>The electronics are parts that I had laying around or salvaged from other systems, so these parts might not be what you will want to use. If your project varies much from this, you may need to tweak my models. I have included links for where you can buy some of these parts, but I don't have records for all of them.</p><p>Non-Printed Parts List:</p><ul><li>Salvaged 12 inch LCD panel from a broken laptop</li><li>LCD controller from Ebay</li><li>I2S 3W Speaker Bonnet <a href="https://adafru.it/3346">https://adafru.it/3346</a></li><li>Stereo Speakers <a href="https://adafru.it/1669">https://adafru.it/1669</a></li><li>Raspberry Pi 3B+</li><li>64GB micro SD card</li><li>Fourteen M3*6 screws</li><li>Eight M2.5 x 10mm standoffs</li><li>Twelve M2.5 x 6mm screws</li><li>HDMI to VGA adaptor <a href="https://www.amazon.com/gp/product/B00SW9JI9A/ref=ppx_yo_dt_b_asin_title_o02_s00?ie=UTF8&psc=1">https://www.amazon.com/gp/product/B00SW9JI9A/ref=ppx_yo_dt_b_asin_title_o02_s00?ie=UTF8&psc=1</a></li><li>Short VGA cable</li><li>5V 2.5A power supply for Raspberry Pi 3B+</li><li>12V power supply for LCD control board</li><li>Multiple Zip Ties for cable management</li><li>Anker Power Strip <a href="https://www.amazon.com/gp/product/B07PPQDW97/ref=ppx_yo_dt_b_asin_title_o07_s00?ie=UTF8&psc=1">https://www.amazon.com/gp/product/B07PPQDW97/ref=ppx_yo_dt_b_asin_title_o07_s00?ie=UTF8&psc=1</a></li><li>Power Socket <a href="https://www.amazon.com/gp/product/B06XNMT3WL/ref=ppx_yo_dt_b_asin_title_o09_s00?ie=UTF8&psc=1">https://www.amazon.com/gp/product/B06XNMT3WL/ref=ppx_yo_dt_b_asin_title_o09_s00?ie=UTF8&psc=1</a></li><li>Power Chord for use with power socket (salvaged)</li><li>USB 3.0 Mount Cable <a href="https://www.amazon.com/gp/product/B06WWNZ18N/ref=ppx_yo_dt_b_asin_title_o01_s01?ie=UTF8&psc=1">https://www.amazon.com/gp/product/B06WWNZ18N/ref=ppx_yo_dt_b_asin_title_o01_s01?ie=UTF8&psc=1</a></li></ul><p>I removed the plug from the Anker Power Strip and wired it directly into the Power Socket that is mounted at the back of the case. (You can see this in a couple of the photos.) I used a normal 120V power chord to go from the outside of the Power Socket and plug into the wall.</p>
With this file you will be able to print Retro Style Case for 12 inch LCD and single board computer with your 3D printer. Click on the button and save the file on your computer to work, edit or customize your design. You can also find more 3D designs for printers on Retro Style Case for 12 inch LCD and single board computer.
