 thingiverse
Reverse Engineering Lesson
Students learn about the engineering process while taking a part of an object and trying to recreate it using modeling software and 3D printing.
Print Settings
Printer Brand:
MakerBot
Printer:
MakerBot Replicator (5th Generation)
Rafts:
Yes
Supports:
No
Resolution:
0.1
Infill:
100%
Notes:
I always use a raft, but it is probably not necessary.
How I Designed This
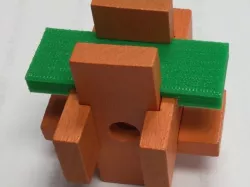
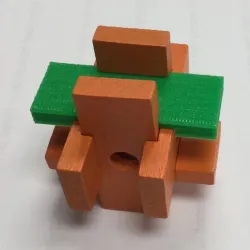
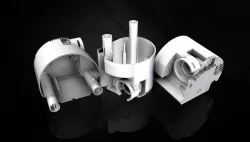
How I designed this is the heart of the lesson. I took a toy found in my classroom and duplicated a piece of the puzzle using Tinkercad design software. I then printed it and used it to replace the piece I duplicated.
Overview and Background
Reverse Engineering Lesson
Students will learn about reverse engineering, by taking a piece of an object and recreating it in 3D software. If they are successful, they can use their part as a replacement for the original. Objectives
Define reverse engineering as the process of disassembly and careful analysis with the goal of duplicating or improving a device or component.
Demonstrate the process of reverse engineering using a given object or component and suggest areas of improvement. Skills Learned
Analyze data from tests to determine similarities and differences among several design solutions to identify the best characteristics of each that can be combined into a new solution to better meet the criteria for success. (Grades 6 - 8)
Develop a model to generate data for iterative testing and modification of a proposed object, tool, or process such that an optimal design can be achieved. (Grades 6 - 8)
Math
Grades 6–8 students should– understand both metric and customary systems of measurement; understand relationships among units and convert from one unit to another within the same system; understand, select, and use units of appropriate size and type to measure angles, perimeter, area, surface area, and volume.
Grades 9–12 students should– make decisions about units and scales that are appropriate for problem situations involving measurement Lesson Plan and Activity
The instructor begins by describing the reverse engineering process. Each student group will be assigned a part of an object (in my case it was a piece of a wooden puzzle). Students will measure their part and draw it in three views on the engineering design paper. (Example of design drawing in "files")
After instructor approval of the design, students will then use 3D design software to create a printable part. The parts will be printed, and tested against the original part. Students are successful if their part goes back into the original object and performs the same or better than the original part. Day 1
Explain the reverse engineering process, and why it is necessary. This will be a good time to discuss what measurement units would be best to use (In Tinkercad, metric (mm) is the default) Students could begin to disassemble their given object to prepare for the design process. Day 2
Students measure their assigned part and sketch it out on paper. showing all dimensions. They will need to understand that they will need to show three views - Front, Top and Side, in order to get the complete 3D structure. Day 3-4
Depending on the complexity of the part - my part took 5 minutes to design.
Printing time is dependent on the number of parts printed, capacity and speed of printer. Materials Needed
Toys or objects that can be disassembled (and reassembled) - one for each group.
3D design software with accounts for all students
Handout (in "files")
Students will need something to measure their parts. Calipers and Rulers are recommended.
Duration of Lesson
3-4 Days Rubric and Assessment
Students will be assessed on the quality of their drawn design (are there 3 views?, Do they line up? Is all information necessary included?)
Students will also have to show that their reverse-engineered part works as well or better than the original part.
References
http://www.teachengineering.org/activities/view/cub_engineering_in_reverse
Direct link to the original creator's page
Also Available On
More from mom0sarah

Similar Models


Model Specifications
Frequently Asked Questions
How do I download Reverse Engineering Lesson?
Click the "View on thingiverse" button above to visit the original model page on thingiverse. You can download the STL file directly from the creator's page for free.
What 3D printer can I use for this model?
This STL file is compatible with most FDM 3D printers (Creality Ender 3, Prusa MK3S+, Bambu Lab, etc.) and resin printers (Elegoo, Anycubic). Check the original page for recommended print settings and materials.
Is this 3D model free to download?
Yes, this model is available as a free download on thingiverse. Some creators accept tips or donations.
Can I modify this STL file?
Most STL files can be modified using free software like Blender, TinkerCAD, or Meshmixer. Check the license on the original thingiverse page to see if modifications are permitted by the creator.