Reverse lens adaptor for macro photography
prusaprinters
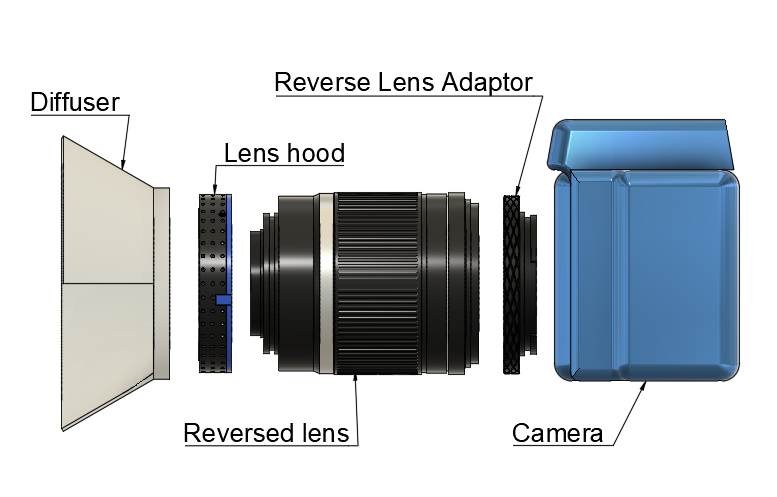
<h3> 3D Print your Macro Photography</h3> <h3>In Brief</h3> <p>This adaptor allows you to take macro photographs with Canon EF or EFS lenses. It was designed with kit zooms in mind. All examples use a kit 18-55mm kit zoom. Heavier lenses may need support.</p> <h3>The Series</h3> <p>The adaptor is part of a collection of 3D printed macro photography tools:</p> <p><strong>*Reverse lens adaptor</strong> <strong>*Lens hood for reversed lenses (Part of Reverse Lens Adaptor).</strong> <strong>*Diffuser for reversed lenses</strong></p> <ul> <li>Specimen/object mount (<a href="https://www.thingiverse.com/thing:4935214">Here</a>).</li> <li>A coupled reversed lens adaptor (<a href="https://www.thingiverse.com/thing:4950226">here</a>).</li> <li>Macro tube kit (Due Sep. 2001).</li> <li>Box to carry adaptors (Due Sep. 2001)</li> <li>Manual slider rail for focus stacking (Due Oct 2001).</li> <li>Fully automated slider rail for focus stacking (Due Oct 2001).</li> <li><p>Micro adaptor (In planning) Detailed <a href="https://www.instructables.com/3D-Print-Your-Macro-Photography-part-2-the-Reverse/">Instructables</a> support all tools. (See each tool)</p> <p>### How it works</p> <p>This adaptor screws into the filter thread on the front of your lens. The other side has an EF/S camera mount. When reverse mounted, your lens behaves like a macro. My kit 50:55 acts like a 3:1 macro.</p> <p>### Reverse Lens Hood and Diffuser</p> <p>The reverse lens hood isn't essential but stops stray light from entering the lens, protects the delicate rear element, allows you to attach filters, a diffuser. You can also add reflective material that helps light the subject.</p> <p>The diffuser mounts onto the reversed lens hood. It's designed to deflect light from above and behind the lens onto the subject. It's most valuable when used with the internal flash.</p> <p>### Subjects, Example Images, (Lef to Right)</p> <p>Alligator clip, spring, moss, souvenir spoon, fossil</p> <h3>Print Settings</h3> </li> </ul> <p><strong>Printer Brand:</strong></p> <p>Prusa</p> <p><p class="detail-setting printer"><strong>Printer: </strong> <div><p>i3 MK3 MMU 2</p></div><strong>Resolution:</strong></p> <p>100</p> <p><p class="detail-setting infill"><strong>Infill: </strong> <div><p>38</p></div><br/> <strong>Filament:</strong><br/> [</p> <h3> Various PLA or something more robust if you have it ](http://www.amazon.com/s?url=search-alias&field-keywords=Various+PLA+or+something+more+robust+if+you+have+it&tag=thingiverse09-20) Black, blue and clear <br/> <p class="detail-setting notes"><strong>Notes: </strong> </p><div><ul><li>Two colour version files have an 'MMU' suffix. They come as one file, you'll have to split them into parts.</li> Ideally, you would use 0.1 layer height because the threads are fine, but 0.2 can work. Please refer to the instructable for details about printing Post-Printing</ul></div></h3> <p><a href="https://www.instructables.com/3D-Print-Your-Macro-Photography-part-2-the-Reverse/">See Instructable</a>. Particularly concerning 'cleaning' threads</p> <h3> How I Designed This</h3> <p>I designed this using Fusion 360. Fusion didn't have the fine threads I needed in its thread library, so I used the 'Coil' feature. Even though the EF mount is simple, I had trouble getting it precise. Surprisingly the best method was to take photos flat on. Top and side. Ensure these were corrected in software and then trace over them in Fusion 360. If nothing else, this helped with 'seeing' what the problem was.</p> </p></p> Category: Camera
With this file you will be able to print Reverse lens adaptor for macro photography with your 3D printer. Click on the button and save the file on your computer to work, edit or customize your design. You can also find more 3D designs for printers on Reverse lens adaptor for macro photography.