RGB Headphone Stand
thingiverse
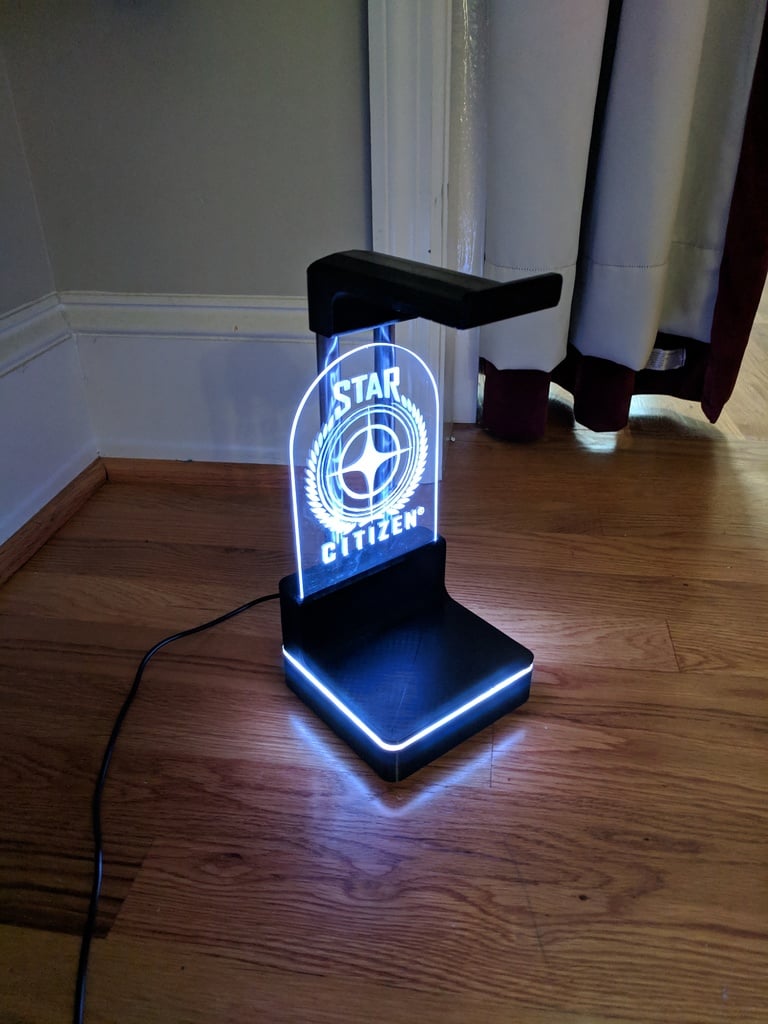
This is a headphone stand, with an integrated RGB light ring, and a slot for an etched acrylic panel with a logo of your choice. There is space inside the base for an LED controller and a power port in the back. EDIT April 9, 2019: I updated the base bottom and lid to bring the screw holes and posts 3mm closer in, to avoid hitting the LED cradle. I enlarged them before posting the original version, but didn't account for that in their placement. EDIT April 14, 2019: I made a couple more enhancements, to improve the strength of the screw posts and to help the LED cradle print more easily in ABS as well as reduce heat buildup in it. The LED cradle should now be printed right side up (make sure to remove any bumps from the supports as they may be visible at the edge). The screw posts were actually pretty strong if correctly glued, but I put all four on a single piece with more surface area to glue to the underside of the lid. This also helps with alignment. FYI I use this glue: https://www.amazon.com/gp/product/B003HNFLMY. Notes/build tips: * This is designed to use two pieces of 1/2" steel tubing as vertical supports. There are holes for these in all the relevant parts. * The unit is designed for 'high-density' LED strips which can be cut every 2 inches, like these: https://www.amazon.com/gp/product/B006L8UAZU. * The LED strip above comes with an infrared controller, which won't be able to receive the IR signals from the remote from inside the unit. Unless you modify the base to include a port for the IR receiver, you will want to swap the controller for a wifi-based one like this one: https://www.amazon.com/gp/product/B0778TNKC6. * The LED cradle (BaseLEDCradle.stl) should be printed in clear or translucent filament, with 100% infill, to get the best light transmission. You may want to print it in ABS to better deal with the heat generated from the LED strip. If you do, you may need to enlarge it slightly due to shrinkage. * There is a channel in the LED cradle for the LED strip. Cut a 16" piece of strip (eight 2" sections), and lay it in the side and front channel, then across the little shelf in the back, pointing up for the acrylic sign (see below). * The slot in the top is for a piece of 1/8" acrylic. You can etch or engrave whatever design you like into that*, and the RGB light will come up through the bottom and illuminate it. Consider etching onto the back of the acrylic if you want the front to be smooth. * You may want to measure the width of the slot after you print, but to fit the lid as printed on my machine, the acrylic piece ended up needing to be about 107mm wide. There are little shoulders in the bottom of the slot to hold up the panel and keep it from falling through and hitting the LED strip underneath. Cut small 3mm square notches into the bottom corners to allow the sheet to sit properly. * You can improve transmissivity through the bottom by applying clear nail polish to the bottom edge, or (better) by flame-polishing the bottom edge with a propane torch. * Some glue is required. The top mount should be glued to the top cap. The screw posts come in two varieties, for tapping and for brass inserts, and should be glued to the underside of the lid. I sized the posts for 1/2" #6-32 screws. The main concern here is not tightening the screws too tightly, or the screw posts may break loose from the lid. * I put a hole in the center of the back for power, but you will likely need to enlarge or modify the hole depending on what kind of power connection your LED controller has. Mine has a 2.1/5.1mm barrel plug, so I reamed out the hole to accept the barrel jack, and then hot glued it in place. * If your printer is like mine, the parts should be printed in the orientation in the .stl files (a couple are upside down), to get the best finish on the visible surfaces and hide any necessary supports. *I did this design by hand with an X-Acto knife, because I don't have access to an engraver (CNC or laser). It's up to you to figure out how to engrave your design... there are lots of tutorials on the web, at least :)
With this file you will be able to print RGB Headphone Stand with your 3D printer. Click on the button and save the file on your computer to work, edit or customize your design. You can also find more 3D designs for printers on RGB Headphone Stand.