RGB Uplighter Light: "Doobie Uplighter"
prusaprinters
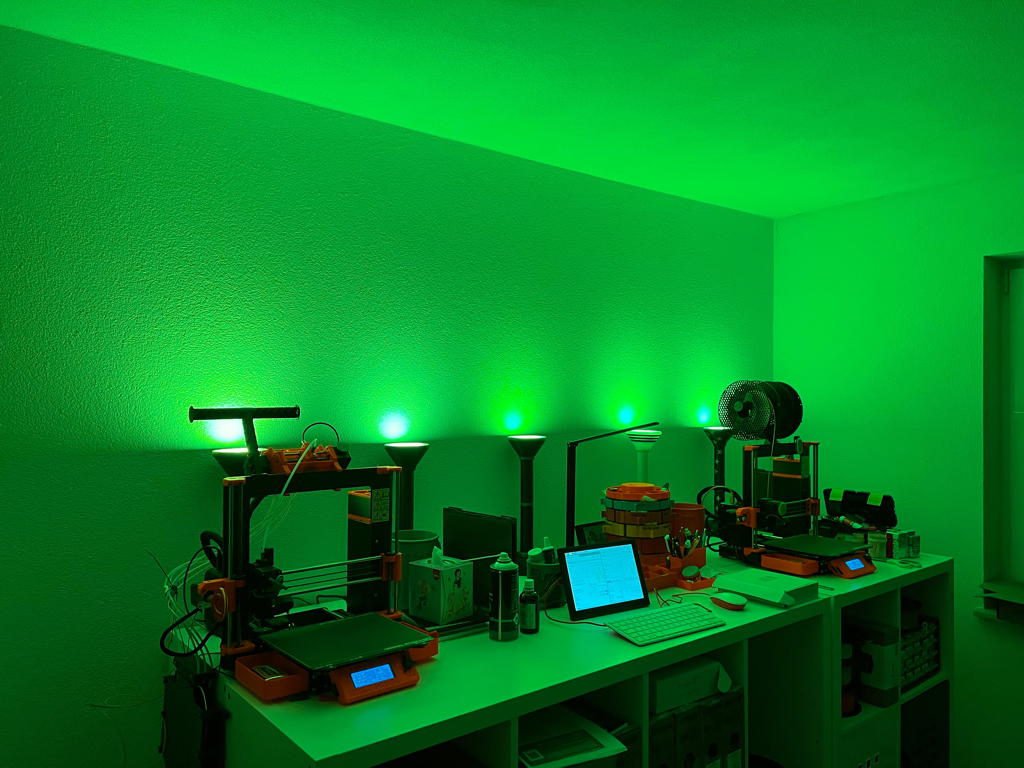
<p><strong>Wat?</strong></p><p>The <i>Doobie Uplighter</i> is a nice slow color changing RGB light for indirectly lighting living spaces. It slowly goes through the RGB spectrum and provides the room with a nice chill atmosphere. The more Doobie Uplighters the merrier!</p><p>There are some designs provided but feel free to design your own. Creating new designs is easy, for example you can use the color change option in PrusaSlicer. I've also uploaded a special edition lamp which looks very nice when printed on an MMU.</p><p> </p><p><strong>Shopping list:</strong></p><ul><li><strong>Arduino Uno</strong> (or compatible microcontroller board), very easy to find, Arduino Uno, Leonardo or Clones go for € 8 - 25. They usually come with an USB cable included.</li><li><strong>CJMCU 8x8 RGB LED Matrix Panel</strong> (with 64 WS2812 LEDs), search for “CJMCU 8x8”, they go for € 7 - 35.</li><li><strong>3 Wires </strong>( 5V, GRND, Data), ideally with Dupont connectors, the length depends on the number of tubes you plan to use, check the assembly guide PDF for exact dimensions.</li></ul><p>Order now, printing will take 1 - 3 days :-) Your parts will arrive once you are ready for assembly.</p><p> </p><p><strong>Building Instructions</strong></p><p>Start by printing every part once:</p><ul><li><strong>Beamer</strong> and <strong>tube</strong> parts are best printed using the <strong>brim feature</strong> in Prusaslicer at <strong>15% infill </strong>and a <strong>layer hight of 0,15 - 0,2 mm</strong>. The threads will be a little harder to screw if you use thick layers. Clean all threads for easy assembly, a drop of <strong>silicone lubricant</strong> will also help.</li><li>The <strong>foot</strong> <strong>parts</strong> are best printed with a little more<strong> infill (20 - 30%)</strong> making the lamp harder to tip over.</li><li>The <strong>diffusor</strong> is best printed in <strong>clear PETG</strong>, clear PLA will do. The lamp will work without, but it just looks nicer.</li><li>Print the <strong>tube</strong> part as <strong>many times</strong> as you need, all my photos show 2 tubes, which works for me. Don't forget the <strong>brim</strong>.</li></ul><ol><li>Connect the <strong>Panel</strong> to the <strong>3 wires</strong> and lead the wires down through the beamer, keep track of the wire colors you use for <strong>5V, GRND, DIN</strong></li><li>Remove the brim and <strong>assemble your tubes</strong> by screwing them together, mind the <strong>wires</strong>.</li><li>Assemble the <strong>foot top part</strong>, mind those <strong>wires</strong>!</li><li>Put your <strong>Arduino</strong> or compatible <strong>inside foot bottom part</strong></li><li>Wire Controller to Board: <strong>5V → 5V, GRND → GRND, Pin 7 → DIN</strong></li><li>You might want to <strong>glue</strong> the Panel inside the beamer or the microcontroller board inside the foot bottom part.</li><li>Use <strong>Arduino SDK</strong> (or compatible) to upload "Doobie_Uplighter_Code".ino" to your microcontroller board. Notice that you can always change the code on your controller without disassembling the lamp.</li><li>Use an <strong>USB cable</strong> and <strong>power supply</strong> for your new Doobie Uplighter or plug it into your <strong>PC, TV</strong> or any other <strong>USB outlet</strong>.</li><li>You are done! Enjoy the calm chill ambiance lighting. </li></ol><p> </p><p><strong>Credits</strong></p><p>I used the Adafruit NeoPixel library for Arduino. Adafruit has their own variety of a 8x8 RGB LED Matrix, which will fit if you clip the topmost pins in the beamer and use 6 small drops of glue. Check out https://www.adafruit.com/product/1487</p><p>The term <i>Dooby Lamp </i>was first coined by Big Clive (http://www.bigclive.com). Later the term <i>Dooby</i> <i>Computer</i> or <i>Doobie Computer</i> was used by his YouTube chat for any kind of blinking or color changing LED matrix assemblies of which there are<i> a lot </i>on his YouTube live channel. <i>Doobie Uplighter </i>consequentially<i> </i>combines<i> </i>slowly color changing LEDs and indirect lighting and is also a word play on lighting up a doobie.</p><p> </p><p><strong>Bruh!</strong></p><p>Stay save, mind local laws and never drive under the influence!</p>
With this file you will be able to print RGB Uplighter Light: "Doobie Uplighter" with your 3D printer. Click on the button and save the file on your computer to work, edit or customize your design. You can also find more 3D designs for printers on RGB Uplighter Light: "Doobie Uplighter".