Ridgid 18V battery to Craftsman 19.2V Tool adapte
thingiverse
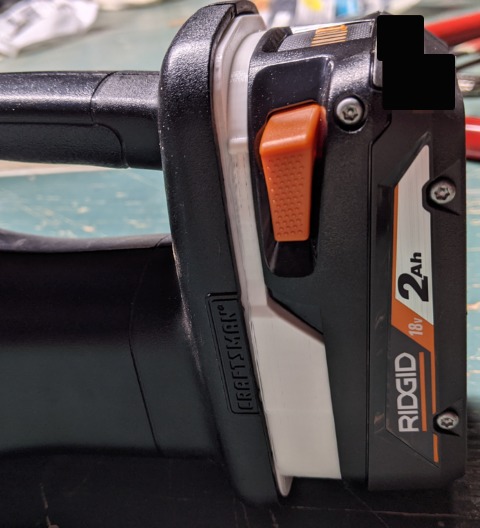
This is a semi-permanent adapter which gets installed into a Craftsman 19.2V C3 tool. Once installed, this will allow you to use a Ridgid 18V battery to power your Craftsman tools. This is a remix from the incredible work of Itnaanti for the Ridgid side of the adapter, and LazyTArrow for the Craftsman side. I can't tag them properly, as the Thingiverse website is having another issues preventing proper tagging. Ivnaanti Ridgid Battery to Ryobi Tool Adapter https://www.thingiverse.com/thing:4362124 LazyTArrow Dewalt 20V to Craftsman 19.2V Adapter https://www.thingiverse.com/thing:3045342 Especially important are the instructions from Itnaanti on how to create the battery contacts. Take a look at the source of this remix for full instructions. Some assembly and hardware is required, Hardware required ------------------------------------ - 2 X 1/4" wide X 41mm long metal strips. (I used metal from dryer ducting, cut with tin snips) - 2 x M3 20mm screws with nuts - 2 X 6" wire (ideally one red, one black) - 2 X 1/4 tab spade connectors (optional) Printing process ------------------------------------ Print one each of: Ridgid battery adapter (no support, Itnaanti's model ) Ridgid battery adapter lid (no support, Itnaanti's model) Ridgid battery to Craftsman 19.2 Tool MK2 (supports everywhere) Assembly instructions ------------------------------------ - Take one of your metal strips, and follow Itnaanti's instructions to create the battery terminals. I've included his photo in these instructions for clarify. Be sure that the metal strip is not taller than the 'battery adapter' - Solder one end of each wire to the lead you have just fit into the battery adapter. (The Ridgid battery has marking to show which terminal is positive, and which is negative, be sure to double check) - Run the wire through the cable race, and up through the lid. - Use a M3 20mm screw, push the screws up through the battery adapter lid, then the battery adapter, and finally though the tool adapter, and tighten. (Note: the screw heads will be on the battery side, and the nuts will be on the tool side). - Prepare each spade connector by flattening down each one, and test fit using a pair of pliers to make sure they are 'gripped' by the battery connectors in the tool. - On the other side of each wire, crimp on a flattened spade connector Using long pliers, push the spade connectors into the terminal. - On my tools, the positive lead is the round side of the housing, and the negative lead is the flat side of the housing. Double check yours before wiring! (Note - you could probably solder the wires directly to the tool connectors for a stronger fit, but I wanted the ability to remove mine. I'd suggest a drop of hot glue to ensure they don't come loose in the future. - Tuck any excess cable into the tool housing, and snap the adapter into the tool. It will take a fair enough of force to clip in. The adapter can be removed by carefully prying around the edge of the adapter with a flat bladed screwdriver.
With this file you will be able to print Ridgid 18V battery to Craftsman 19.2V Tool adapte with your 3D printer. Click on the button and save the file on your computer to work, edit or customize your design. You can also find more 3D designs for printers on Ridgid 18V battery to Craftsman 19.2V Tool adapte.