Ring for a standing windowsill wreath
thingiverse
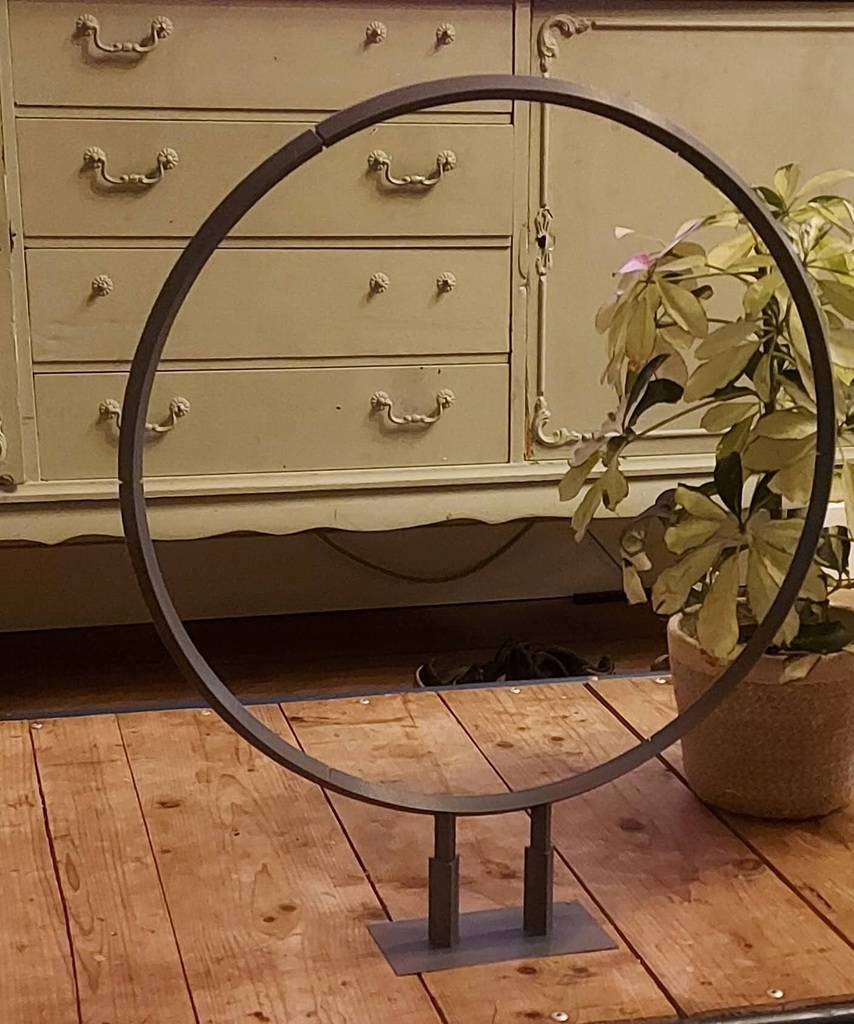
I saw these large metal rings with a bottom plate, meant to be used as a base for a DIY Christmas wreath to place on a windowsill or around the house. I didn't like the size, prize and some other aspects, so I decided to design my own version. It was also a nice challenge to create something big and think of a way to divide it in parts. It can be printed on any printer with a 220mm by 220mm bed. I chose to make the ring triangular. This has a few advantages: -It can be printed mostly hollow, almost without support and with low infill. -when the parts of the ring are connected, they stay in place. you can't twist them -The sharp corners provide some grip for the decoration. much better than the smooth, round metal ring I saw at the store. I printed this with my Anet A8 that had some bed adhesion problems, so I tested printing with a brim and a raft. Because I plan to cover the entire ring with decoration it does not matter to me if the bottom side is a little rough, so printing with a raft was fine. The ring is divided in six parts. You need to print five regular ringparts and one ringpart with legs. Instructions: ==================== 1. Open the regular ringpart in you slicer. 2. Rotate and move the part until it fits nicely on the bed. 3. Change skirt brim or raft settings to your liking. 4. Double check if these settings will not cause the print head or auto leveler to touch any clamps holding the bed plate 5. If you want you can add the same part again. two regular ringparts will fit. 6. After printing, remove the support from the smallest end of the ringpart. 7. After printing two regular ringparts, test them by trying to fit them together. you might need to remove some stubborn support material at the edges. 8. After printing five regular ringparts, print the ringpart with legs. 9. Before printing the bottom plate, you can print the "testbottom" file to test if the ringpart with legs fits snugly in it. If not, you could try to scale it. don't press too hard, because it will tighten. 10. Print the bottom plate and place the ring in it. the legs don't slide down as far as you would expect. Again, don't press too hard. The ring should retain it's shape on it's own. create your own wreath. 11. After the holidays, the ring can be disassembled easily this is my first thing (reuploaded). Feel free to give feedback and/or suggest changes.
With this file you will be able to print Ring for a standing windowsill wreath with your 3D printer. Click on the button and save the file on your computer to work, edit or customize your design. You can also find more 3D designs for printers on Ring for a standing windowsill wreath.