Photo Box 3D Printer Enclosure
thingiverse
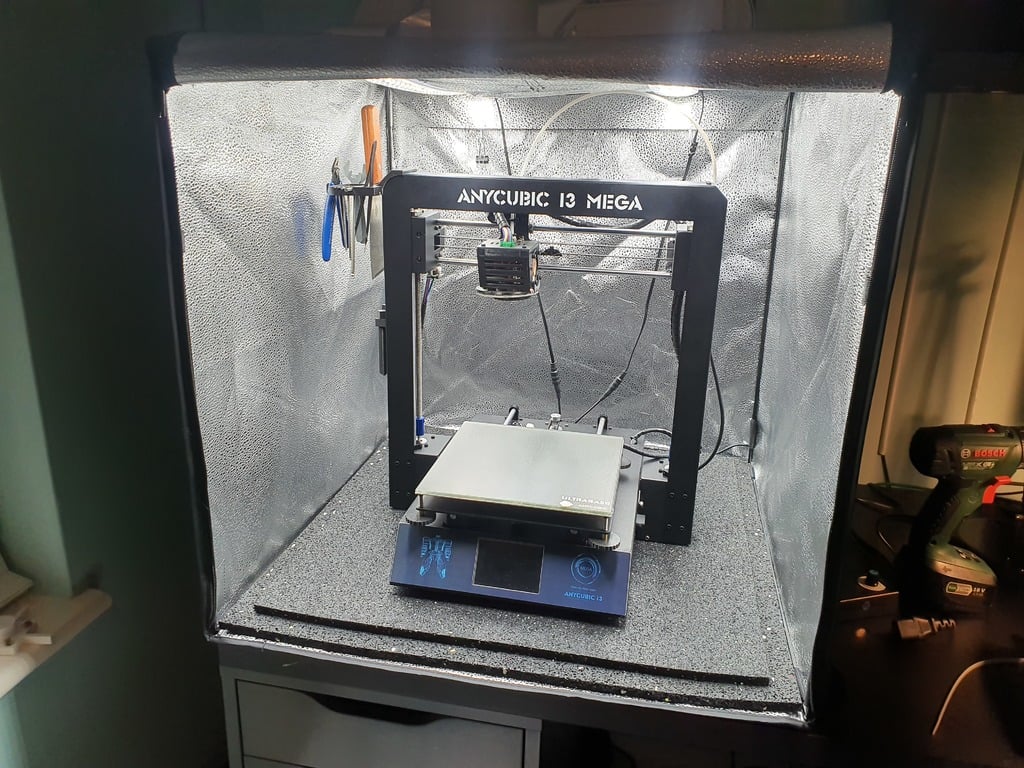
The IKEA LACK enclosure has become a bit of a standard in DIY upcycled 3D printer enclosures. But, after nearly a year of fiddling around with extractor fans, lighting, noise reduction, blah blah blah, I've grew tired of it and wanted to start again and build a slick new solution. This time I wanted to throw some more money at the project, and wanted the following: - Something simple to set up - Can be dismantled and packed away if needed - Lots of lighting! - Keeps ambient heat in for ABS prints (duh!) - Lets ambient heating out for PLA prints - Easy and full access to the printer - Simple, low key aesthetics (I didn't like how the IKEA LACK enclosure looked in my office) - Minimal printed parts (sacrilege, I know!) - Upgradability. At the very minimum I wanted to install an extractor fan to chug those ABS fumes out of the nearby window. But other bits would be nice (e.g. my automatic fire extinguisher solution). So, after browsing around Amazon for potential candidates, I stumbled onto the perfect solution! Ladies and gentlemen behold... The Photo Box* Enclosure! I've also remixed my fan extractor assembly for the IKEA LACK enclosure to work with this. *Technically it's called a "photo light box" but from this point forward I'll be referring to it as a "photo box" ---------------------------------------------------------------------------------------------------------------- ###Parts - Photo Light Box (60cm x 60cm x 60cm) https://www.amazon.co.uk/gp/product/B07TYCH18N/ >The bread and butter of the build, a light box used for photography. Right off the bat this thing ticks a lot of boxes. It comes with it's own lighting solution, a metal frame which can be used for mounting stuff, has a foldable design that allows you to fold it flat and store away, reflective interior for heat retention and light distribution, has a bunch of access holes all in the right places (hur hur!), and looks pretty low key. Plus some extra parts for photography that will come in handy in later in the build. - Anti-Vibration Washing Machine Mat https://www.amazon.co.uk/gp/product/B00QVN1JPA > I've modded my Anycubic i3 Mega to be quiet, but prints with rapid back and forths can still send vibrations through the printer and whatever it's on top of. I use a anti-vibration mat for washing machines to make sure that those all-nighter prints can't be heard anywhere else in the house. Plus, it's 60cm X 60cm which fits perfectly in the photo box (in one of the photos I have a second mat from my LACK enclosure that was 50cm x 50cm, I got rid of it in favour of just the one) - Scythe GlideStream 120mm PWM SC https://www.amazon.co.uk/gp/product/B01D64OXA4/ > I pinched this from my IKEA LACK extractor fan assembly build. The fan comes with a 3 speed controller switch that allows you to increase or decrease RPM's based on your needs. The Amazon link will take you to a listing that's no longer available, but any standard 120mm PC fan will work for this. - 120mm Ultra Fine Fan Dust Filter https://www.amazon.co.uk/gp/product/B00DL4BMVS > Honestly... probably not needed. I just liked the look of it and it hides away the fan blades. - Jack 5.5 x 2.1mm Splitter Cable https://www.amazon.co.uk/gp/product/B07K28ZBH8/ > The photo box comes with it's own lighting solution which is pretty neat. It's 2 dimmable LED strips that fit to the frame of the box, and is incredibly bright at max power (beware, at full power the LED's produce some heat, which you can use to your advantage). Inexplicably though, the light strips have their own individual power supplies, so I used this splitter to power both strips from one power supply. - 5.5 x 2.1mm DC Female + DC Male Plug https://www.amazon.co.uk/gp/product/B01JZ3O36O > So, where is the extractor fan getting it's power? Well, in my enclosure I also have my custom built UV curing oven for my resin prints (you can see it in one of the photos) that uses a 12v switching adapter. I wired the 12v (red) and ground (black) wires from the PC fan to one of these 5.5mm DC jacks, and then use another one of those splitter cables (above) to split the power from the curing oven to the extractor fan. - DC 12V Inline Switch Cable https://www.amazon.co.uk/gp/product/B07HD5MLBB > I use an inline switch cable for the fan... you know.... so it's not always on. - 12V Switching Power Supply Adapter https://www.amazon.co.uk/EFISH-Switching-100-240V-Electronic-Components/dp/B07C1QKKY4/ > I have a bunch spare, but I assume you're not a plug adapter horder like me, so grab yourself one of these to power your fan. I do not recommend you use the variable power supply from the LED strips, it will affect the performance of the fan. - M3X42 mm Black screw https://www.amazon.co.uk/gp/product/B000BM7XDO > To hold the fan assembly together - 6mm x 600mm metal rod x 2 > Got these from the local hardware store. I got solid ones, but they were a tad expensive, so you can get some hollow ones if you can find them. Doesn't have to be 6mm in diameter, but the STL's I've uploaded are all built for these 6mm rods. That said, I had to widen the holes on the prints with a dremmel to get them to fit properly. I'll add the TinkerCAD links so that you can adjust the holes to what ever rod size you're using. > Also, the rods i bought were 1000mm and I hacksawed them down to size. If you're going to do this DO NOT cut them to 600mm exactly like I did. I didn't account for the brackets and had to file them down a bit. I think 592mm - 595mm should do the trick. I also had to dremmel the brackets to fit the rods into them. - Carbon Filter (2mm thick) https://www.amazon.co.uk/gp/product/B06XF5MWWK > The STL files accommodate a 2mm thick carbon filter used for cat litters. You can buy thicker ones, but you'll have to adjust the extractor fan assembly to accommodate them. These filters require you to cut them to size, you'll need to cut them down to 120mm x 120mm. - 100mm tumble dryer\cooker hood flexible ducting https://www.amazon.co.uk/INCH-100MM-FLEXIBLE-DUCTING-HOSE/dp/B004X4SSNA/ > I picked up mine from a hardware store, but any 100mm flexible ducting will do. One end goes on the extractor fan assembly outlet pipe, and the other goes out the window. - Universal Window Seal https://www.amazon.co.uk/HOOMEE-Universal-Window-Portable-Conditioner/dp/B07BPZGJ3B/ > It's winter, and you're not paying to heat up your home only to have an open window letting the heat out (thermodynamics 101, cold doesn't go in, heat goes out)! > OK, this is a little flimsy and isn't the most insulated solution, but it is better than an open window. Remember to get one for your window type and size. ---------------------------------------------------------------------------------------------------------------- ###Instructions It should be pretty self explanatory, but here is a simple step guide: 1. Unfold your photo box 2. Install the LED light strips. Use the splitter to split the power from one of the 2 12v power supplies supplied with the photo box. Now you can operate both LED strips with one dimmer. 3. Slap the anti-vibration mat at the bottom of the photo box 4. The photo box comes with a diffuser cloth, cut a 120mm x 120mm square dead center of the cloth. This will be used to "seal" the hole at the top of the photo box as it's a bit wider than the fan assembly so fumes can escape around the assembly into the surrounding room. The cloth gets "clamped" between the fan housing and the carbon filter camp. 5. Remove the 3-4 pin connector from the fan cable. Wire the red (positive\12v) and black (negative\ground) to some extra wiring to extend it's reach (use this guide to solder and shrink wrap them properly and safely: https://www.wikihow.com/Solder-Wires-Together), then screw the other ends into one of the 5.5mm x 2.1mm female jacks. 6. Print all the parts for the fan assembly. Use the blow-up diagram in the photos to see how it's put together, but it's basically: M3 nut -> dust filter (if using) -> fan -> fan housing -> carbon filter -> diffuser cloth with hole -> carbon filter clamp -> fan duct outlet -> M3 screws. Before you put it all together make sure the rods slide through the holes in the fan housing, if not then widen them with a dremel or file. Same goes for the rail brackets. 7. Install the rails and rail brackets to the fan assembly 8. Install the fan assembly to your photo box frame (see images) and hook the diffuser cloth to the frame. 9. Connect up the fan to the in-line switch, and then connect that to the 12v DC switching adapter. 10. Zip tie the 100mm fan duct to the duct outlet and feed the other end out of a window ---------------------------------------------------------------------------------------------------------------- ###CAD Files - Fan Housing - https://www.tinkercad.com/things/1mNWrOTbaN1 - Carbon Filter Clamp - https://www.tinkercad.com/things/55KOu2zFcAn - Fan Duct Outlet - https://www.tinkercad.com/things/35kfZKDIlZJ - Fan Rail Bracket - https://www.tinkercad.com/things/eFPpacpEcXg ---------------------------------------------------------------------------------------------------------------- I'll put up some better pictures and maybe tidy up these instructions when I get the time.
With this file you will be able to print Photo Box 3D Printer Enclosure with your 3D printer. Click on the button and save the file on your computer to work, edit or customize your design. You can also find more 3D designs for printers on Photo Box 3D Printer Enclosure .