RMZ 150 v4 (RAMAC Mini-Z 150)
thingiverse
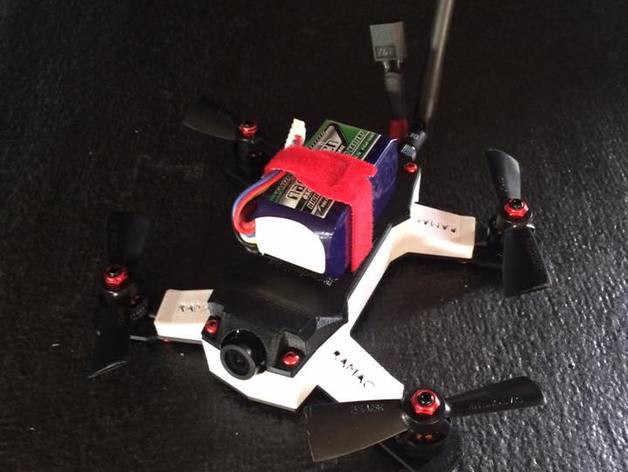
UPDATES AT BOTTOM Printed this today after about 30 hours into it :P (3/5/16) so i havent had a chance to get parts and make sure everything fits perfectly. It has been designed with very particular parts in mind given the very small margin of room. I will list links to the parts it is designed to fit. Let me know what you think! Oh and RAMAC stands for (Redding Area Miniature Aircraft Club), so youll be sportin our name :P Parts: Motors & ESC's- http://www.ebay.com/itm/4-x-1306-3100KV-Brushless-CW-CCW-Motor-4Pcs-DYS-Mini-20A-BLHeli-BL20A-ESC-3030-/121830743584?hash=item1c5dad9e20:g:kz0AAOSwwE5WX~XB Mini Bee Esc's will fit too! VTx & Camera- http://www.amainhobbies.com/rc-drones/rctimer-elgae-fov127-fpv200-camera-transmitter-set-w-lt200-v650-fpv-rtu-cable-32ch-sma-rtrfov127-sma/p449377 Naze 32- http://www.amainhobbies.com/rc-drones/abusemark-funfly-acro-naze32-revision-6-flight-controller-abuacronazer6/p466930 PDB- http://www.amainhobbies.com/rc-drones/red-rotor-mini-esc-power-distribution-board-w-power-filter-rev.3-rrt-mpdbr3/p393552 Also can fit any satellite Rx, (Not sure about full size Rx, its a pretty small craft) We are using Lemon rx DSMX satellites and they fit under the vtx nicely Any 3 inch prop And batteries i would say need to be about 70mm in length or less. You will need 16 (M3x 6mm) screws Standoffs for the center boards are just standard M3 !! V4 Updates !! (3/27/16) Sorry for the delay guys! i know i kept saying i would update but we would have another version, and then find something we wanted to change.. and then another version and another change and so on. lol. So here we are at V4! or 4.1... or 5... lets just call it V4 :P. What we have new... By the way if you have printed V1 you're going to want to print all three components new, as some of the measurements are no longer compatable between versions. Added RMZ150_Bottom_Carbon_v4.stl for those of you that wish to get a bottom plate cut from carbon Lowered "camera cockpit" profile and optimized size Entire frame got a "0.5mm" larger overhaul (was a little too tight on Esc's and FC) USB port got a few more adjustments in size and positioning (still made for Naze32 r6) Changed Esc covers to secure from the bottom (screw now goes through bottom plate and up into the esc cover) for a cleaner look Adjusted a few hole sizes and positions slightly for better fit Added holes for satellite antenna (seen in picture) Removed most of the vents as we arent getting much heat in our builds i didnt feel like they were needed... plus they turned out kinda ugly. And a few other random structural upgrades that youll never visually notice, but i know they're there and it makes me feel warm inside :P Hints & Tips** I've found that the easiest way to secure the camera is to put two zipties crisscrossed across the back and front (Seen in picture), my buddy has his secured with hot glue packed into the mount with it. Both seem to be very firm mounting techniques. When mounting the satellite (particularly the Lemon rx) you'll find it will fit within the mess a lot easier if you take it out of the plastic case, this gives plenty of room to run the xt-60 wires underneath and out the back. The esc's are easily mounted with a pad of double sided tape, they wont go anywhere under those covers, but please do yourself a favor and mount them on the bottom plate and fit the covers over to make sure that they're stuck in the right positions before cutting motor wires and securing them. Place a little piece of double sided tape or padding on top the vtx (as shown in picture), when you put the top cover on it will sandwich the vtx and hold it nice and secure. If you want my honest opinion, i would have to rate this build as an Advanced level build. These components are very small, more fragile during assembly than most of the infamous 250 electronics, and you will be soldering wires straight to the PDB, Naze, and Esc's. There's no room for pins and connectors and definately no room for error. This guy (pointing to myself of course) burnt up 2 Naze boards during the build, we wont get into why, but just be careful guys!! :P Well I think that's about it! If anyone has any questions, suggestions, concerns please dont hesitate to comment or message me! Thanks guys :) Print Settings Printer: Flashforge Creator Pro Supports: Yes Resolution: 0.3 Infill: 50%-100% Triangular Notes: Supports on Top and Enclosure Bottom plate is probably better as 100% infill, The other two are just fine at 50%
With this file you will be able to print RMZ 150 v4 (RAMAC Mini-Z 150) with your 3D printer. Click on the button and save the file on your computer to work, edit or customize your design. You can also find more 3D designs for printers on RMZ 150 v4 (RAMAC Mini-Z 150).