Robo Kitty v1.0
thingiverse
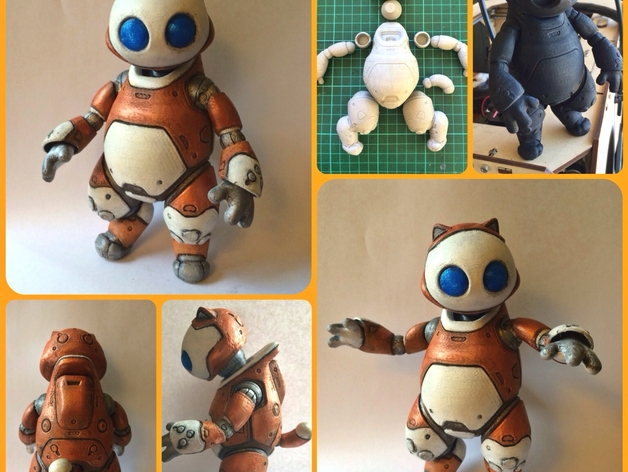
Come join our Patreon!\ For several years now, we've been collecting an extensive assortment of busts, cosplay, props, and various models designed specifically for the Patreon page.\ If you'd like to check out the models that some of our 400+ members enjoy printing, please join our Facebook group!\ https://www.facebook.com/groups/333491834120262/\ Currently, all new members gain access to older models released, so we're talking about suits, full-scale prints (like 1:1 scale articulated Droideka...), helmets, detailed busts, and dioramas all for the low subscription of $10 a month.\ If you think this might be for you, please click on the link below or through the Facebook page.\ https://www.patreon.com/Geoffro\ Update Feb 2017\ I've put this one on hold for a bit, sorry guys. I'll get back to the updates as soon as I can fit in some time for personal projects again.\ Robokitty V2.0 is due very soon. I'm really hoping to get it done by the end of June. There are just too many paid projects that have priority over kitty.\ Development on this Kitty has not ceased; if anything, it's moving forward at a rapid pace. I haven't posted an update for a while because of all the work I've been putting into it now. So many opening compartments have been added, all joints have been done, and I'm just working on tolerances so people can print this as easily as possible, no matter what printer they use.\ There are several new heads, four new torso's with different features, hands that rotate inside the cuffs too, and even fingers that get snap fit joints so they can be manipulated. I got down to the fingers and thought, hey- why not just do it all, so the fingers now also have snap fit joints.\ Featured on 3DPrint.com:http://3dprint.com/51801/robo-kitty-3d-printed/\ You will need to glue the neck to the head, but the neck slots into the body freely, allowing for rotation.\ If anyone has ever used a program called Poser, they may have played with a model called Robo Kitty by Sanctum art, released back in 2009. This low poly rigged figure, while perfect for poser, was never designed nor intended for 3D printing, but I've had a burning desire to rectify that and turn it into a high-res prototype toy.\ I have put on hold many of my other projects to focus on Robo Kitty... I would like to make my next few uploads additions to him, like making all the joints work. For now, I've fused the parts together, so his head and arms are movable. "Why didn't you complete the joints?"\ Because it takes a lot of time. The legs are tricky because they have two ball joints plus a rotating joint below the thigh, which is taking me some time to get right.\ The elbow joints are not easy either - that's two interlocking discs with 'nipples' in the center to lock them in place. THIS IS A WORK IN PROGRESS... But... In the spirit of letting people have things before they're actually completely finished (i.e., instead of a teaser image and no files to download !) here is Robo Kitty for you to at least print version 1.0.\ After a lot of sweat and tears, here he is - now it's down to making all the joints movable and other miscellaneous things. I will add the remix option in the very near future, don't worry.\ Please read the instructions for printing tips... Instructions I printed my sample at 0.2mm in Grey ABS. I used this because it sands very well and does not overheat like PLA can when sanding it.\ The models are pretty high res - it requires little sanding, but I wanted a nice smooth finish as I was really aiming to push what can come out of my printer, and I have to say probably has to be one of the favourite things so far produced. Supports and infill are required for this
With this file you will be able to print Robo Kitty v1.0 with your 3D printer. Click on the button and save the file on your computer to work, edit or customize your design. You can also find more 3D designs for printers on Robo Kitty v1.0.