Robo-Shutta for terraPin Pinhole Cameras
thingiverse
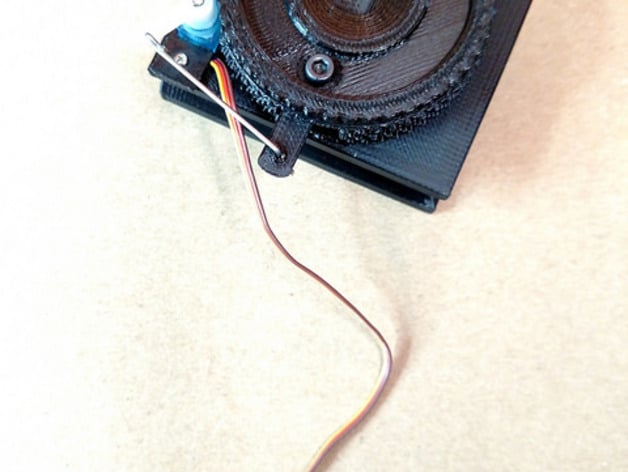
Add remote control to the terraPin camera's shutter! Make pinhole photos operating distant to the camera, or program an Arduino or similar for shutter control. These are alternative extensions for the terraPin 6X6 and 6X9 pinhole camerashttp://www.thingiverse.com/thing:495230http://www.thingiverse.com/thing:577223 The only modifications are to the shutter blade and the body of the extension, which accommodates a small hobby servo to actuate the shutter blade via remote or automated control. I shot a few rolls out the back window of my Prius, controlling the Robo-Shutta from the driver's seat. Click the link for the Flickr Album. I have included a sketch for remote control with an Adafruit Trinket Arduino (semi-) compatible. The Trinket cannot output PWM, but a clever hack uses interrupts to simulate the necessary servo signal timing. Here's a video of a Trinket Arduino compatible microcontroller opening and closing a terraPin shutter ATTENTION This work is licensed under the Creative Commons - Attribution - Non-Commercial license. This license applies only to the files and documents available for download from the Thing Files section of this Thing.All other related content (photographs, videos, and verbiage such as contained in "Description" or "Instructions" ) are excluded from this license. with all rights reserved, unless specifically available for download This notice constitutes a clarification, not a change, to licensing for this design. Instructions These are designed around the Common Sense RC-35 Ultra-Nano Servo. They're small, cheap and strong. The 6X9 Robo-Shutta uses small plates and 3mm bolts to clamp the servo in place. For best results, tap threads in the mounting holes. The 6X6 version is designed to mount with the tiny screws that come with the servo. You will need to drill mounting holes. You should be able to discern relative dimensions from the STL file viewer, but the 6X9 has more pieces. I used #12 piano wire to link the servo to the shutter blade. I used a heated tip of the #12 piano wire to quickly melt a hole in the shutter blade. It's a better method than 3Dprinting the tiny hole. Position the servo arm and the assembled shutter blade at their halfway points in their arcs of travel. Measure the distance between pushrod holes. Carefully shape your push rod from the #12 piano wire.
With this file you will be able to print Robo-Shutta for terraPin Pinhole Cameras with your 3D printer. Click on the button and save the file on your computer to work, edit or customize your design. You can also find more 3D designs for printers on Robo-Shutta for terraPin Pinhole Cameras.