Rocker Switch Housing For PLA Cooling Fan Retrofit (PowerSpec, CTC, Wanhao Duplicator, FlashForge, Makerbot)
thingiverse
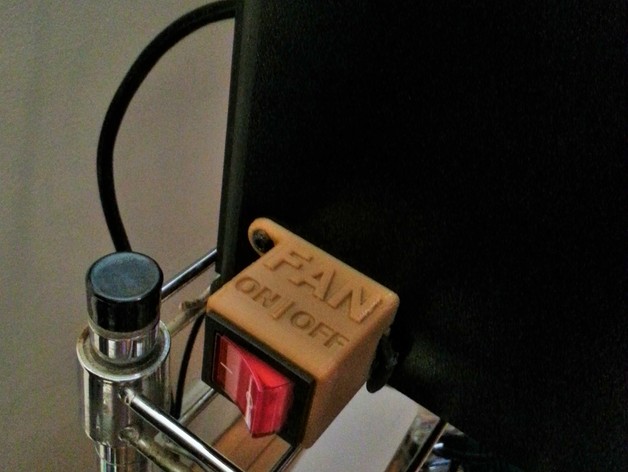
Human: Title says it all. This is the housing for a Rocker Switch to wire and power a dedicated cooling fan to my PowerSpec3D Pro printer (also fits a FlashForge Creator Pro, CTC, Wanhao Duplicator 4, and any other Makerbot Replicator Dual clone). Here's My Parts List: 1EA x 3D Printed Rocker Switch Housing 1EA x 3D Printed Fan Duct (http://www.thingiverse.com/thing:802781) or (http://www.thingiverse.com/thing:537918) 1EA x 40mm CPU Fan 12V (http://www.amazon.com/gp/product/B002OFL1J8/ref=oh_aui_detailpage_o02_s01?ie=UTF8&psc=1) 1EA x 12V DC Power Supply Adapter (http://www.amazon.com/gp/product/B005JRGOCM/ref=oh_aui_detailpage_o08_s00?ie=UTF8&psc=1) 1EA x Rocker Switch (http://www.amazon.com/Green-Light-Illuminated-Rocker-Switch/dp/B008421RRG/ref=pd_bxgy_60_img_y) 5EA x Zip Ties 2EA x Posi-Lock Wire Connectors (http://www.amazon.com/Posi-Lock-Connectors-18-24-gauge-600/dp/B00HT9XJLW/ref=sr_1_3?s=automotive&ie=UTF8&qid=1432601908&sr=1-3&keywords=positap) 1EA x 40" length of Black/Red Wire & 1EA x 2" length of Black/Red Wire (http://www.amazon.com/gp/product/B001JT1CEE/ref=oh_aui_detailpage_o04_s01?ie=UTF8&psc=1) Instructions Here's the Basic Instructions on How I Put Everything Together. Between These Instructions and the Pictures, It Should Be All You Need to Wire This Up as I Did. Cut the End Off the 12V DC Adapter. Strip the Outer Coating from 3-4 Inches of the End of the Wire to Expose the Red and Black Individual Wires. Strip the Red and Black Wires So There's About 1/2" of Bare Wire. Print This Rocker Switch Housing (Without Supports, 30% Infill, 2 Shells) and Print Out Your Fan Duct of Choice. I Printed This Duct: (http://www.thingiverse.com/thing:537918) in Blue T-Glase (PET) Strip the Ends of the 40" Length of Wires and 2" Length of Wires to Expose About 1/2" of Bare Wire. Slide One End of the 40" Length of Wires and the Ends of the Stripped Wires Attached to the Power Supply Adapter Through the Printed Switch Housing. Solder All the Wires Onto the Back of the 6-Pin Rocker Switch According to the Picture of the Wiring Diagram. I'm Sure There Is a Simpler and More Straight Forward Way of Wiring This Fan But I Don't Know Much About Electrical Things and I Had This Switch Laying Around So This Is How I Got It to Work. The Two Notched Out Areas in the Rocker Switch Housing Are for Strain Relief on the Wires. Wrap Each Set of Wires Once Around Its Own Strain Relief Notch. See the Pictures if You're Unsure About What I'm Talking About Here. Unscrew the M6 Screw from the Back Bottom Left Side of the Printer and Screw It Back In with the Housing and Rocker Switch. Use the Zip Ties to Secure the Wires to the Grill on the Underside of the Printer (See Pictures) and Thread the 40" Length of Wire Up Through the Wire Cover. Optional: Install the Posi-Lock Connectors on the End of the 40" Length of Wires and Attach the Corresponding Wires from the 40mm Fan to These Connectors. In the Event the Fan Burns Out, This Will Prevent You From Having to Remove Any of the Other Wiring. Install the Fan and Fan Duct. Zip Tie the Excess Portion of Wires Out of the Way. Plug in the Power Supply Adapter and Whenever You'd Like to Print PLA or Have a Need for Active Cooling on Your Nozzles, Flip the Switch to the ON Position. Just Remember to Turn the Switch Off When You Are Finished.
With this file you will be able to print Rocker Switch Housing For PLA Cooling Fan Retrofit (PowerSpec, CTC, Wanhao Duplicator, FlashForge, Makerbot) with your 3D printer. Click on the button and save the file on your computer to work, edit or customize your design. You can also find more 3D designs for printers on Rocker Switch Housing For PLA Cooling Fan Retrofit (PowerSpec, CTC, Wanhao Duplicator, FlashForge, Makerbot).