RODE NTH100 Headband Fix
thingiverse
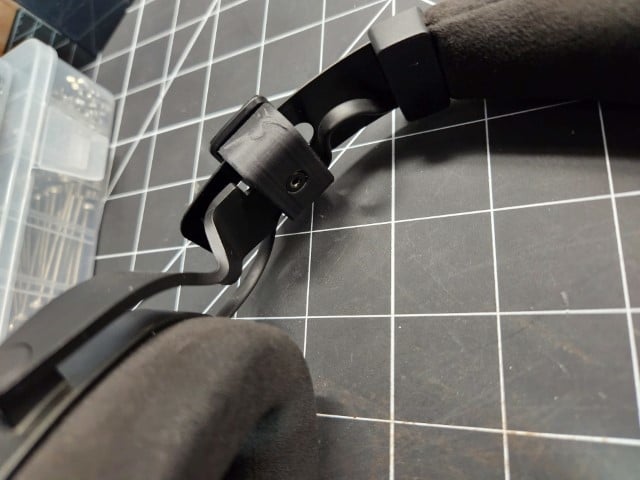
To replace the locking mechanism first you need to remove the hex screw from the inside of the connector, set it and the twist lock that should now come free to the side. Next if it hasnt completely fallen apart by now you need to finish breaking off the outer housing, its all one piece and cannot come off without either breaking it or cutting the wire, please dont cut the wire. inside the casing are 3 parts. a small round leaf spring, a flatplate, and a wire carriage. It should slide down and out of the casing. Set the leaf spring and the flatplate to the side and dont lose these. Now take the Rear case model, printed so the logo is towards the rear of the headphone and slide it over the yoke (the part that is attached to the speaker hosing) fitting it into the hourglass slot in the bottom of the rear case print. Insert the wire into the wire channel it should be a snug fit. Now is the tricky part, place the leaf spring on the FlatPlate so that it fits flush with the profile and the bent tabs on the inside of the spring away from the FlatPlate. Now without dropping the spring, place the FlatPlate into the rear housing. Now we can place it up against the headband once more followed by the appropriate FrontPlate. Insert the Twist lock (the end is keyed so dont force it if it doesn't fit, try a different orientation) into the FrontPlate though the headband and into the RearCase, followed by reinserting the hex screw into the rear of the case. Dont overtighten the bolt or you wont be able to adjust the headband. Enjoy! Feel free to reach out to me on my Discord server for assistance with this!
With this file you will be able to print RODE NTH100 Headband Fix with your 3D printer. Click on the button and save the file on your computer to work, edit or customize your design. You can also find more 3D designs for printers on RODE NTH100 Headband Fix.