Rokid Max - Magnetic Clip-on Light Blocker
thingiverse
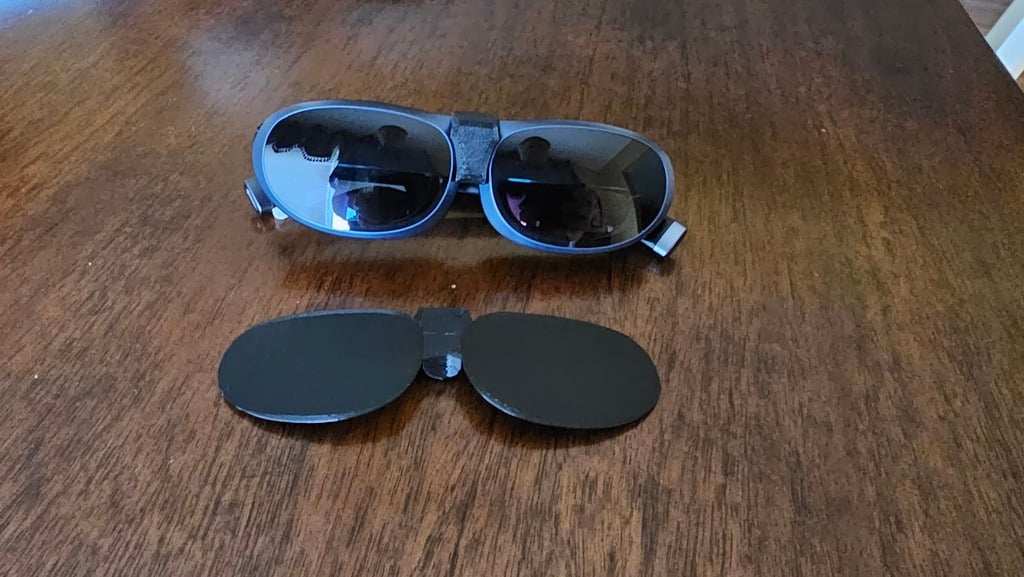
While the stock light blocker that ships with the Rokid Max is actually quite good, I generally prefer to retain a bit more of my peripheral vision when the light blocker is installed, including the ability to look below the glasses. In addition, while the stock light blocker is actually fairly easy to put on and take off, it's still not quite as nice as a [magnetic clip-on blocker](https://www.thingiverse.com/thing:5437892), so I decided to go ahead and create a magnetic clip-on blocker for the Rokid Max that fully blocks the projection area, while maintaining more peripheral vision around the frame of the glasses. This design is made so that the magnets can actually be embedded into the print itself. To do this you need to modify the gcode so that the printer pauses at the appropriate layer, insert the magnets into the print, and then continue the print. Most decent slicers should have an option to pause the print at a specific layer or height. When printed at 0.2 layer height, I had to pause at layer 11 for the clip, and at layers 11 and 16 for the blockers. This print is designed around these magnets, which I found at my local Home Depot: [1/4 in. x 0.06in Dia Neodymium Rare-Earth Magnet Discs](https://www.homedepot.com/p/Master-Magnet-1-4-in-Dia-Neodymium-Rare-Earth-Magnet-Discs-with-Foam-Adhesive-12-Pack-97584/206503481?irgwc=1&cm_mmc=afl-ir-2003851-1420157-EdgeBingFlow&clickid=RsQ30KxNaxyPW6HVA0VoJw1jUkF2KqSry3Jqzk0) The adhesive backing needs to be removed before inserting the magnets into the print. This was easy enough to do with my fingernail. For the top two magnets, I used one N and one S magnet. The flipped poles help the blocker to better align when popping it on. The lower magnet's pole doesn't matter so long as the poles on all the magnets in the clip and the blockers are reversed. For simplicity, both the clip and the blockers are designed to print flat with no supports. After printing, the lens portion of the blockers need to be bent in slightly like butterfly wings so that they sit closer to the lenses when installed. This can be done simply by running the print under some hot water right where the lens meets the magnetic center, and then bending the wings down slightly using your fingers. If you have any trouble with the bridge clip itself being too tight or too loose, hot water can also be used to fine tune that fit as well. I printed in PLA, which works well because of the ability to adjust the "wings" post-print.
With this file you will be able to print Rokid Max - Magnetic Clip-on Light Blocker with your 3D printer. Click on the button and save the file on your computer to work, edit or customize your design. You can also find more 3D designs for printers on Rokid Max - Magnetic Clip-on Light Blocker.