Rollpad: Fridge notepad for roll of adding machine paper
thingiverse
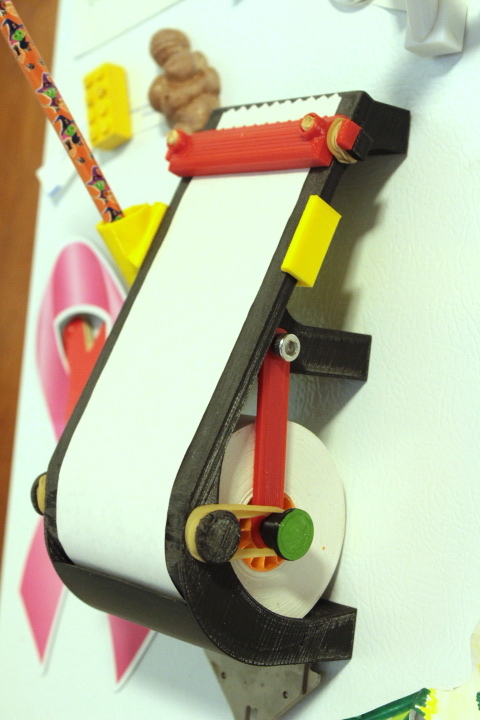
This is a "notepad" for the fridge (though you could also use it, upside-down, placed on a table or desk). I designed it for rolls of paper that I have, which are: * 2 1/4" wide * 2 5/8" in diameter * 1/2" diameter hole through the spool **Print these parts:** * main.stl (this is the main body of the thing; probably print with writing surface flat on build plate) * cutter.stl (this is the paper cutter) * cutter-post.stl X2 (or you can find some 4-5mm posts of some kind, like bamboo skewers, and glue/press them into the main body; they need to be guides to keep the cutter moving up and down in a fairly straight line; tolerance ~0.2mm). **Update: The cutter probably doesn't need to move up and down at all; if it is fixed in place with a gap allowing the paper to slide under it, that seems to work OK.** * axle.stl (this goes through the center of the paper spool). Print horizontal, with supports and maybe a raft, for best results. Alternatively, just use a 6-8mm rod of some kind, and make it long enough that the rubber bands don't fall off the ends. * arm.stl X2 (the arms connecting the axle that goes through the paper spool to the pivot points on the main body). **6/5/2019 Update: Arms now beefier around axle; they seemed a bit thin in first version.** * axle-cap.stl (these go on the ends of the axle so the rubber band doesn't fall off; you might need to heat them or glue them, depending on your printer setup; tolerance = 0). **Other stuff you'll need** * Four (4) rubber bands (to keep pressure on the cutter and on the spool) * Two (2) M5 screws for the pivot on the spool arms. * Nine (9) 8mm x 3mm neodymium magnets. They should press into the feet (tolerance = 0) but, depending on your printer setup you might need to either heat the feet up a bit first (if the holes are too small) or use strong glue (if the holes are too big). **6/5/2019 Update: The paper roll is pretty heavy if it's full-size. Nine magnets is not quite enough for a slippery fridge (the unit slides down when you write on it) but seems just fine if the fridge is a little less slippery.** **Assembly** * Attach the arms to the main body * Place the paper spool in the main body * Attach the axle caps to the ends of the axle * Wrap rubber bands around the posts and tabs * Adjust the rubber bands to get the desired tension **Pen Holder** Print as in the file (i.e., widest part of cone sort of pointing down, but "front" of bracket flat on build plate). Snap on (I hope) as shown in the image with the green pen holder in it. I designed the pen holder for a right-handed person (the holder is on the left of the rollpad), but it can be easily adapted for a left-handed person by *mirroring* the part (right-to-left) in Cura , Meshmixer, or your slicer/3D program of choice. Note: pen holder v1 and v2 are identical except that v2 sticks out a bit more in the wide part of the "cone". IDK which will be more ergonomic/useful.
With this file you will be able to print Rollpad: Fridge notepad for roll of adding machine paper with your 3D printer. Click on the button and save the file on your computer to work, edit or customize your design. You can also find more 3D designs for printers on Rollpad: Fridge notepad for roll of adding machine paper.