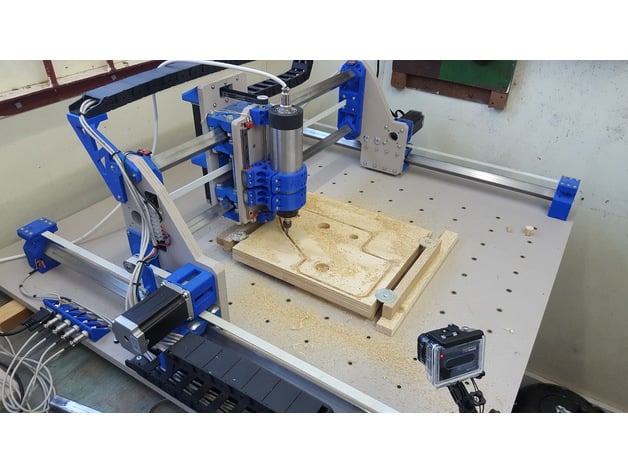
Root 3 CNC multitool router 3D printed parts
thingiverse
Official Website! Join our forum and ask questions with our community. https://www.rootcnc.com Info Current Version = R3 The Updated version of Root2 CNC is here! I've been completely blown away by the community that's been created by this project, and listening to all the comments and suggestions made - R3 was created. R3 keeps the same design goals as before, but since then a lot has been learned and areas for improvement have been highlighted. There have been many changes implemented on this revision, some radical and some minor, though all the changes have been implemented to increase configurability, rigidity, flexibility, accuracy, and also reduce the amount of different parts required. R3 supports the use of the largest NEMA23 motors and also the NEMA17 motors depending on the user's configuration. Its accuracy has also been increased by removing the second loop of belt on the Y-Axis while still keeping the two sides of the gantry connected together. The second loop of belt introduced a position error when a load was applied to the gantry, now there is only single belt length to increase its positional accuracy. By doing this made it difficult to keep the two sides of the gantry relatives to one another (something another 3D printed CNCs suffer with). Though R3's gantry sides are connected together, so no matter if the machine loses power or is disconnected the machine still stays relevant to one another to keep its running true and square. Belt or Lead screw? This has been an interesting topic but no matter what your preference is, R3 has provisions for a Lead screws as drive mechanism for both the X and Y Axis. This does require some of your own design work to fit the type of Lead screw the individual is running though the core R3 shouldn't need any modification and will work with Belt or Lead screws. Linear Guilds for the Z axis?! I know these aren't considered cheap but once all the variables and benefits have been factored in, they become a compelling option to use. Especially for the short lengths the Z axis requires. With the original design there was sufficient play in the carriage due to its minimalist design though R3 has attempted to remove or possibly of play with the wood panel and the use of Linear Guilds. But don't think this is the only limited to linear guilds, R3 keeps legacy support implementing the same linear bearing style design and also legacy Z carriages. Build one Please if you build one post some photos! I would love to see them! Shop If you need parts for your CNC Machine then visit the Root CNC shop https://rootcnc.com/shop/ Facebook Consider joining us on our Facebook group to share and ask questions. https://www.facebook.com/groups/1023078667749894/ Revision History R2.1.1: -Base R2.1.2: -Added Z-Axis Linear Guild Wooden Front & Back Single Compatible Part (.STL) -Nema23 50mm Spacer (Missing from Original) -Nema17 50mm Spacer (Missing from Original) R2.1.3: -Amended Y Gantry side panel holes to the correct dimensions R2.1.4: -Added Mirrored version of the Y axis box mounts -Added a universal front and rear X carriage Z plate R2.1.5: -Added a first rev of the BOM!! (about time hay ;). Use the filter tab to help configure your setup (requires MS office) -Added a Connector Panel for G16-4 connectors -Revised the X axis belt clamps -Added the missing drag chain mount. -Added the optional Y gantry bearing cap with added cable management tab. R3 Working Release: -Tweaked the Z carriages with the new test and also increased the clearance for the Z endstop switches -Added the Z Probe connector for 4mm banana plugs -Tweaked the BOM slightly Wishlist: -Lead screw mounting for X and Y axis! Assembly Guild Animated Assembly guild: https://www.youtube.com/playlist?list=PL5hghy18PulWahNTYJ5U9uzd7b4gYzUDA
With this file you will be able to print Root 3 CNC multitool router 3D printed parts with your 3D printer. Click on the button and save the file on your computer to work, edit or customize your design. You can also find more 3D designs for printers on Root 3 CNC multitool router 3D printed parts.
