Rostock Maxx Fan Shroud-------------USE AT OWN RISK
thingiverse
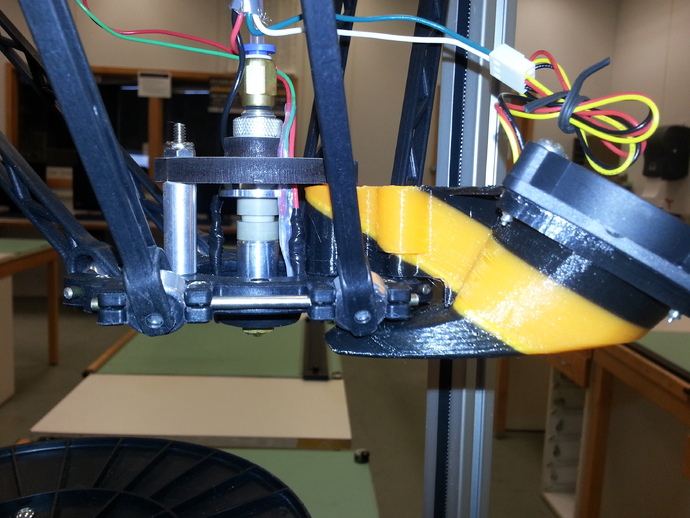
Fan shroud for the Rostock Max by SeeMeCNC. This is still a bit of a work in progress as it requires a little final sanding to provide clearance for the U-joints, however, clearancing them in the model would increase an already heavy overhang. This SHOULD work with the new nozzle designs with little (or no) modifications. UPDATE: This has been redesigned. It looks like it now clearances the u-joints without modification (if it makes contact it should be JUST barely). It has also been slightly shortened to allow easier assembly with the longer hotend bolts. Finally, the angle of the fan has been rotated to a 45*, which should help with airflow (less bend) and makes for an easier print (fewer overhangs). CAD file is the old design, I'm tweaking some things still for a 40mm setup and need to redo the CAD file for the new design. Will upload those when complete. UPDATE: Experimenting with this fan setup is causing too much back pressure still with my current fans. Check my other "Things" for additional designs that are more successful on the SeeMeCNC Rostock. Instructions This fan shroud prints fairly well on an Ultimaker. Simply rotate the fan shroud the 30* necessary to place the flange for the fan flat on the printbed. The overhangs are a bit large, but with a good cooling system, it SHOULD print. For those without a proper cooling setup at the moment, try printing as oriented in the .stl file with support and cleaning up the bores after printing. After you have printed the shroud, mount a 50 mm fan on the flange at the rear. then remove one of the 1" cylindrical spacers from the hotend. It gets placed in the larger bore of this shroud. Then reassemble hotend. Finally, insert one more screw in the smaller bore through to the open hole in the hotend platform. Connect wires of fan to remaining two wires from 4 wire cable supplied by SeeMeCNC. This fan works well for cooling the part without cooling the nozzle, as it is important not to blow air across the nozzle for sudden extrusion changes. Two of these on opposite corners works best. Supplied with the AutoCAD 2010 drawing file for editing by collaborators. Reshare contributions with appropriate crediting please.
With this file you will be able to print Rostock Maxx Fan Shroud-------------USE AT OWN RISK with your 3D printer. Click on the button and save the file on your computer to work, edit or customize your design. You can also find more 3D designs for printers on Rostock Maxx Fan Shroud-------------USE AT OWN RISK.