Rostock Mini Round Print Base (Trinity Labs 160mm round kapton heater)
thingiverse
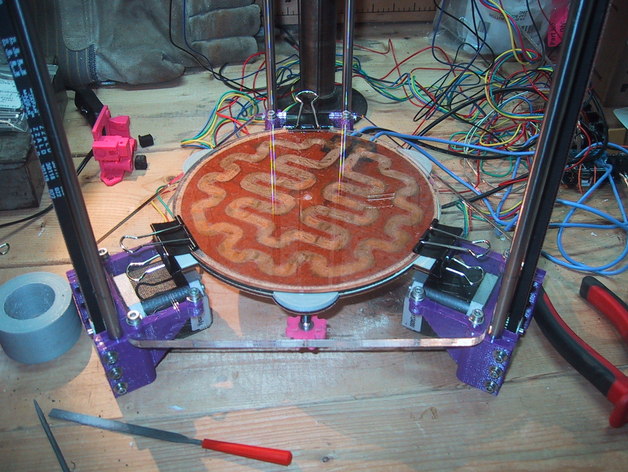
I purchased a 160mm round kapton heater from Trinity Labs (with a matching 170mm Borosilicate Print Surface) and needed a mounting solution for my Rostock Mini. This is a print base that uses three M3 screws with knobs (under the rostock-mini base) to make it easy to adjust. It is spring loaded so it can survive minor miscalibration mistakes. Instructions Extra parts: You will need 3x M3 hex head screws (I used 35mm long, you may need longer or shorter depending upon the thickness of the base you are mounting on. You will also need 3 springs that fit over the M3 screws, and 3x M3 nuts and 3x M3 washers. Laser (or waterjet?) cut the print base from wood or some other heat resistant material. I used 1/8" craft plywood. Plastic may not work well depending upon how good of an insulator you use between it and the heater!. Also cut an insulator to protect the wood from the heater and conserve heat into your build plate. I used 1/8" adheasive backed cork gasket (McMaster Carr: 9487K53) If you don't have access to a laser cutter, just print out the design and cut it out using a bandsaw or coping saw. If that is the case, you may want to change out the rectangular pegs in the hex holders for cylinders, so that you can just drill a hole for them. Print out 3x nuts knobs and 3x hex holders. Push the hex holders onto the top of your M3 hex bolts. (I used McMaster Carr: 91287A026). Push the bolts and hex holders into the print base. I used some superglue to hold them to the plywood. (If you used 1/8" plywood, the tabs will stick out the bottom slightly. You can hit them with epoxy or a hot iron to make the connection even better, but you probably don't have to--I didn't bother.) Put the cork insulator into the print base (on the same side as the hex holders). Stick the Trinity Labs round Kapton heater to the borosilicate glass print surface, being careful to center it! Turn it so that the heater is between the glass and the cork, and the wires/thermister fit inside the slot cut out of the cork. Clip the glass to the print bed using binder clips (bulldog clips). Now, drill 3 holes (3mm or 1/8") into whatever surface you are mounting the print bed to at the appropriate positions for the screws. (You may want to use the print base as a template.) Put one spring over each bolt, and then set the three bolts into the 3 holes. Push an M3 nut into each of the 3 knobs, place a washer on top of the knob, and thread the knob/nut onto the bottom of the screws (under your support surface). Your final ordering from the bottom will be: nut/knob, washer, bottom surface, spring, print base, hex bolt head, hex-holder plastic part. (See photos.) Turn each knob so that all the springs are under light tension, then adjust each knob to level the base. I used springs that were only about 10mm tall (uncompressed), so after adjusting my print base was only sitting about 5-6mm over my support surface, so your build-height hit can be relatively low (5-6mm + 1/8 plywood, as you would need the cork insulator and glass print surface anyways...)
With this file you will be able to print Rostock Mini Round Print Base (Trinity Labs 160mm round kapton heater) with your 3D printer. Click on the button and save the file on your computer to work, edit or customize your design. You can also find more 3D designs for printers on Rostock Mini Round Print Base (Trinity Labs 160mm round kapton heater).