Rotating Fishing Lure Drying Rack
thingiverse
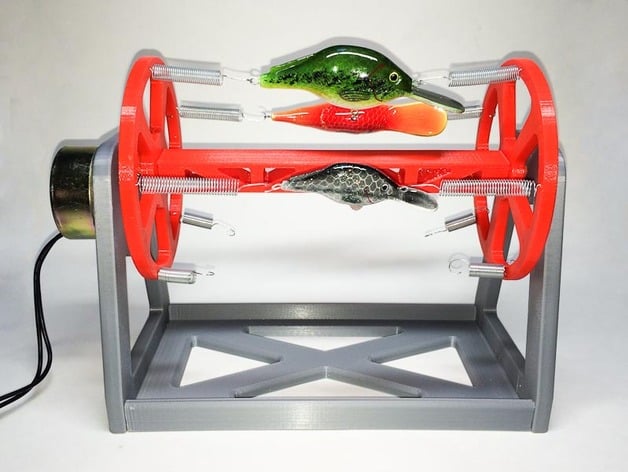
This is a Motorized Rotating Drying Rack used for getting an even coat of the sealing epoxy used on fishing lures after painting. The use of epoxy to seal lures is common practice but if you use a thin epoxy's like EnviroTex's Lite Pour-On High Gloss Finish epoxy it is so thin that if just left to dry in one position gravity will do it's thing and the epoxy will pool to the lowest spot of the lure forming drips as seen in the link below. http://imgur.com/iceBfvP . A spinning drying rack system is used to keep the coat of epoxy even as it dries. Most of the homemade racks used for this practice just use large clips to hold the lure by the lip but the 3D Printed Crankbait Lures I designed have the entire lip painted so I came up with this drying rack that uses extension springs to hold the lure by it's loops instead. This rack will hold up to 5 lures at a time for drying. Hardware Required for Assembly (8) 4-40 Heat Set Inserts (2) 6/32 Heat Set Inserts (1) 4-40 x 3/8" Flat Head Screw (1) 4-40 x 5/8" Flat Head Screw (6) 4-40 x 1/2" Socket Head Screws (1) 4-40 x 5/8" Socket Head Screw (1) 4-40 Nut (2) 6-32 x 1/4" Button Head Screws (1) Micro-Mark Animation Gearmotor (I bought mine years ago but it the linked one looks the same.) I've uploaded some blank .step files of the Motor Side Plate and Motor Wheel just encase you want to use a different motor you can edit them to make your own mounting locations. Motor Side Panel Blank.step = No motor mount locations except for a .10" hole to show shaft center position. Motor Side Wheel Blank.step = No motor shaft holes or attachment screw holes. (if you use a motor with a small shaft you may have to glue the wheel to the motor brace as there will be no room for the mounting screw anymore.) 11-04-16 Added some longer Base and Wheel Brace files to make a longer version for bigger lures. Glue the longer pieces together with superglue and use 1.75mm filament for pins for the base. (I haven't printed this version so let me know if there are any issues.) Assembly Instructions Start by inserting the Heat-Set Inserts into the pieces show. Next screw the two Wheels to the Wheel Brace using the screws shown. (The 3/8" long screw is used on the Motor side Wheel.) Mount the motor to the Side Plate with (2) 6-32 x 1/4" button head screws and then the side plate to the base with (3) 4-40 x 1/2" socket head screws. Attach the Wheel Assembly to the Motor Shaft using a 4-40 x 5/8" Socket Head Screw & Nut. Then align the Wheel Post with the hole in the other Side Plate and attach the PLate with (3) 4-40 x 1/2 socket head screws. Next you will be attaching 10 Suitable Spings to the Wheels. First straighten one end of the spring loop and then inserting it through a hole in the wheel. Now just bend it toward the center of the wheel to secure it from falling out.
With this file you will be able to print Rotating Fishing Lure Drying Rack with your 3D printer. Click on the button and save the file on your computer to work, edit or customize your design. You can also find more 3D designs for printers on Rotating Fishing Lure Drying Rack.