Rotating Paint Rack
myminifactory
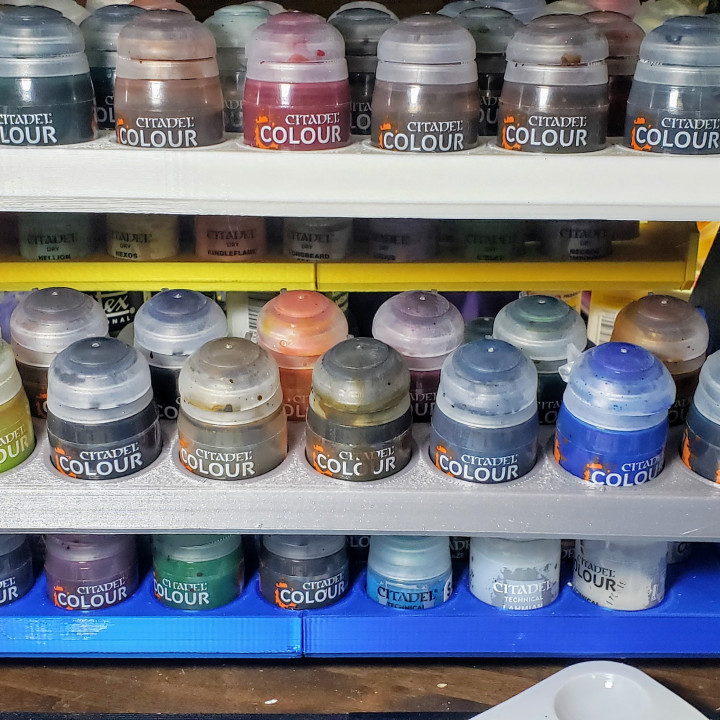
Rotating paint rack This is a rotating paint rack that can hold anywhere between 90 and 120 paints depending on the bottle size. It can hold Citadel, Vallejo, Scale75, Army Painter, Reaper, WarColors, and probably other paints in similar-sized bottles. The rack has six shelves in a carousel. Each shelf holds the bottles of one size but you can install any combination of shelves and swap them out later if you need different sizes. The rack is designed to print on the common medium-size printers like Prusa MK2/3 or Ender 3, although a large printer makes things easier. All parts are printable, there are no bearings or other parts you need to buy, In my experience, it spins freely enough that I don’t need any bearings. I’ve printed this rack on several printers from Prusa, Anycubic, and Lotmaxx, mixing the parts between them, so it’s not super-sensitive to the tolerances as long as the printer is decently calibrated. See the video of the rack in action: https://tinyurl.com/34sytsys Change History: 2022/04/18 - Initial upload 2022/04/22 - Added shelf bottom files for Tamiya 10ml and 25ml bottles 2022/04/27 - Updated Tamiya 25ml shelf, added shelves for Daley-Rowney inks and Turbodork bottles Paint rack printing and assembly instructions Don’t worry, it looks scarier than it really is. Reading the directions is the longest part. Printing All rack parts are printable on a printer with the bed size of Ender 3 or Prusa MK2/3. If you have a printer with a 300mm or larger bed, you can print most parts uncut. A single rack consists of the stand and up to six shelves. The stand needs these parts: stand side x2 wheel 2x stand brace x5 handle wheel (optional, 1 or 2) stop rings x2 Stand sides and braces can be printed cut or whole, depending on your printer size. For each shelf, print these parts shelf bottom x1 shelf side x2 stop ring x2 The shelf bottom is the only part that depends on the paint bottle dimensions. So far, I have these shelves (all sizes are based on the paints I have, some brands may have multiple sizes so measure yours): Citadel, 33mm diameter (fits citadel pots, short and tall) Reaper, 26mm diameter (fits Reaper and some Vallejo bottles) Vallejo, 25mm diameter (fits Vallejo, Army Painter, and Scale75 bottles) War Colors, 24mm diameter (fits War Colors bottles) The maximum bottle height is about 80mm. The shelf bottom can be printed uncut diagonally on a printer larger than 300mm, or cut on an Ender 3 or MK2/3 (you can fit two shelf sides next to the bottom halves). The stop rings for the shelves and the stand are the same. A full rack has 6 shelves, you can start with at least two. Shelves can be inserted and swapped any time after the rack is assembled. All parts print without supports in the orientation provided. Printing settings should be chosen for best strength: I printed all parts except stop rings with 0.3mm layers and at higher than normal temperature for better layer adhesion. PLA is perfectly adequate, There are three important places to check the fit: The shelves should spin freely in the wheel spokes and the wheels should spin freely on the stand sides (the hub and hole sizes are the same). The stop rings should fit very tight on the hubs of wheels and shelves (but it should be possible to slide them on, of course). The stand braces (hex rods) should fit into the hex holes in the stand sides and wheels. This fit does not need to be particularly tight since you will use glue there, but the assembly is easier if the fit is not very sloppy. Assembly Assemble the stand sides if you printed them cut. Use strands of filament to align the two halves. Make sure to check that the filament pieces are not too long before you put the glue on the joint. The most important part is to make sure that the part is completely flat, so glue the halves on a flat surface and hold the piece down until the glue sets. Assemble the stand braces if you printed them cut. Again, use a strand of filament and make sure the brace is straight in every direction (put it on a flat surface, then hold it firm and rotate it onto another face before the glue sets to make sure all faces are flat). While you wait for the stand parts to dry, you can assemble as many shelves as you plan to install (two to six, the rack is balanced better if you install shelves in pairs). Assemble shelf bottoms if you printed them cut. Again, use filament strands to align them (two strands in the outer holes should be sufficient, note that some filament holes are not used on the shelves designed for taller bottles). Attach the shelf sides to the shelf bottoms. Pay attention to the direction: the hubs go on the outside of the shelf! If you want to use more than two filament strands (the more the stronger), start with just two, install the side on the end of the shelf bottom, then insert the remaining strands from the outside before the glue sets (it’s easier than trying to align all filament pieces at once). Glue four stand braces (hex rods) into one stand side, flush with the outside of the stand (direction does not matter for the stand side). Insert the braces into the other side but do not glue the braces into the other side yet! This should be a tight fit, so you can assemble the rack without the glue, but eventually, it will come apart from shaking. You’ll glue the second side later after you adjust the length of the stand. Insert the remaining stand brace into the two wheels, hubs facing away from each other. Do not glue anything yet. To insert the wheels into the stand, you will need to slide them closer to the center of the brace, then slide them outwards. Make sure the brace sticks out of both wheels approximately equally. It is best to install the stop rings on the wheel hubs now. Stop rings should have a very tight fit, they are hard to install. Make sure to press them on flat, if you let one side slide onto the hub and tilt the ring, it won’t fit. The rings should hold tight without the glue. Do not press the ring tight against the stand brace; if it slips too close to the brace just use a knife blade to open a gap between the ring and the stand to reduce the friction. You can glue the brace (hex rod) into one of the wheels if you want, but it’s not required. The wheels should spin freely in the stand. Now install at least two shelves (if you install less than the full complement of shelves, install them in pairs). You should be able to flex the wheels enough to install the shelves, one end at a time. Install the stop rings on the shelf hubs on both sides. Again, if the ring sits too close to the wheel and rubs on it, open a gap with a knife blade. The shelf should swing freely in the wheel-spoke holes. Once you have at least two shelves in, make the final adjustment to the length of the stand: you want the wheels and the shelves to rotate freely, so avoid squeezing the whole assembly too tight. You also don’t want the hubs to fall out, so there should be enough room on the outside for the stop rings, and they should not rub against the stand or the wheels. Glue the stand braces into the other stand side and, optionally, into the wheel. You can now install one or both handle wheels. They slip onto the ends of the hex rods sticking out of the wheel hubs and are used to rotate or hold the rack. Use glue both on the hex hole inside the handle wheel and on the flat end of the handle wheel hub, so it is glued to both the hex rod and the wheel. That’s it, your rack is ready for use! If you need to remove and replace shelves, pop the stop rings off with a knife (you will probably need to work from two sides to avoid tilting the ring too much), pull the shelf out one end at a time, and install a new one. Shelves can be mixed in the same rack in any combination. Racks are stackable: you can glue some filament pieces into the holes on top of the stand and install the second rack (they will stay just with filament holding them but I recommend gluing the stands together eventually).
With this file you will be able to print Rotating Paint Rack with your 3D printer. Click on the button and save the file on your computer to work, edit or customize your design. You can also find more 3D designs for printers on Rotating Paint Rack.