Router templates for addresses on Mailbox posts
prusaprinters
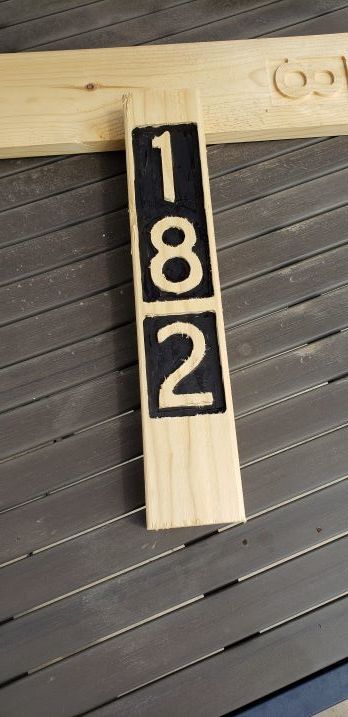
<p>I wanted to replace my mailbox post and thought it would be nice to be able to put my address numbers on the post. You can just buy stickers to put on the box, but I was looking for something different. I liked the idea of engraving the numbers on the wood, and couldn't find any templates that would help me get it to look the way I wanted. So I designed these. You print the ones you need, and carve out the area around the number with your router. I intend to paint the area that gets carved with a dark color so the wooden numbers stand out more. Anyway, a work in progress, but I'm happy with how it is going so far.</p><h3>Print Settings</h3><p><strong>Printer Brand:</strong></p><p>Prusa</p><p> </p><p><strong>Printer: </strong></p><p>I3 MK3S</p><p><strong>Rafts:</strong></p><p> </p><p>No</p><p> </p><p><strong>Supports: </strong></p><p>No</p><p><strong>Resolution:</strong></p><p> </p><p>200</p><p> </p><p><strong>Infill: </strong></p><p>20</p><p><br/><strong>Filament:</strong><br/>Any<br/> </p><p><strong>Notes: </strong></p><p>this is an excellent opportunity to use up leftover filament. The color is completely unimportant.</p><h3>Post-Printing</h3><p>Be careful with your router. It is a potentially dangerous tool, so treat it accordingly. Read and follow all safety instructions that come with your tool. These templates are designed to fit around a 4x4 post. Print the ones you need, and screw them on by the holes on the side. When they are attached, prepare your router and straight cutting bit. I used one about 1/4 inch in diameter, and that worked well. I also used a suitable router baseplate template guide that helps follow the pattern. Take shallow passes. Don't cut more than 1/8 inch (2-3 mm) at a time. It makes it much easier to control. You probably don't want to go super deep anyway. One quarter inch, or 5-6 mm, should be enough. For a number, once you have routed out the "A" portion, swap to the '"B" template and repeat. You can decide if you want the numbers to blend together, or if you prefer a raised gap between them. I think when mine is all done I will paint the lowered area black, to make the numbers easier to read. But of course it is all up to you.</p><h3>How I Designed This</h3><p>openscad</p><p> </p><p> </p><p> </p><p>Category: Outdoor & Garden</p>
With this file you will be able to print Router templates for addresses on Mailbox posts with your 3D printer. Click on the button and save the file on your computer to work, edit or customize your design. You can also find more 3D designs for printers on Router templates for addresses on Mailbox posts.