Roxy Iris Box --- Full Source!
thingiverse
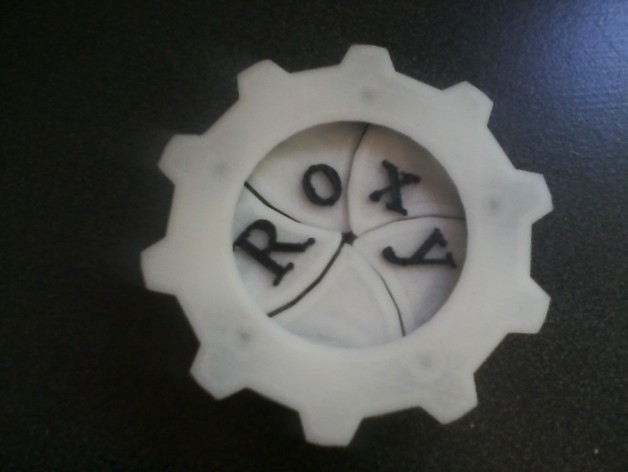
Roxy Iris Box: The Iris Boxes provide a good example of what 3D Printing is capable of doing. Because of the way Iris Boxes open people find them fascinating. The Roxy Iris Box is a reverse engineered version of a previous Iris Box that appeared on WWW.ThingiVerse.Com. Specifically: http://www.thingiverse.com/thing:140048 It is a very nice design but because it only had .STL files for the box it isnÂt easy to modify it. I wanted to make a number of changes to it. I wanted: a thicker (and stronger) box. The ability to put lettering on the leaves to change the speed at which the leaves open (so they open easier) change and simplify the way the door mechanism mounts to the box I borrowed very heavily from the previously mentioned design, but the source code is entirely rewritten and available as part of this ThingÂ. Whether you want to change the letters on the leaves or the number of leaves or the height of the box, it should all be easy to accomplish (because the source code is provided). Instructions Instructions: You will need 5 STAINLESS PHILLIPS PAN HEAD SCREWS 4/40 X 3/8" Type T-23. (It's easiest to get these on eBay but you might get something close enough at your local hardware store.) And in fact, they dont have to be stainless, but stainless makes a nicer screw for this application. It is very helpful to have a 2.8 mm drill bit and a Dremel tool to ream out the pivot holes of the leaves. However, this is not necessary. You can even use a smaller drill bit and even clean up the holes by hand. Lastly, you will need a small amount of some glue. Super Glue, Testers Model Glue or Goop all work fine. I prefer Goop. The design this Thing is reverse engineered from used a different design to hold things together. But it wasnÂt as strong as I wanted to be. Putting a lip on the box and using glue makes a much simpler and stronger finished product. First, you need to decide if you want multiple colors in your finished box. If not it will be easier to get your plastic pieces printed. Assuming you do want multiple colors the following information will be helpful to you. I sliced the design with a first layer height of .25mm and subsequent layers at .3mm using Slicer. Using those settings you will want to start with white filament and pause the print when the Z-Axis gets to 2.950 mm. My printer has a filament change command (M600) and I search in the GCode for: G1 Z2.950 F4800.000 ; move to next layer (9) When I find that line of GCode I modify the GCode and add a filament change command at that point. Specifically, I add: M600 Z 50 I repeat that process for a Z-Axis height of 4.750 mm so I can switch back to the white filament. It is not necessary to have a filament change command to make the multi-colored plastic pieces. You can watch your Printer Program and manually pause when you see it doing things that should be in the other color. It will not hurt the finished product to have some of the raised letters and design down in the original color because they are thick enough that a color change anywhere during the first layer of the letters will be covered up by subsequent layers. Also, it takes a while to purge the black filament out of the nozzle. I dont try to do that with the second filament change. I let the normal printing process slowly let the black fade to grey and eventually to white. It gives the finished box an interesting appearance. If you choose or need to slice at different thicknesses, you can use the GCode viewing tool at: http://gcode.ws/# to see where you need to be making filament changes. Assembling the Roxy Iris Box: When you have your pieces printed at a suitable quality level, you will need to assemble them. There are two major parts to the finished Roxy Iris Box. There is the Iris mechanism and the box. The Iris mechanism will be glued into the box. The bulk of the assembly work is building the Iris mechanism. - It is important that your leaves are within tolerance when you assemble the Iris mechanism. It is extremely important that the screws fit snugly with very little slop through the pivot holes but do not bind. A 2.8 mm drill bit works perfectly for this step. If your printer prints perfectly, the pivot holes will be 2.8 mm big. This discrepancy is intentional to insure you can ream the holes to the correct size. Most printers make holes a little bit smaller than what is specified. - The other important tolerance on the leaves is the width of the drive slot on the bottom side. The posts of the slip ring will need to move freely through these drive slots. These drive slots need to fit tightly so the leaves of the box close completely but not bind because that will make it difficult to open and close the box. You need to check each leaf against several of the drive pins of the slip ring to make sure the post can easily travel the full length of the slot. If it binds, gently ream the edge of the slot with a spinning drill bit. Take care not to gouge into and deform the arc shape of the slot. - When the leaves all slide nicely on the posts of the slip ring, you can start assembling the Iris mechanism. I usually start with the leaf that has the R on it. I put the gear grip handle on the table with the raised black areas pointing up. There is a small pilot hole fabricated into each black area of the grip ring (assuming you printed in white and black). Position the leaf with the letters pointing down and the leaf pivot hole aligned to the grip ring pilot hole. The leaf should be orientated with the drive groove inside the grip ring. Place the slip ring on top of the leaf with one of its posts in the leafs drive groove. Place a screw into the leafs pivot hold and gently screw it until it is firmly mounted. Do not tighten fully tighten the screw at this time. (In fact, you will never Âfully tighten the screw!!!!) - At this point you have one leaf mounted to the Gear Grip Ring. Identify the next leaf to put in place. I usually do the Âo leaf next. It is easy to get confused and get the leaves in the wrong position. Im at the point where I get the leaf in position and turn the assembly over to make sure the right thing is happening. Ive made too many mistakes and it is easier to double check each leaf before screwing them into position. Position the leafs pivot hole on the next raised portion of the Gear Grip Ring. You will need to gently deflect the slip ring so you can get its post inserted into the new leafs drive slot. When that is accomplished, position the various pieces so you can insert the new leafÂs pivot screw. Once again, do not fully tighten it! You need to be able to deflect the slip ring to add the remaining leaves into the assembly. At this point, it should be possible to rotate the slip ring back and forth and verify the two leaves open and close nicely and completely. If one them is binding (usually do some warping during the print) you can trim the pieces to remove the problem. - Continue adding the leaves until they are all in place. After adding each leaf check that the slip ring rotates back and forth easily. It is much easier to figure out what is wrong when you only have one leaf that can be causing the problem. Tighten down the screws but leave a small gap so the head of the screw is not tight against the slip ring. This is important so the slip ring can move freely and the box can be opened and closed easily. - When you are confident the Iris Mechanism assembly is correct and working, it is time to place it in the box. I usually try to align the letters so they open with the design inside of the box nicely positioned. When you can insert the Iris Mechanism nicely into the box, it is time to glue it. You want to be careful not to have drips and drops of glue that can get smeared into the various parts of the Iris Mechanism. If this happens, the Iris Mechanism wont open correctly if it opens at all. I usually use a toothpick and smear a thin layer of goop on the inside lip of the box. I smear it in a full circle so all points on the Iris Mechanism are in contact with the glue. And then I twist the Iris Mechanism back and forth a small amount to really smear the glue between the two surfaces. If you are using Super Glue, it usually works nicely to put the nozzle right at the inside corner of the lip in the box, and carefully twist the box as you squeeze out a SMALL amount of glue. If you are using Super Glue, you will need to work very quickly during the gluing! - Once the glue dries your Roxy Iris Box is ready to use. If there are portions of the travel distance that are sticky, they will loosen up with use. If there are portions of the travel that are sticky it is because the drive pins of the slip ring are fitting too tightly at some point of their travel in one or two of the leaves. Just holding the iris box in one hand and opening and closing it again and again will slowly make things better. - Enjoy!!! I use mine to hold parking meter change in my car!
With this file you will be able to print Roxy Iris Box --- Full Source! with your 3D printer. Click on the button and save the file on your computer to work, edit or customize your design. You can also find more 3D designs for printers on Roxy Iris Box --- Full Source!.