RPI 2/3 19" rack mounting plate
thingiverse
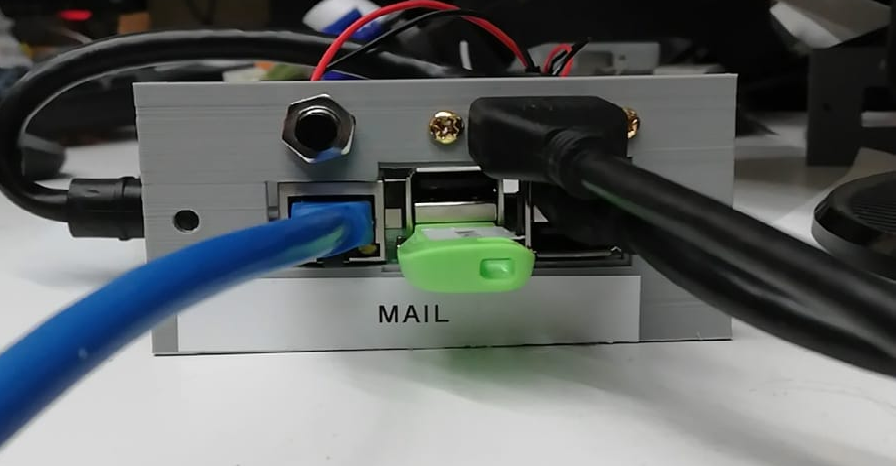
Remake of https://www.thingiverse.com/thing:1793758 These mounts are designed to fit in these 19" frames. https://www.dv247.com/en_GB/GBP/DAP-2-HE-Rackblende-f-Modulsystem-10-Segmente-MP-1/art-PAH0017160-000 The model adds stand offs to support PI better, rear mounting supports, HDMI socket and a hole for a power button connected to the GPIO. I have also added a small recess around the USB ports as I increased the thickness of the front panel to 3MM and found that the USB ports were not able to locate correctly. HDMI Panel mount extensions https://www.ebay.co.uk/itm/352286650230?ssPageName=STRK%3AMEBIDX%3AIT&_trksid=p2060353.m2749.l2648 or these from Amazon which are a bit longer https://www.amazon.co.uk/gp/product/B07CH73TTJ/ref=ppx_yo_dt_b_asin_title_o02_s00?ie=UTF8&psc=1 POE Injectors https://www.amazon.co.uk/gp/product/B07JPXR9ZN/ref=ppx_yo_dt_b_asin_title_o09_s00?ie=UTF8&psc=1 Pi-Fan such as this https://www.amazon.co.uk/MakerHawk-Raspberry-Brushless-Connector-Separating/dp/B071JN6HKM/ref=sr_1_3?dchild=1&keywords=pi-fan&qid=1621636707&sr=8-3 "Power" Switches https://www.amazon.co.uk/gp/product/B08GPCV2S7/ref=ppx_yo_dt_b_asin_image_o01_s00?ie=UTF8&psc=1 You will need 2 off 2.5x8mm machine screws and a 2.5mm tap to tap the mounting holes in the frame for the fan mount. 4 off 2.5x12MM machine screws and nuts to mount the pi to the frame. To enable the power button you need to add the followng to /boot/config.txt "dtoverlay=gpio-shutdown" The button needs to be connected to GPIO 3 and GND, pin 5 and 7 on the GPIO header. The fan can be hooked up to any 3v3/GND pins, I use Pin 3 and 4 on the GPIO header
With this file you will be able to print RPI 2/3 19" rack mounting plate with your 3D printer. Click on the button and save the file on your computer to work, edit or customize your design. You can also find more 3D designs for printers on RPI 2/3 19" rack mounting plate.