RPi-microscope for histology with focus-drive and XY stage
thingiverse
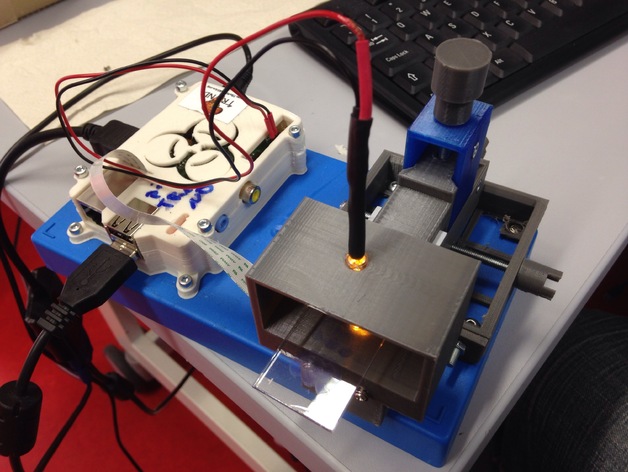
Note: Any tips will go straight to our charity "TReND in Africa" (www.trendinafrica.org) which is dedicated to fostering university level science education on the African continent! Simple framework to hold a histology sample above a Raspberry-Pi (RPi) camera fitted with an acrylic lens to generate a half-descent, low cost microscope. Shown in the images is a brain-slice from rat focussed on the hippocampus and a piece of 3D printing garbage. "Magnification", with a large screen as shown, is in the order of x100. ///////////////////////////////////////////////////////////////////////////////////////////////////////// CHECK OUT OUR SCIENCE IN AFRICA NGO: TReND in Africa gUG: http://trendinafrica.org/ A registered charity run by volunteer scientists on 4 continents Help us design good, affordable lab equipment for African scientists!http://trendinafrica.org/activities/open-source/open-source-main/ Join us! Sponsor us! Spread the word. Thank you! Also, check out our dedicated lab.equipment tinkering page: http://open-labware.net ///////////////////////////////////////////////////////////////////////////////////////////////////////// The idea is pretty similar to my "phone-scope (http://www.thingiverse.com/thing:280004)" - but image quality is much better (as the RPi camera is great for macro) and here I have a proper focus drive as well as XY-table. A raspberry pi costs about 30$ and the camera another 10$ - so it's a quite cheap solution for a simple, yet half-descent microscope (e.g. for teaching). Note: Acrylic lense does, like basically any plastic, filter UV. So in principle it should be possible to get fluorescent images out of this by using a strong UV-LED and hope for the best in terms of UV filtering with the lens. If this doesn't work ( I havent tried) try adding some cheap sunglasses, or indeed any odd bit of plastic under the sample for extra UV filtering. Instructions For lenses, see the phone-scope (http://www.thingiverse.com/thing:280004). For instructions how to fit continuous rotation servos if required (like this one could turn this into a fouuly automatic 3 axis control system) see my manipulator (http://www.thingiverse.com/thing:239105). Here you also find detailed instructions how to assemble the manipulator part. The LED shown can be driven by the GPIO ports of the RPi if required - it's quite simple to do if you know some basic python or have used an Arduino before - it's very similar. I have a silly little python script that controls both the RPi camera and an LED - msg me if interested (but you are probably better off writing your own if you know what you are doing, mine really is very silly indeed)
With this file you will be able to print RPi-microscope for histology with focus-drive and XY stage with your 3D printer. Click on the button and save the file on your computer to work, edit or customize your design. You can also find more 3D designs for printers on RPi-microscope for histology with focus-drive and XY stage.