RPI4 + x857ssd modulable case
thingiverse
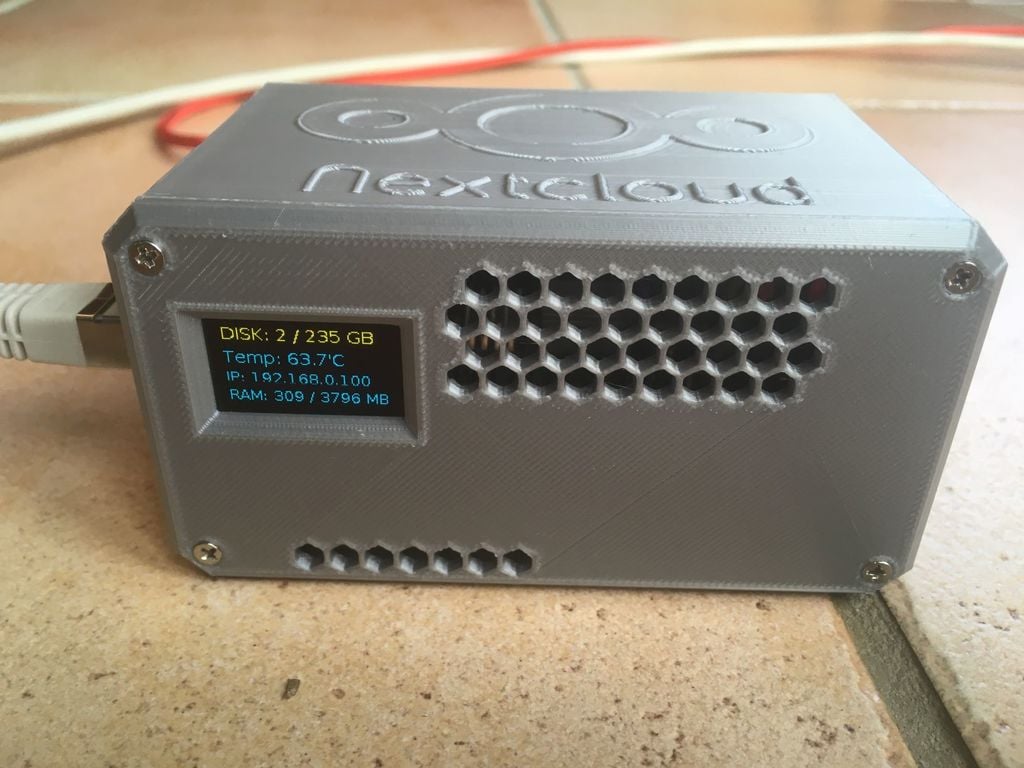
I sometimes end up with the need for some cases, but don't want to make to many versions. So this is my take on a raspberry pi 4 case with a X857 mSATA ssd adapter. The case comes in 3 versions: - standard with fan mount - standard without fan mount - Nextcloud logo and fan mount for the right side you have 2 options: - standard - ssd1306 oled display mount There's a USB-Adapter cover that you can tape with double sided tape to the adapter so you don't have the bare soldered pins. The case is designed to OEM screws, but you will still need x8 2x10mm flathead self tapping screws. They're cheap on amazon (about 8$ for 500 pcs) and I strongly suggest having some spare for any other 3d printed stuff. I use the case with a raspberry fan that is controlled by temperature (you can find a howto here: https://howchoo.com/g/ote2mjkzzta/control-raspberry-pi-fan-temperature-python ). You need to modify the fan with a 2N2222 transistor and a resistor though. If you don't want to use a fan but some other cooling, there is enough headspace for most cooling systems. Mine runs passively and rarely triggers the fan. Nevertheless, depending on your usage an active cooling is always better with the pi4. For the SSD1306 display there's an adaptor. I suggest printing it, attaching the display by melting the pins, and then glueing it to the side-panel. Here's some more info on how to use the SSD1306 with the pi: https://www.raspberrypi-spy.co.uk/2018/04/i2c-oled-display-module-with-raspberry-pi/ You can find the base code when you install python3 (script called stats.py), but if you want to take my modifications (I removed most of the comments to shorten it). Don't forget to put it into your crontab so it will start at boot. <pre><code> #!/usr/bin/env python3 # Copyright (c) 2017 Adafruit Industries # Author: Tony DiCola & James DeVito # import time import Adafruit_GPIO.SPI as SPI import Adafruit_SSD1306 from PIL import Image from PIL import ImageDraw from PIL import ImageFont import subprocess # Raspberry Pi pin configuration: RST = None # on the PiOLED this pin isnt used # Note the following are only used with SPI: DC = 23 SPI_PORT = 0 SPI_DEVICE = 0 # 128x64 display with hardware I2C: disp = Adafruit_SSD1306.SSD1306_128_64(rst=RST) disp.begin() # Clear display. disp.clear() disp.display() width = disp.width height = disp.height image = Image.new('1', (width, height)) draw = ImageDraw.Draw(image) draw.rectangle((0,0,width,height), outline=0, fill=0) padding = -2 top = padding bottom = height-padding x = 0 font = ImageFont.load_default() vera14 = ImageFont.truetype ( "/programs/oled_display/Vera.ttf", 14 ) veraS = ImageFont.truetype ( "/programs/oled_display/Vera.ttf", 12 ) while True: draw.rectangle((0,0,width,height), outline=0, fill=0) cmd = "hostname -I | cut -f 2" IP = subprocess.check_output(cmd, shell = True ) cmd = "vcgencmd measure_temp |cut -f 2 -d '=' " TEMP = subprocess.check_output(cmd, shell = True ) cmd = "free -m | awk 'NR==2{printf \"RAM: %s / %s MB \", $3,$2 }'" MemUsage = subprocess.check_output(cmd, shell = True ) cmd = "df -h | awk '$NF==\"/\"{printf \"DISK: %d / %d GB\", $3, $2}'" Disk = subprocess.check_output(cmd, shell = True ) draw.text((x, top), str(Disk,'utf-8'), font=vera14, fill=255) draw.text((x, top+18), "Temp: " + str(TEMP,'utf-8'), font=vera14, fill=255) draw.text((x, top+36), "IP: " + str(IP,'utf-8'), font=veraS, fill=255) draw.text((x, top+52), str(MemUsage,'utf-8'), font=veraS, fill=255) disp.image(image) disp.display() time.sleep(2) </code></pre>
With this file you will be able to print RPI4 + x857ssd modulable case with your 3D printer. Click on the button and save the file on your computer to work, edit or customize your design. You can also find more 3D designs for printers on RPI4 + x857ssd modulable case.