Rubik cube solver robot (V-shape)
prusaprinters
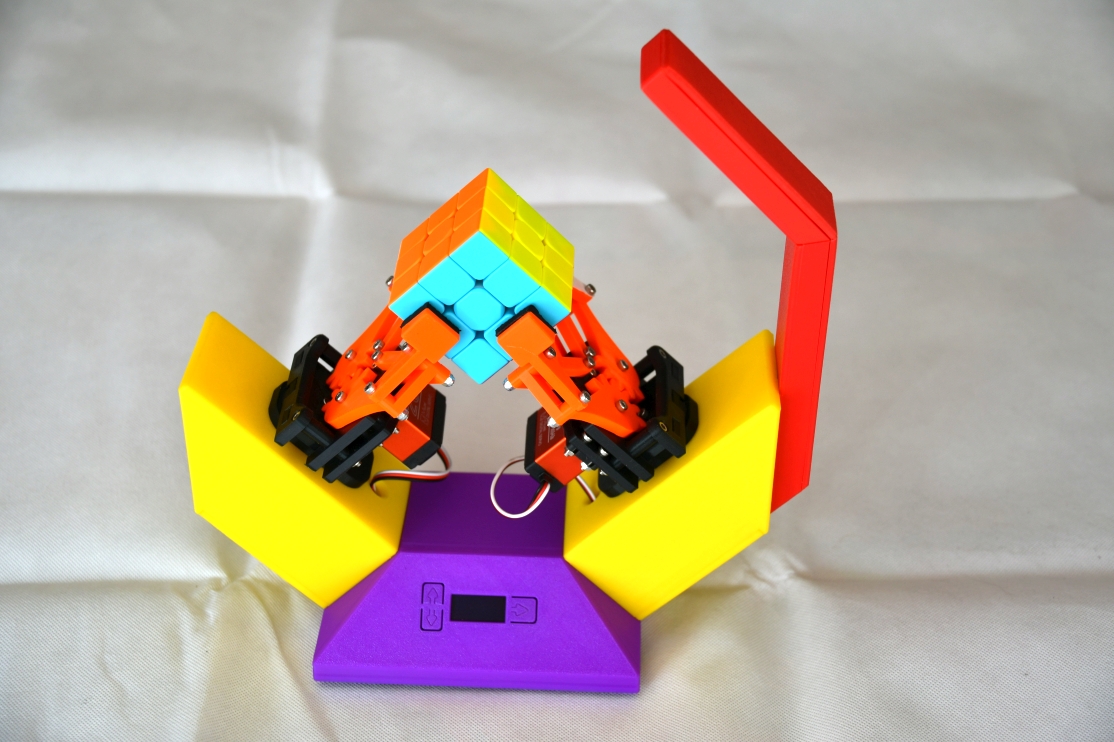
<p>Core requirements<br/> Stand-alone (no PC; no smartphone)<br/> Nice looking (minimum cable; solid standing; no “gimmics”)<br/> Should work for all cubes (typical size 2”), in any sticker configuration (pure color; no pattern)<br/> Should work in difficult light situation.<br/> If center stick is marked with a logo it might be required to cover it with the appropriate color (normally those logos are printed on the white center – therefore no problem using a white sticker)<br/> No speed record - but reasonable fast</p> <p>Concept and idea:<br/> <a href="https://forum.arduino.cc/index.php?topic=271827.0">https://forum.arduino.cc/index.php?topic=271827.0</a></p> <p>Heavy duty gripper (including link to Fusion360 Files):<br/> <a href="https://www.thingiverse.com/thing:2800244">https://www.thingiverse.com/thing:2800244</a><br/> changes, improvements:</p> <ul> <li>Holder with soft rubber (4mm) to control gripper force more easily</li> <li>Smaller holder due to conflict caused by inaccurate gripper movement (mechanics and servos)</li> <li>Support of turning servo (turning supported by basement and not only hold by servo axis)</li> </ul> <p>result:<br/> <figure class="media"> <oembed url="https://youtu.be/Xv4a6-XM1M4"></oembed> </figure> </p> <p>Typical solving time including scanning and calculation < 2 min.</p> <p>I'm using 270° servos to enable 180° moves (stepper motor might be faster, but more effort for initialization). Other servos could be used – with the limitation to 90° moves (the SW on Github is configured for standard 180° servos)<br/> Small display with core messages (count down; timer and calibration assistance)<br/> Teaching / calibration of servos without external computer</p> <p>Mechanical assembly with M3 Allen screws<br/> Screws in plastic with brass threads. <a href="https://www.youtube.com/watch?v=KUEFhiFB6Zs">https://www.youtube.com/watch?v=KUEFhiFB6Zs</a>)</p> <p>Use wb_shield if gripper is not printed in White. White area is needed to adjust white balance. White balance of picam does not work very well.</p> <p>SW available on Github:<br/> <a href="https://github.com/DrVoHo/Rubik_solver">https://github.com/DrVoHo/Rubik\_solver</a></p> <p>Driver for display and kociemba solver needs to be installed separately.</p> <p>Parts needed:<br/> Raspberry pi<br/> Pi-cam<br/> Servos: MG996 (for given timing in the SW) or Miuzei DS3218 with 270° turning angle to enable the 180° feature. But be aware of the changed Timing.<br/> Display: I used AZDelivery 128 x 64 (luma OLED ssd1306) as found on the big online store. You need to install the luma Driver as described in the handbook. If you decide to use a different Display, be aware to change a couple of parts in the SW, due to the fact that the functions of the library are not the same. Especially the start of the Program and the function "Anzeige()" needed to be adapted.<br/> Optional: PCA9685 PWM Driver board. Creates stable servo moves without jitter (please find adapted program on github<br/> power supply (5V 50W due to high power servos)<br/> set of M3 allen screws (different length)<br/> set of M3 brass threads (only short length required)<br/> microswitches for "+" "-" "Enter. They need to switch GND to the GPIO pin<br/> mini solder boards</p> <p>Wiring:<br/> The Display is directly connected to the I2C Bus, according the documentation of the Display. Please test with one of the supplied test Programs.</p> <p>For the microswitches and servos use the GPIO Ports as in the SW described:</p> <p>PLUS_BUTTON = 11<br/> MINUS_BUTTON = 13<br/> ENTER_BUTTON = 15</p> <p>LINKS_DREH = 36<br/> LINKS_GRIP = 37<br/> RECHTS_DREH = 18<br/> RECHTS_GRIP = 16</p> <p>Be aware that those numbers are the Pins of the GPIO Board and not the GPIO number.<br/> If you use "GPIO.BCM" (actual GPIO number and not the Pin) you have to transform the numbers. (s. <a href="https://indibit.de/raspberry-pi-die-gpio-schnittstelle-grundlagenbelegung/">https://indibit.de/raspberry-pi-die-gpio-schnittstelle-grundlagenbelegung/</a> - a documentation in German). Some display libraries are using GPIO.BCM and you cannot switch back to GPIO.BOARD.</p> <p>Make sure that only the control line of the servos goes to the Raspberry Pi. Power an GND of the servos must be directly connected to the power supply. The Raspberry Pi cannot deliver the required current for the servos. Make sure that GND of Raspberry Pi is connected to the GND of the servos<br/> Servo Timing:<br/> Raspberry Pi can only create PWM with 50Hz frequency (20 ms duration). All servos are controlled with a PWM with a Minimum time and a maximum time. You can use different servos with different Timing. The SERVO_PWM_xxx and SERVO_OFFSET_xxx needed to be calculated according the timing of the servo which is sometimes difficult to get.<br/> SERVO_OFFSET_xxx = Minimum_Time / 20 x 100 (Minimum time in percent of PWM Duration)<br/> SERVO_PWM_xxx = (Maximum_Time - Minimum_Time)/ 20 x 100<br/> TURN_MAX_xxx = maximum turn angle of the servos according the timing.<br/> Raspberry Pi is doing a SW-PWM. That means that start and end point of the PWM Signal are created by SW routines (inside Raspberry Pi). If there are background tasks the PWM timing can be influenced, resulting in some jitter on the servos (shaking arms). If this is not acceptable you can use a PCA9685 PWM board. This board creates HW-based PWM Signals without any jitter. You can also use higher PWM frequency (does not Change anything in the behavior of the robot)</p> <h3>Print instructions</h3><h3>Category: Robotics Print Settings</h3> <p><strong>Printer Brand:</strong> Prusa</p> <p><strong>Printer:</strong> I3 MK3S</p> <p><strong>Rafts:</strong> No</p> <p><strong>Supports:</strong> No</p> <p><strong>Resolution:</strong> .15</p> <p><strong>Infill:</strong> 15</p> <p><strong>Filament:</strong> PLA / PETG<br/> <strong>Notes:</strong></p> <p>use PETG for all parts with direkt contact to servos</p>
With this file you will be able to print Rubik cube solver robot (V-shape) with your 3D printer. Click on the button and save the file on your computer to work, edit or customize your design. You can also find more 3D designs for printers on Rubik cube solver robot (V-shape).